

Bravo Reinstallation Tips?
 05-17-2011, 03:16 PM
#1
Registered
Thread Starter
Join Date: Jun 2010
Location: Cadillac, MI
Posts: 131
Likes: 0
Received 0 Likes
on
0 Posts
Recently removed the Bravo's on my boat and sent them to All American for a rehash. Will be putting the drives back on this Friday if all goes well. Was wondering if anyone has any tips/tricks that will make the process easier. When they came out they didn't fight me and the shift cables unhooked as they should have. I never moved the boat or changed anything, so I'm assuming I shouldn't have to realign anything with the drive couplers- correct? When I reinstall them, should I just leave the shift levers in forward (I think this is where they ended up when I pulled the drives off)? Is there any trick to getting the cable hooked back up to the connection on the drive itself? Just looking for any advice that will make the process easier. Or anything I should look out for- Thanks!
 05-17-2011, 04:57 PM
#2
Gold Member

It is pretty straightforward.
Use a second person to help hold while you hold one side.
Don't F-up the shift cable. I missed it one time, got to the ramp, put it in reverse and then it wouldn't come OUT of reverse - had to run home rip it off and correct the problem.
I always use my alignment tool when I reinstall mine because you want to get it right.
Don't lube the splines up TOO much because it will eventually build up in the coupler and cause a little bit of a problem.
Don't stress it too much, they will go back on pretty easy.
05-17-2011, 08:48 PM
#3
Registered
Join Date: Feb 2011
Location: Chatt, TN
Posts: 27
Likes: 0
Received 0 Likes
on
0 Posts
I leave the shift lever in neutral. Check your drive and see if the cable connection is all the way out. If not use a coat hanger to pull it all the way out. Get a buddy to help hold it, line up the drive shaft and slide it in. Leave just some threads showing on the six bolts or roughly 3/8 to 1/2" gap between drive and gimbal, check the linkage and push the drive in all the way. The linkage will snap in place so long as its aligned correctly. You might have to wiggle the drive or get a friend to put a socket on the harmonic balancer bolt to turn the engine slightly while you push. After install move the prop back and forth. It should turn freely in both directions, if not the linkage and gear are not in the correct positon. Also its a good time to grease the u-joints before installation.
05-17-2011, 09:15 PM
#4
Registered
Join Date: Dec 2009
Location: Grain Valley,Mo
Posts: 867
Likes: 0
Received 0 Likes
on
0 Posts
I do mine just as Hard charger said you can pick the sucker up by yourself but need a buddy to make sure linkage goes in usally a couple of beers will get more of my buddies over, more help than i need most of the time.
05-18-2011, 06:38 AM
#5
Registered
Thread Starter
Join Date: Jun 2010
Location: Cadillac, MI
Posts: 131
Likes: 0
Received 0 Likes
on
0 Posts
Thanks a ton guys- just what I was looking for. The drives will be all greased and filled with oil when I get them back. Also wanted to verify that I can just fill the oil bottles and the drives will burp themselves over the next couple running hours until I'm done with the break-in oil, correct? Any input on the procedure for adjusting the shift linkage properly? I have a service manual and will be getting the little plastic tool from Merc, but once again, if anyone has tips for making it easier, I'm all ears.
 05-18-2011, 08:16 AM
#7
Gold Member

If you are going to be doing this regularly / annually, I would invest in a drive stand. They aren't too expensive, or you can make your own. Do a search on "drive stands" and you will see different designs.
The shifter should be in neutral for a bravo. The shift cable shouldn't need to be adjusted if it was not disturbed during removal.
The shifter should be in neutral for a bravo. The shift cable shouldn't need to be adjusted if it was not disturbed during removal.
05-18-2011, 11:05 AM
#8
Registered
Join Date: Mar 2007
Location: Lake Dallas, TX
Posts: 1,087
Likes: 0
Received 0 Likes
on
0 Posts
Recently removed the Bravo's on my boat and sent them to All American for a rehash. Will be putting the drives back on this Friday if all goes well. Was wondering if anyone has any tips/tricks that will make the process easier. When they came out they didn't fight me and the shift cables unhooked as they should have. I never moved the boat or changed anything, so I'm assuming I shouldn't have to realign anything with the drive couplers- correct? When I reinstall them, should I just leave the shift levers in forward (I think this is where they ended up when I pulled the drives off)? Is there any trick to getting the cable hooked back up to the connection on the drive itself? Just looking for any advice that will make the process easier. Or anything I should look out for- Thanks!
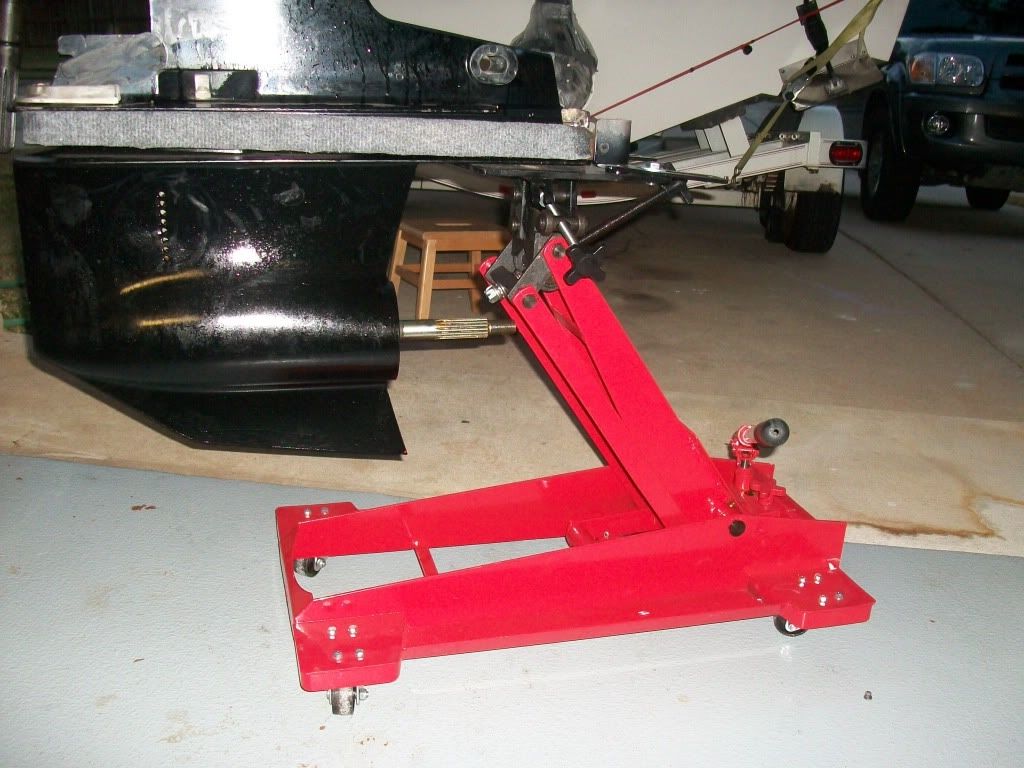
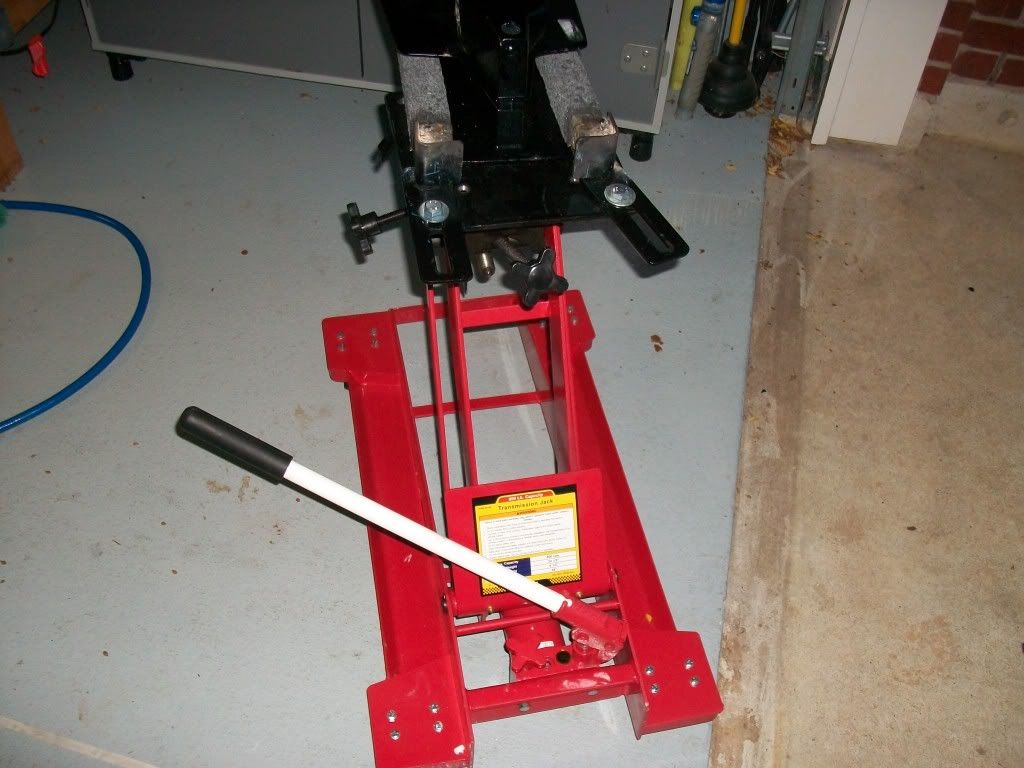
I would also make a drive stand,(http://www.offshoreonly.com/forums/g...welding-3.html), lots of ideas shown on this thread, it will save you a decent amount of $$$ in the long run if you do the maintenance on the drive yourself and you don't break your back trying to manhandle the drive on and off. I created one from a transmission jack. This give me a 3 dimension adjustment so I can just slide it back in with no issues. Cost: $140.00
 05-18-2011, 08:06 PM
#9
Gold Member
You won't need a shift cable adjustment tool if all you have done is pull the drive. Just get it back in the shift cable latch and you are good to go. The Merc Shift Cable adjustment tool can be simulated with a paint stirrer and a slot in it - it isn't worth the 35 bucks, but again, you ONLY need it if you have removed the shift cable - not if you just removed the drive.
Once re-installed I would fill the drive from the bottom and keep an eye on the resevior bottle inside the boat (assuming you have one).
Once re-installed I would fill the drive from the bottom and keep an eye on the resevior bottle inside the boat (assuming you have one).
05-19-2011, 09:54 AM
#10
Registered
Thread Starter
Join Date: Jun 2010
Location: Cadillac, MI
Posts: 131
Likes: 0
Received 0 Likes
on
0 Posts
Thanks for all the further input guys. Already have the drive stand handled. I built one that attaches to the bucket of my little Kubota tractor. Worked slick getting them off, then was able to just lift them up into the bed of the truck without ever having to manhandle them. Should work great putting them back on too. Only reason I asked about the shift cable adjustment is because the guy doing my drives said I should check it because often times it's off anyway because of poor maintenance by a shop. Said you can do damage to the drives if it isn't adjusted properly. Getting the drives tonight and will put them back in tomorrow. Hopefully nothing to report but success, but will see!


