

27PC Transom Repair
 11-24-2014, 07:42 PM
#41
How long do you plan on keeping this boat? Answering that question would really help solidify a decision to replace all the wet stuff the proper way, or do a partial job and disclose the issues you have unearthed to the new owner. IMO if you plan to hold onto it, just replace all of the old wet stringers/bulkheads that weren't constructed worth a darn in the first place, wet or not. It's really not that bad of a job. You have ample time with the long winters over in Kentucky.
It's like a flashback to last winter and what my Mirage looked like. After collecting some truly invaluable advice from Glassdave I started ripping and tearing. Bought resin, 1708, 1.5 Mat, sanding tools, marine plywood and some Corebond + west system 404.. Thing is 10 times the boat it was before. Even though I found another boat that fits my families needs, I don't regret the learning experience. 9 out of 10 boats out there were built by guys with less intellect than Forrest Gump. People just want to think they were constructed by Jesus himself. You soon find out there is much to be desired regarding materials/application, which all effect watertightness.
It's like a flashback to last winter and what my Mirage looked like. After collecting some truly invaluable advice from Glassdave I started ripping and tearing. Bought resin, 1708, 1.5 Mat, sanding tools, marine plywood and some Corebond + west system 404.. Thing is 10 times the boat it was before. Even though I found another boat that fits my families needs, I don't regret the learning experience. 9 out of 10 boats out there were built by guys with less intellect than Forrest Gump. People just want to think they were constructed by Jesus himself. You soon find out there is much to be desired regarding materials/application, which all effect watertightness.
 11-25-2014, 04:40 AM
#42
Registered
Yup, cruisers seem to be a different animal when it comes to fixing structural issues because of the limited access, and there are very few repair threads on the forums to serve as a guide. (Maybe SeaRay, Chaparral or Four Winns forums might have something . . . )
Anyway, looks like you are still in the discovery phase at this point, however I am thinking that the foam beneath the tank may be wet and if that is the case you will want to get a look at the tank for any corrosion damage.
When I was assessing the moisture issues in my F-330SS last year, I had taken a core sample of the foam using a 1" pipe (similar to how ice core samples are done in the polar regions). This let me know that the foam along the keel was wet.
11-25-2014, 11:10 AM
#43
I replaced my cruisers transom 5 yrs ago. Cut the whole thing out. It was over 9' wide and would not fit down the engine openng in 1 piece if I had prefabed it outside. Since it had to be seamed anyways, was easier to build it in place. Installed the 1st 8' length piece in, then the remaining 18" section. A layer of CS and then the 2nd layer using the reverse stagger. This put both smaller prieces and the joint to the outside where the stress is almost a non issue. I did have to cut the 2 inner stringers at about a 45 to allow the 8' pieces to slide in and then down into position. After transom was all glassed in, I glassed the 2 stringer wedges back in. Trying to do a partial replacement woulda been more time consuming with a weaker end job in my opinion, so it all came out. The transom is 10x stronger and 100x better sealed than when the boat left the factory.
__________________
Some people are like Slinkies - Not really good for anything, but they
bring a smile to your face when pushed down the stairs.
Some people are like Slinkies - Not really good for anything, but they
bring a smile to your face when pushed down the stairs.
11-25-2014, 12:03 PM
#44
I replaced my cruisers transom 5 yrs ago. Cut the whole thing out. It was over 9' wide and would not fit down the engine openng in 1 piece if I had prefabed it outside. Since it had to be seamed anyways, was easier to build it in place. Installed the 1st 8' length piece in, then the remaining 18" section. A layer of CS and then the 2nd layer using the reverse stagger. This put both smaller prieces and the joint to the outside where the stress is almost a non issue. I did have to cut the 2 inner stringers at about a 45 to allow the 8' pieces to slide in and then down into position. After transom was all glassed in, I glassed the 2 stringer wedges back in. Trying to do a partial replacement woulda been more time consuming with a weaker end job in my opinion, so it all came out. The transom is 10x stronger and 100x better sealed than when the boat left the factory.
11-25-2014, 03:36 PM
#46
Go figure, they do make a cruiser about the same but sure looks ;ole you have more room to work.
1993 290 engine compartment, beam 10 feet, hatch opens closer to the stern . No seat to either side, Guessing hatch is at least 7 if not 8 feet across
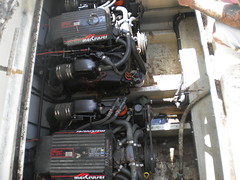
Mine, beam 9.5, deck covers part of the engine. beach seat on starboard side. My hatch opening is 4.5 feet

1993 290 engine compartment, beam 10 feet, hatch opens closer to the stern . No seat to either side, Guessing hatch is at least 7 if not 8 feet across
Mine, beam 9.5, deck covers part of the engine. beach seat on starboard side. My hatch opening is 4.5 feet
 11-25-2014, 04:20 PM
#47
Took the water tank out, only good thing is since I just did replace it a few years ago it came out a bit easier the second time around. This is inside the aft cabin with the mirror removed. I used a saw last time to cut up through the fist layer because other wise it could not be removed. Used scres to put it back in place and white tape to cover the cut

You can see were I replaced the wood and covered it with glass and resin. My glass job isn't very good but in this case it works to my advantage making it easier to remove. Only wrong thing I did was use screws, screw heads get filled with resin and the bit won't go in to remove. Note to self, use nails or staples

Now start digging the foam out

Tank and foam renived

There was some water in the area. Vacuumed it out and will see what shows up tomorrow. Started to think my new tank had a crack but I filled it up and let set for a few hours and nothing. Guess the water is coming from somewhere else. Either hot water tank or water lines is next on the list
You can see were I replaced the wood and covered it with glass and resin. My glass job isn't very good but in this case it works to my advantage making it easier to remove. Only wrong thing I did was use screws, screw heads get filled with resin and the bit won't go in to remove. Note to self, use nails or staples
Now start digging the foam out
Tank and foam renived
There was some water in the area. Vacuumed it out and will see what shows up tomorrow. Started to think my new tank had a crack but I filled it up and let set for a few hours and nothing. Guess the water is coming from somewhere else. Either hot water tank or water lines is next on the list
11-26-2014, 11:16 AM
#49
Do those meters read thru glass? No idea how they work. When I tore out my transom, there were areas that were wet in 1 layer, but the 2nd layer was dry as can be cause the glass between the 2 plywood layers kept them isolated from each other.
__________________
Some people are like Slinkies - Not really good for anything, but they
bring a smile to your face when pushed down the stairs.
Some people are like Slinkies - Not really good for anything, but they
bring a smile to your face when pushed down the stairs.

