

Thermostat Replacement
 06-22-2012, 10:29 AM
#1
Registered
Thread Starter
I'm not sure if there is a recommended number of hours when it comes to thermostat replacement (raw water cooled system) but I was quoted one hours labor per motor and the usual waiting time as this is a busy time of the year. The project looked a bit more complicated than a "regular" car thermostat but still only a #1 degree of difficulty on a 1-5 scale.
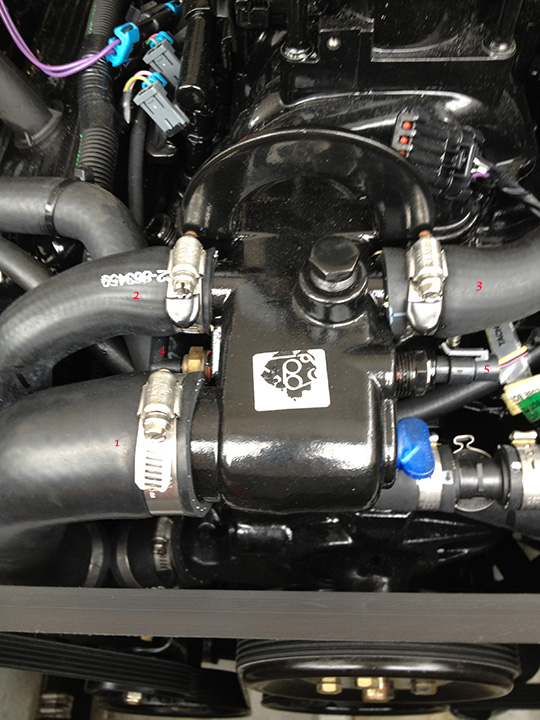
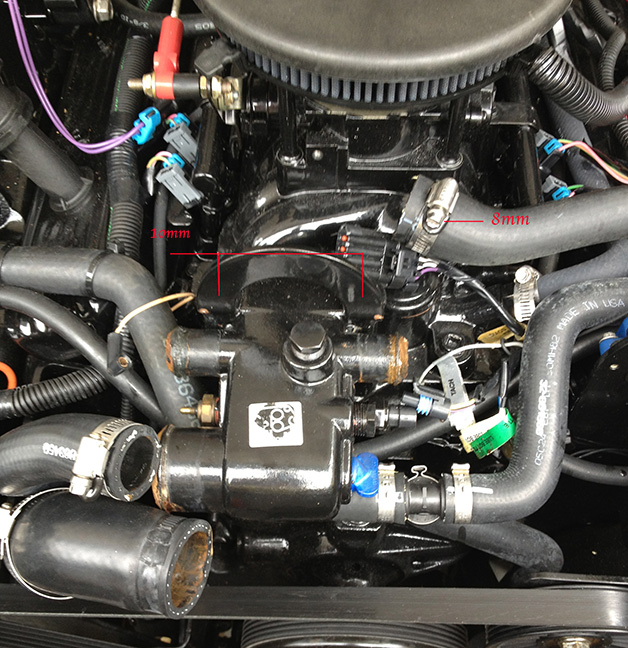
Tools needed: 8mm wrench (or screwdriver - flat blade) for hose clamps, 10mm 6-point socket w/2" extension for thermostat bolts, torque wrench (30# final torque for thermostat bolts), and a gasket scraper.
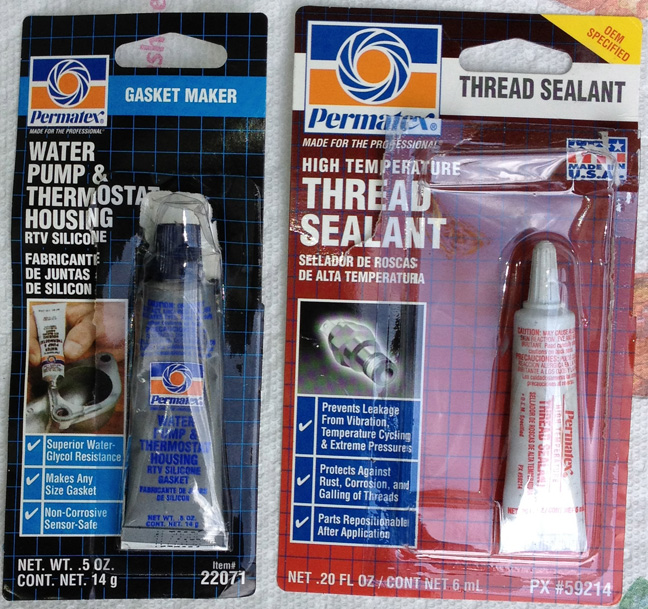
I used these products, one to seal/lube the threads and the other is gasket sealer for the thermostat gasket.
There are three hoses and two sensors to remove before you remove the two housing bolts.
I gently pried out the sleeve to get to the thermostat.
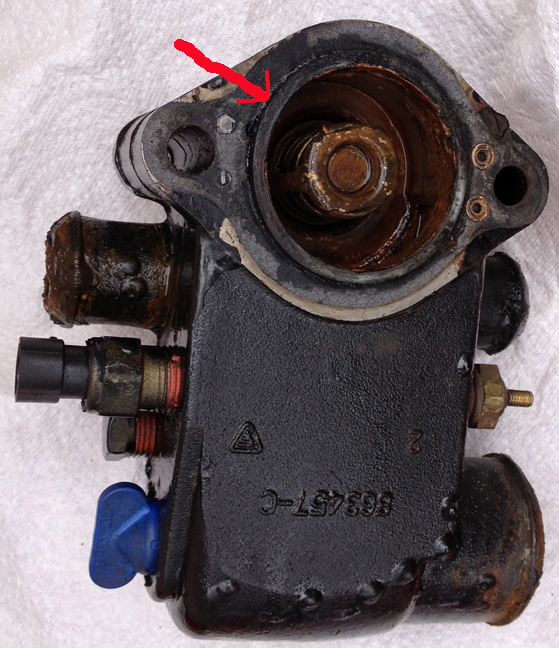
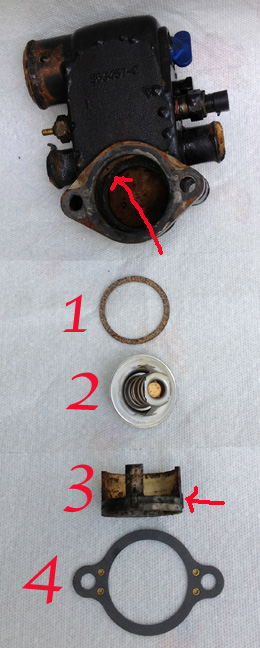
Once you remove the sleeve the thermostat comes right out. There is a circular cork gasket that the thermostat sits on. I was able to easily get the old gasket out with my gasket scraper (see gasket #1 in next picture). As this gasket fits in a groove I did not use any sealer on the new one. I just cleaned the area and put the new gasket in place. The thermostat goes in next. The metal sleeve (#3) goes back in open end down. There is a small groove on this sleeve for alignment purposes. The order is: cork circular gasket, thermostat, metal sleeve, and the thermostat housing gasket.
This is how the housing will look minus the light coating of RTV silicone.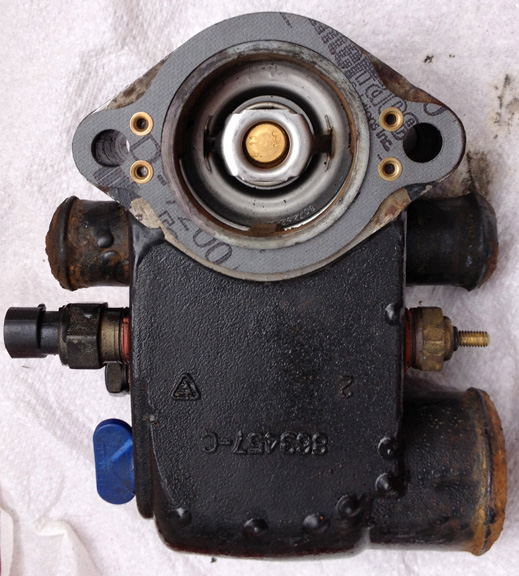
The final steps are to reposition the thermostat housing assembly, torque the bolts (I did this in three steps) and hook up the three hoses and the two sensors (mine boat has gauge and alarm sensors). Test for leaks and that's that. Start to finish took me 1/2 hour per side. Skill wise I'm pretty much at the change my own oil & filter level, a beginner. Lastly the cost of the thermostat and gaskets from Mercury was $32.
Tools needed: 8mm wrench (or screwdriver - flat blade) for hose clamps, 10mm 6-point socket w/2" extension for thermostat bolts, torque wrench (30# final torque for thermostat bolts), and a gasket scraper.
I used these products, one to seal/lube the threads and the other is gasket sealer for the thermostat gasket.
There are three hoses and two sensors to remove before you remove the two housing bolts.
I gently pried out the sleeve to get to the thermostat.
Once you remove the sleeve the thermostat comes right out. There is a circular cork gasket that the thermostat sits on. I was able to easily get the old gasket out with my gasket scraper (see gasket #1 in next picture). As this gasket fits in a groove I did not use any sealer on the new one. I just cleaned the area and put the new gasket in place. The thermostat goes in next. The metal sleeve (#3) goes back in open end down. There is a small groove on this sleeve for alignment purposes. The order is: cork circular gasket, thermostat, metal sleeve, and the thermostat housing gasket.
This is how the housing will look minus the light coating of RTV silicone.
The final steps are to reposition the thermostat housing assembly, torque the bolts (I did this in three steps) and hook up the three hoses and the two sensors (mine boat has gauge and alarm sensors). Test for leaks and that's that. Start to finish took me 1/2 hour per side. Skill wise I'm pretty much at the change my own oil & filter level, a beginner. Lastly the cost of the thermostat and gaskets from Mercury was $32.
Last edited by Wes Burmark; 06-22-2012 at 01:31 PM.
 06-22-2012, 11:54 AM
#2
Registered
Join Date: May 2006
Location: Greenwell Springs, LA
Posts: 121
Likes: 0
Received 0 Likes
on
0 Posts
I changed mine on a 502mag mpi last year in about 15 min. I sucked up some sand last year at the Emerald Coast Poker Run in Destin and had an overheating problem. Flushed everything and the problem was still there. Changed the thermostat and no more overheating.
06-22-2012, 12:02 PM
#3
Platinum Member
iTrader: (6)
I'm not sure if there is a recommended number of hours when it comes to thermostat replacement (raw water cooled system) but I was quoted one hours labor per motor and the usual waiting time as this is a busy time of the year. The project looked a bit more complicated than a "regular" car thermostat but still only a #1 degree of difficulty on a 1-5 scale.
Tools needed: 8mm wrench (or screwdriver - flat blade) for hose clamps, 10mm 6-point socket w/2" extension for thermostat bolts, torque wrench (30# final torque for thermostat bolts), and a gasket scraper.
I used these products, one to seal/lube the threads and the other is gasket sealer for the thermostat gasket.
There are three hoses and two sensors to remove before you remove the two housing bolts.
I gently pried out the sleeve to get to the thermostat.
Once you remove the sleeve the thermostat comes right out. There is a circular cork gasket that the thermostat sits on. I was able to easily get the old gasket out with my gasket scraper (see gasket #1 in next picture). As this gasket fits in a groove I did not use any sealer on the new one. I just cleaned the area and put the new gasket in place. The thermostat goes in next. The metal sleeve (#3) goes back in open end down. There is a small groove on this sleeve for alignment purposes. The order is: cork circular gasket, thermostat, metal sleeve, and the thermostat housing gasket.
This is how the housing will look minus the light coating of RTV silicone.
The final steps are to reposition the thermostat housing assembly, torque the bolts (I did this in three steps) and hook up the three hoses and the two sensors (mine boat has gauge and alarm sensors). Test for leaks and that's that. Start to finish took me 1/2 hour per side. Skill wise I'm pretty much at the change my own oil & filter level, a beginner. Lastly the cost of the thermostat and gaskets from Mercury was $32.
Tools needed: 8mm wrench (or screwdriver - flat blade) for hose clamps, 10mm 6-point socket w/2" extension for thermostat bolts, torque wrench (30# final torque for thermostat bolts), and a gasket scraper.
I used these products, one to seal/lube the threads and the other is gasket sealer for the thermostat gasket.There are three hoses and two sensors to remove before you remove the two housing bolts.
I gently pried out the sleeve to get to the thermostat.
Once you remove the sleeve the thermostat comes right out. There is a circular cork gasket that the thermostat sits on. I was able to easily get the old gasket out with my gasket scraper (see gasket #1 in next picture). As this gasket fits in a groove I did not use any sealer on the new one. I just cleaned the area and put the new gasket in place. The thermostat goes in next. The metal sleeve (#3) goes back in open end down. There is a small groove on this sleeve for alignment purposes. The order is: cork circular gasket, thermostat, metal sleeve, and the thermostat housing gasket.
This is how the housing will look minus the light coating of RTV silicone.
The final steps are to reposition the thermostat housing assembly, torque the bolts (I did this in three steps) and hook up the three hoses and the two sensors (mine boat has gauge and alarm sensors). Test for leaks and that's that. Start to finish took me 1/2 hour per side. Skill wise I'm pretty much at the change my own oil & filter level, a beginner. Lastly the cost of the thermostat and gaskets from Mercury was $32.
 06-22-2012, 01:17 PM
#4
Registered
Thread Starter
33outlawsst - Thanks for the kind words. The information on Offshoreonly.com is so helpful to a new boat owner. The people on this forum really take time to help each other out. The supporting vendors take time out of their busy day to answer personal questions. Even though my contributions will be very low level projects I am trying to "give back." Again, thanks for the kind reply.
Last edited by Wes Burmark; 06-22-2012 at 09:14 PM.
06-22-2012, 06:06 PM
#6
Registered
Thread Starter
Thanks Mark -
When the boat was in the shop one water pump was replaced and the other was rebuilt so yes, both impellers are new. Interestedly enough there's no increase in water pressure over last years' impellers (before I accidentally fried them). The technician that worked on my boat said that they only need to be replaced every 100 hours. He felt that the notion of them "taking a set" over the winter was incorrect. I realize that opinions vary... I had the starboard oil/power steering cooler professionally cleaned and brazed (it had a small leak in an end-cap seam. I'm thinking of removing the port cooler and having it professionally cleaned as it may contain impeller pieces. That side is showing 10+� hotter oil temp that the starboard engine. I'm probably just too picky!
I did manage to put four hours on my boat. Several trips to the Tides and around Fox Island. Waiting for more sunshine. When will you have your Fountain ready?
06-22-2012, 06:18 PM
#7
Registered
Thanks Mark -
When the boat was in the shop one water pump was replaced and the other was rebuilt so yes, both impellers are new. Interestedly enough there's no increase in water pressure over last years' impellers (before I accidentally fried them). The technician that worked on my boat said that they only need to be replaced every 100 hours. He felt that the notion of them "taking a set" over the winter was incorrect. I realize that opinions vary... I had the starboard oil/power steering cooler professionally cleaned and brazed (it had a small leak in an end-cap seam. I'm thinking of removing the port cooler and having it professionally cleaned as it may contain impeller pieces. That side is showing 10+� hotter oil temp that the starboard engine. I'm probably just too picky!
I did manage to put four hours on my boat. Several trips to the Tides and around Fox Island. Waiting for more sunshine. When will you have your Fountain ready?
When the boat was in the shop one water pump was replaced and the other was rebuilt so yes, both impellers are new. Interestedly enough there's no increase in water pressure over last years' impellers (before I accidentally fried them). The technician that worked on my boat said that they only need to be replaced every 100 hours. He felt that the notion of them "taking a set" over the winter was incorrect. I realize that opinions vary... I had the starboard oil/power steering cooler professionally cleaned and brazed (it had a small leak in an end-cap seam. I'm thinking of removing the port cooler and having it professionally cleaned as it may contain impeller pieces. That side is showing 10+� hotter oil temp that the starboard engine. I'm probably just too picky!
I did manage to put four hours on my boat. Several trips to the Tides and around Fox Island. Waiting for more sunshine. When will you have your Fountain ready?
06-22-2012, 07:18 PM
#8
Registered
Thanks Mark -
When the boat was in the shop one water pump was replaced and the other was rebuilt so yes, both impellers are new. Interestedly enough there's no increase in water pressure over last years' impellers (before I accidentally fried them). The technician that worked on my boat said that they only need to be replaced every 100 hours. He felt that the notion of them "taking a set" over the winter was incorrect. I realize that opinions vary... I had the starboard oil/power steering cooler professionally cleaned and brazed (it had a small leak in an end-cap seam. I'm thinking of removing the port cooler and having it professionally cleaned as it may contain impeller pieces. That side is showing 10+� hotter oil temp that the starboard engine. I'm probably just too picky!
I did manage to put four hours on my boat. Several trips to the Tides and around Fox Island. Waiting for more sunshine. When will you have your Fountain ready?
When the boat was in the shop one water pump was replaced and the other was rebuilt so yes, both impellers are new. Interestedly enough there's no increase in water pressure over last years' impellers (before I accidentally fried them). The technician that worked on my boat said that they only need to be replaced every 100 hours. He felt that the notion of them "taking a set" over the winter was incorrect. I realize that opinions vary... I had the starboard oil/power steering cooler professionally cleaned and brazed (it had a small leak in an end-cap seam. I'm thinking of removing the port cooler and having it professionally cleaned as it may contain impeller pieces. That side is showing 10+� hotter oil temp that the starboard engine. I'm probably just too picky!
I did manage to put four hours on my boat. Several trips to the Tides and around Fox Island. Waiting for more sunshine. When will you have your Fountain ready?
I'll keep an eye out for you, might cruise to Gig as well.
Okay....Back to technical Fountain stuff!
06-22-2012, 08:38 PM
#9
Registered
Join Date: Aug 2001
Location: lake of the ozarks,missouri
Posts: 214
Likes: 0
Received 0 Likes
on
0 Posts
if it had a slight leak in an end cap its because it had freeze damage that tries to push the ends off,and if the mechanic was saying the impellers cannot take a winter set,even after only the first year of replacement then hes not the mechanic you should be using
06-22-2012, 09:02 PM
#10
Registered
Thread Starter
Expensive Date - Yes, my Fountain has both an oil cooler and power steering cooler. They are a single unit kind of one on top of the other with the water inlet and outlet in the center of the two on each end. The oil lines go into the top unit. The power steering hoses connect to the bottom part. I will take a picture when I remove it and get PN# info as well as brand.
proboat-wes - As I mentioned, I knew opinions would vary on impeller replacement. As the Fountain has water pressure gauges I will rely on the gauges to let me know when the impeller is losing it's abilities or, as impellers are not expensive, just replace them every year. My boat was put to rest for the winter with straight "pink -50� anti-freeze" I don't think the leak in the seam of the oil/ps cooler was freeze damage but I really can't say what caused it for sure. I'm just lucky I guess...
proboat-wes - As I mentioned, I knew opinions would vary on impeller replacement. As the Fountain has water pressure gauges I will rely on the gauges to let me know when the impeller is losing it's abilities or, as impellers are not expensive, just replace them every year. My boat was put to rest for the winter with straight "pink -50� anti-freeze" I don't think the leak in the seam of the oil/ps cooler was freeze damage but I really can't say what caused it for sure. I'm just lucky I guess...
Last edited by Wes Burmark; 06-22-2012 at 09:17 PM.

