

What do I replace these stringers with?


 10-13-2011, 11:41 AM
#22
Registered
Thread Starter
Join Date: May 2011
Location: Austin, Texas
Posts: 99
Likes: 0
Received 0 Likes
on
0 Posts
Greetings!
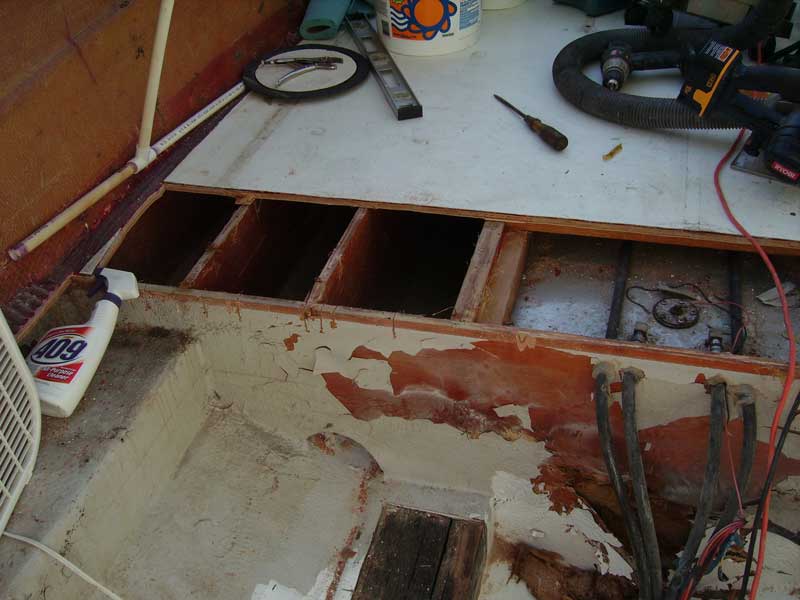
So I have a few more questions about this project. I cut back 12 inches of floor to expose the stringers on the other side of the aft bulkhead. The stringers on the forward side are dry and solid. I thought they might be as the floor has always been rock solid. So the only thing I have to replace is the transom, the stringers between the transom and aft bulkhead and the bulkhead. My questions are:
1) The original builder glassed the stringers to the bulkhead on each side. Would it be better to remove the rotted bulkhead and splice the stringers together, then slot the bulkhead and put it over the stringers and glass it in? Dunno anything about it, but I've seen that done before so was wondering if that's a preferred method.
2) Dave, you suggested replacing those blocks of dimensional lumber with traditional stringers, which I'm going to do. However, that cross steel beam that the motors mount to has long brackets that come down, since the dimensional lumber was only about 5 inches high. That means if I use that steel bar, the stringers will only be about 4 1/2 to 5 inches high. Is that enough height for a stringer? I mean, will that provide enough surface area and strength?
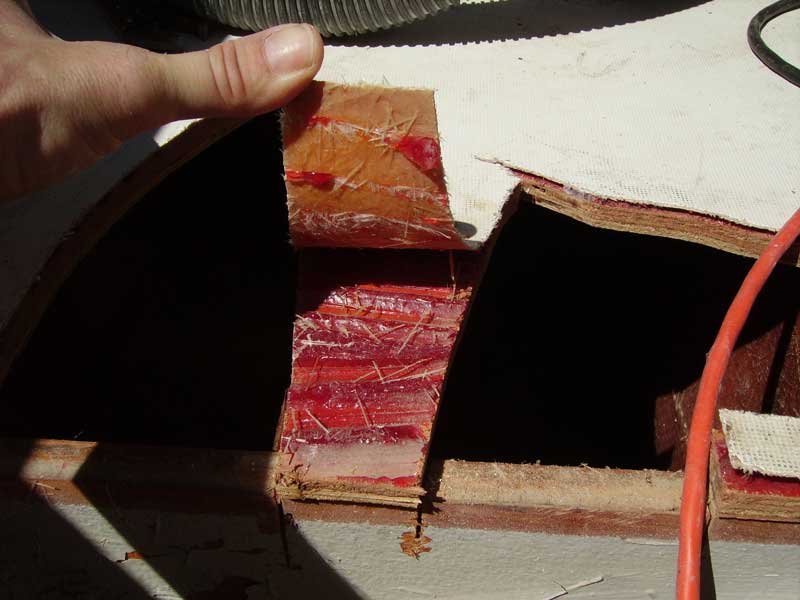
3) The floor appears to be a thin piece of glass, laminated with some very thick layer of something red, which I would guess is resin. But I can't figure out why it's on there so thick. I've got pictures below. That thin floor has a cross hatch pattern pressed into it. Since I'm not replacing the whole thing, I'll be splicing, and it's going to look ugly. What do you guys usually do with the floor in that case? I'm also going to be painting it, and I guess the paint will probably fill in most of that cross hatch non-skid pattern on the floor. I'm kind of lost on how to do the floor since I'm not replacing, but just splicing a new piece on.
Pics below... and thanks in advance for any advice!
Stan
Thin floor covering with very thick layer of something under it:
So I have a few more questions about this project. I cut back 12 inches of floor to expose the stringers on the other side of the aft bulkhead. The stringers on the forward side are dry and solid. I thought they might be as the floor has always been rock solid. So the only thing I have to replace is the transom, the stringers between the transom and aft bulkhead and the bulkhead. My questions are:
1) The original builder glassed the stringers to the bulkhead on each side. Would it be better to remove the rotted bulkhead and splice the stringers together, then slot the bulkhead and put it over the stringers and glass it in? Dunno anything about it, but I've seen that done before so was wondering if that's a preferred method.
2) Dave, you suggested replacing those blocks of dimensional lumber with traditional stringers, which I'm going to do. However, that cross steel beam that the motors mount to has long brackets that come down, since the dimensional lumber was only about 5 inches high. That means if I use that steel bar, the stringers will only be about 4 1/2 to 5 inches high. Is that enough height for a stringer? I mean, will that provide enough surface area and strength?
3) The floor appears to be a thin piece of glass, laminated with some very thick layer of something red, which I would guess is resin. But I can't figure out why it's on there so thick. I've got pictures below. That thin floor has a cross hatch pattern pressed into it. Since I'm not replacing the whole thing, I'll be splicing, and it's going to look ugly. What do you guys usually do with the floor in that case? I'm also going to be painting it, and I guess the paint will probably fill in most of that cross hatch non-skid pattern on the floor. I'm kind of lost on how to do the floor since I'm not replacing, but just splicing a new piece on.
Pics below... and thanks in advance for any advice!
Stan
Thin floor covering with very thick layer of something under it:
10-13-2011, 01:24 PM
#23
1- if you can strip off the plywood bulkhead the same way you strip off the rotted transom you should be left with a vertical wall of fiberglass to work with (just a guess not being able to see it first hand). If its thick enough I would bond the new bulkead right to that and laminate it in, if its kinda flimsy you mght be better to just knock the whole bulkhead out and replace it seeing as you have decent access to the front side. You can pocket the wood before hand and dry fit all of it like a puzzle. I like to strip everything out completely and prep completely before i start cutting anything. Get a nice clean slate to work with in there.
2 - Double up some 3/4" for that and you should be fine. The factory stringers in my ScarabIII were only about six inches tall and only a single 3/4". They held fine for years even with the mediocre OEM build quality.
3 - is that seam going to be under the rear seat?
2 - Double up some 3/4" for that and you should be fine. The factory stringers in my ScarabIII were only about six inches tall and only a single 3/4". They held fine for years even with the mediocre OEM build quality.
3 - is that seam going to be under the rear seat?
__________________
Throttles- Cleveland Construction 377 Talon
08 OPA Class 1 National Champion
08 Class 1 Geico Triple Crown Champion
08 OPA High Points Champion
10 OPA Class 1 National Champion ( happy now Ed! )
Throttles- Cleveland Construction 377 Talon
08 OPA Class 1 National Champion
08 Class 1 Geico Triple Crown Champion
08 OPA High Points Champion
10 OPA Class 1 National Champion ( happy now Ed! )
Last edited by glassdave; 10-13-2011 at 01:27 PM.
10-13-2011, 01:42 PM
#24
Registered
Thread Starter
Join Date: May 2011
Location: Austin, Texas
Posts: 99
Likes: 0
Received 0 Likes
on
0 Posts
1- If its thick enough I would bond the new bulkead right to that and laminate it in, if its kinda flimsy you mght be better to just knock the whole bulkhead out and replace it seeing as you have decent access to the front side. You can pocket the wood before hand and dry fit all of it like a puzzle.
That seam *would* have been under the rear seat, if I had been more careful. Now it'll be about 6 inches in front of it. It's not a huge deal, but since I'm doing all of this work (including painting) I kind of wanted it to be perfect. I keep trying to think of what I could put over it, but nothing satisfactory comes to mind.
10-13-2011, 02:31 PM
#25
yep solid bulkhead butted and tabbed to the existing stringers. i dont think its necessary to key fit the parts together plus your stringer are at the same level as the bulkhead so you would have to do some fancy cuttin to do it that way plus you would have some complex laminating as well. I usually do the surface laminate on stuff like that out side the boat, let it cure out then fit it again and just tab it in.
__________________
Throttles- Cleveland Construction 377 Talon
08 OPA Class 1 National Champion
08 Class 1 Geico Triple Crown Champion
08 OPA High Points Champion
10 OPA Class 1 National Champion ( happy now Ed! )
Throttles- Cleveland Construction 377 Talon
08 OPA Class 1 National Champion
08 Class 1 Geico Triple Crown Champion
08 OPA High Points Champion
10 OPA Class 1 National Champion ( happy now Ed! )
10-13-2011, 02:57 PM
#26
Registered
Thread Starter
Join Date: May 2011
Location: Austin, Texas
Posts: 99
Likes: 0
Received 0 Likes
on
0 Posts
Awesome, thanks!
And nothing touches the hull right (to avoid hard spots)? All of those new stringers to the transom and the new bulkhead get raised ~1/4 inch right? I know that's true for stringers, but not sure about bulkheads.
And nothing touches the hull right (to avoid hard spots)? All of those new stringers to the transom and the new bulkhead get raised ~1/4 inch right? I know that's true for stringers, but not sure about bulkheads.
10-16-2011, 03:03 PM
#27
Registered
Thread Starter
Join Date: May 2011
Location: Austin, Texas
Posts: 99
Likes: 0
Received 0 Likes
on
0 Posts
Man I HATE not knowing what I'm doing.
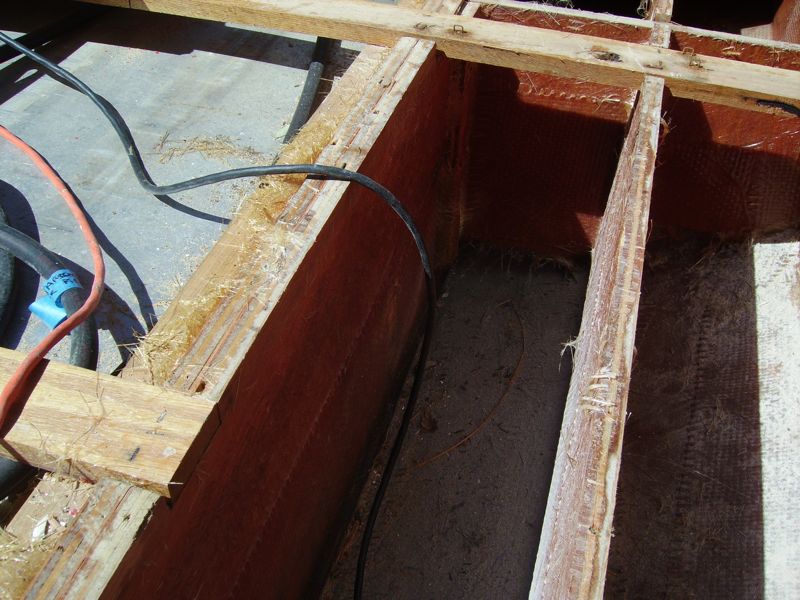
Well I spoke too soon, there is some rotting on the stringers. Back near the aft bulkhead it's about 2 inches up from the hull. I can see black discoloration and stains all the way forward. I've cut back some glass in those places that are forward to expose the wood. They're not totally rotted, but have been exposed to water. It kind of sucks because it's only about two inches of wood right next to the hull. The rest of these stringers are totally fine. The floor is totally fine. I guess I was hoping they'd be totally rotted so I'd feel like I wasn't doing a lot more work than necessary.
It looks like the stringers go all the way to the bow in one piece, which I guess stringers do. But I REALLY did not want to get into the cabin. This whole thing will qualify as a nightmare if I have to rip out the cabin. So I'm wondering, if I splice into the stringers up at the bulkhead where the cabin starts, will the whole thing be strong enough? Or do the stringers HAVE to be all one piece up to the bow? Or can I splice them like a foot before the bulkhead?
You can see that black staining here. As I move forward the wood isn't totally rotted, but it's come into contact with water:
The stringers up near the sides of the hull look fine. It's really the two stringers on each side of the tank. Although, the next two stringers do have some discoloration where they contact the hull. It goes up all the way to the bulkhead where they meet the hull:
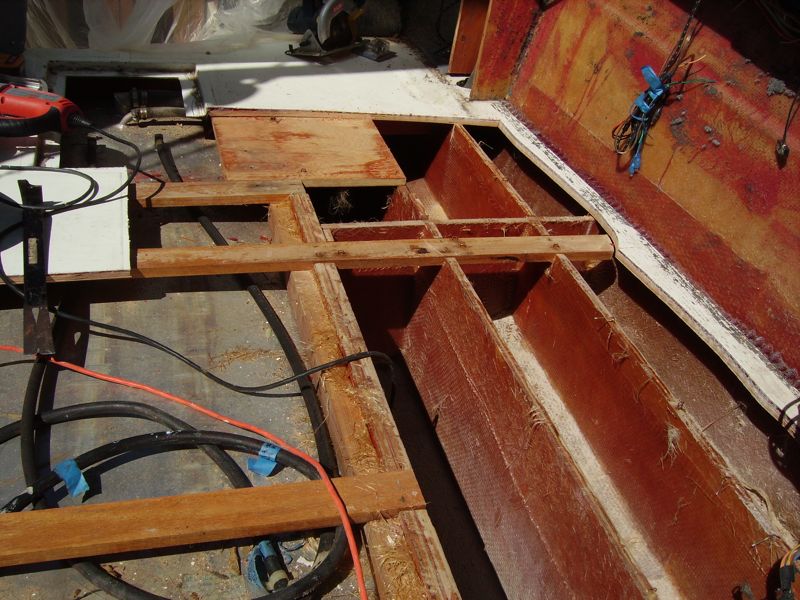
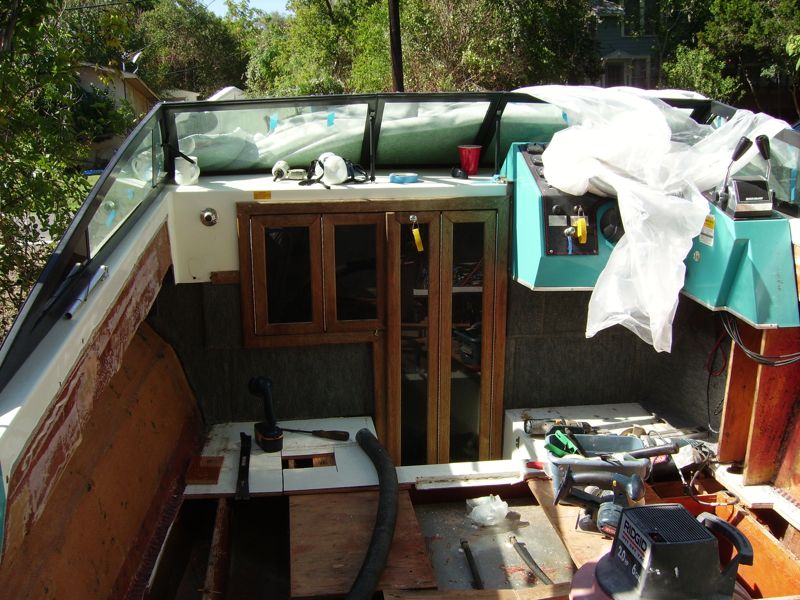
Where the cabin doors are is the bulkhead I'd like to splice into, or just before it:
They used roving to glass in the stringers. It looks like there's probably a gap there because roving doesn't bend well, and it looks like they didn't fillet, and now water travels through those gaps and gets into the wood. It's really irritating that boat manufacturers can't take a little extra time and do it right.
Anyone have any thoughts?
Well I spoke too soon, there is some rotting on the stringers. Back near the aft bulkhead it's about 2 inches up from the hull. I can see black discoloration and stains all the way forward. I've cut back some glass in those places that are forward to expose the wood. They're not totally rotted, but have been exposed to water. It kind of sucks because it's only about two inches of wood right next to the hull. The rest of these stringers are totally fine. The floor is totally fine. I guess I was hoping they'd be totally rotted so I'd feel like I wasn't doing a lot more work than necessary.
It looks like the stringers go all the way to the bow in one piece, which I guess stringers do. But I REALLY did not want to get into the cabin. This whole thing will qualify as a nightmare if I have to rip out the cabin. So I'm wondering, if I splice into the stringers up at the bulkhead where the cabin starts, will the whole thing be strong enough? Or do the stringers HAVE to be all one piece up to the bow? Or can I splice them like a foot before the bulkhead?
You can see that black staining here. As I move forward the wood isn't totally rotted, but it's come into contact with water:
The stringers up near the sides of the hull look fine. It's really the two stringers on each side of the tank. Although, the next two stringers do have some discoloration where they contact the hull. It goes up all the way to the bulkhead where they meet the hull:
Where the cabin doors are is the bulkhead I'd like to splice into, or just before it:
They used roving to glass in the stringers. It looks like there's probably a gap there because roving doesn't bend well, and it looks like they didn't fillet, and now water travels through those gaps and gets into the wood. It's really irritating that boat manufacturers can't take a little extra time and do it right.
Anyone have any thoughts?


