

Come along for the adventurous ride of adding a transom shower and what ever else
 04-12-2014 | 03:58 PM
#1
Thread Starter
Registered

Joined: Mar 2012
Posts: 1,230
Likes: 27
From: Clearwater, Mn
Well I figured I would show my progress of add a transom shower to my 265 DVX, and maybe a couple other goodies.
To recap last springIi added LEDs to the cockpit and cuddy


Along with new bluetooth tunes

And a new top end

Time to get the boat back up next to the house and start the next project.

Now this spring Ill be adding a transom shower.
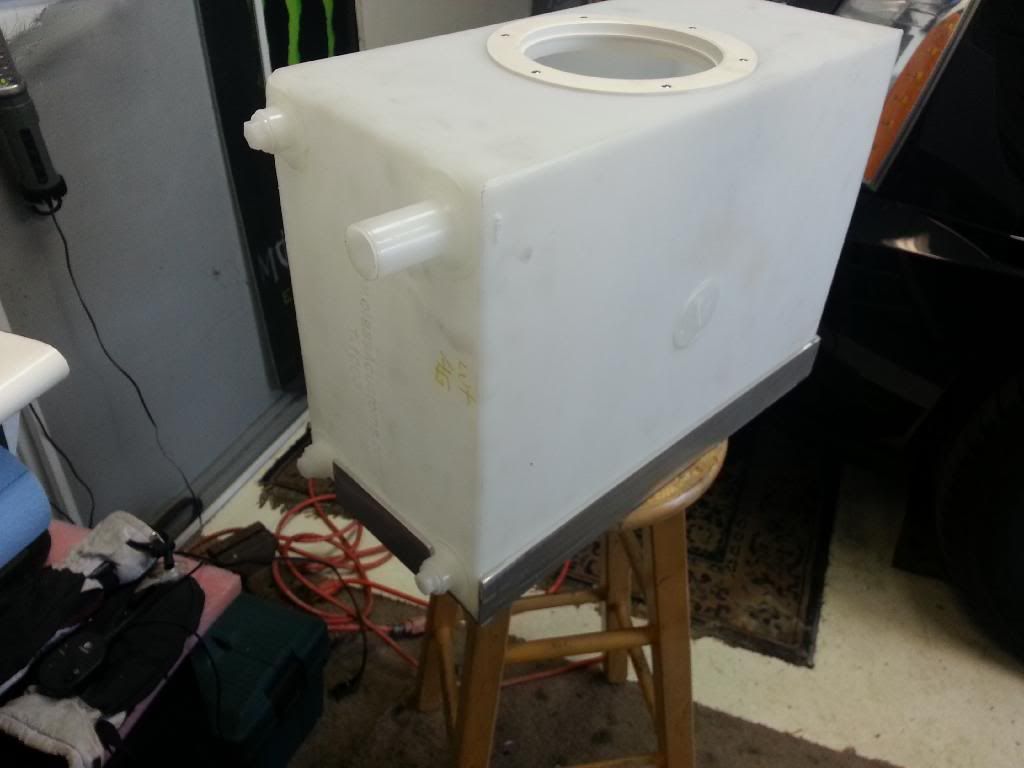
First order was last fall taking some photos so I had the winter to find what size tank, pump, shower, ect. would fit, I knew the third battery would have to move or get elminated all together.


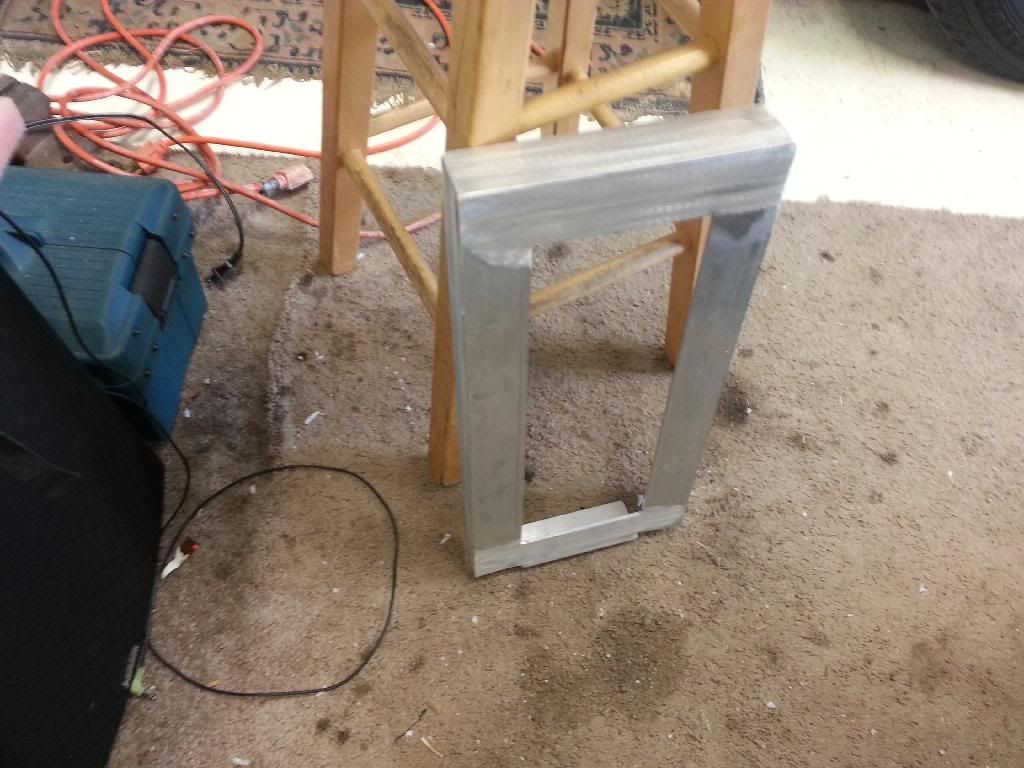
I found a 10 gal tank, (9"X14"x19") that should work perfect. First order was to cut a hole on top and install a inspection plate for filling. Then made a alum. frame to hold it in place. Yes, I know it has a 1" fill plug but Im not going to cut another hole in the side of the boat at this time just to fill the tank form the out side.
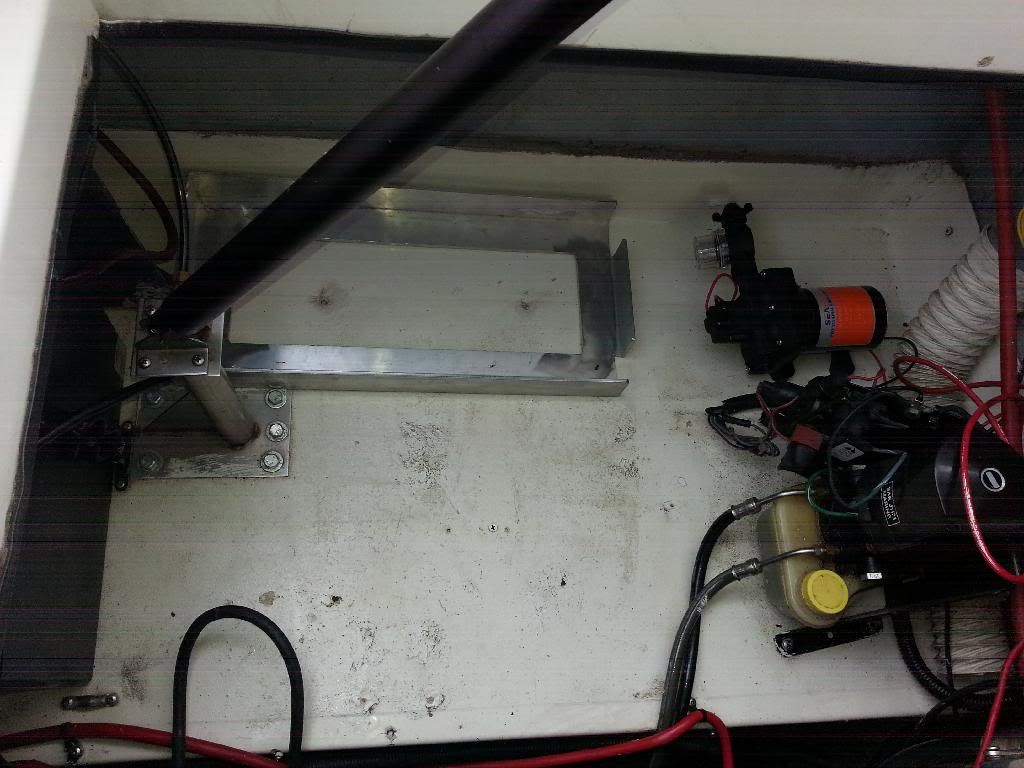
Next I moved the trim pump (square to the world vs the30 degree angle it was at) removed the battery the downs, and misc wires that were mounted in the area where the pump and water tank would go. Then started to lay out where it would all fit. I think I will mount the pump will rotate 90 degrees from this photo.
Here is the shower i picked up. Buddy has one with the rumbber flapper for a cap and it had broke off a coupel times now so I went with the SS cap. (might bite me in the ass later you will see)

Now to find a spot to mount the shower. Im thinking right here under the grab rail on the starboard side

CRAP!!! Not much room actually to mount the cup and have the hose pull in and out smoothly. There is maybe 4" from the mounting hole form the grab rail to the to pof the transom (gray part). Remember I have the solid SS cap for the shower. It dosent look like there will be enought room to open the cap all the way. Umm, i might have to rub or rest on the grab rail once open. The opening or hole size for the shower is 2 3/4".

A wider shot of the area.

This as far as I got at the moment. It was beer thirty.
To recap last springIi added LEDs to the cockpit and cuddy


Along with new bluetooth tunes

And a new top end

Time to get the boat back up next to the house and start the next project.

Now this spring Ill be adding a transom shower.
First order was last fall taking some photos so I had the winter to find what size tank, pump, shower, ect. would fit, I knew the third battery would have to move or get elminated all together.


I found a 10 gal tank, (9"X14"x19") that should work perfect. First order was to cut a hole on top and install a inspection plate for filling. Then made a alum. frame to hold it in place. Yes, I know it has a 1" fill plug but Im not going to cut another hole in the side of the boat at this time just to fill the tank form the out side.


Next I moved the trim pump (square to the world vs the30 degree angle it was at) removed the battery the downs, and misc wires that were mounted in the area where the pump and water tank would go. Then started to lay out where it would all fit. I think I will mount the pump will rotate 90 degrees from this photo.

Here is the shower i picked up. Buddy has one with the rumbber flapper for a cap and it had broke off a coupel times now so I went with the SS cap. (might bite me in the ass later you will see)
Now to find a spot to mount the shower. Im thinking right here under the grab rail on the starboard side

CRAP!!! Not much room actually to mount the cup and have the hose pull in and out smoothly. There is maybe 4" from the mounting hole form the grab rail to the to pof the transom (gray part). Remember I have the solid SS cap for the shower. It dosent look like there will be enought room to open the cap all the way. Umm, i might have to rub or rest on the grab rail once open. The opening or hole size for the shower is 2 3/4".

A wider shot of the area.

This as far as I got at the moment. It was beer thirty.
 04-12-2014 | 04:16 PM
#2
Thread Starter
Registered
Joined: Mar 2012
Posts: 1,230
Likes: 27
From: Clearwater, Mn
Well today I was able to mount the tank, pump and get the wires ran.

The fitting for the hydraulic hatch ram was in the way, so ran up town quick and picked up a 90 degree fitting quick. This way the tank clears with kinking the tube.


Well now all I have left to do is drill the 2 3/4" hole!!!! I picked up the hole saw today, Once home I found out I don't have the correct arbor that fits in the center So the hole will have to wait for another day. Now to figure witch way to mount the shower cup. Maybe it might work mounting the lid so it opens to the side so it clears the grab rail??

Or


The fitting for the hydraulic hatch ram was in the way, so ran up town quick and picked up a 90 degree fitting quick. This way the tank clears with kinking the tube.


Well now all I have left to do is drill the 2 3/4" hole!!!! I picked up the hole saw today, Once home I found out I don't have the correct arbor that fits in the center
So the hole will have to wait for another day. Now to figure witch way to mount the shower cup. Maybe it might work mounting the lid so it opens to the side so it clears the grab rail??
Or


Last edited by 92nsx; 04-12-2014 at 04:19 PM.
04-12-2014 | 05:18 PM
#3
Ginger or Mary Ann?

Joined: Oct 2000
Posts: 11,030
Likes: 9
From: L
If mounted vertical as in 1st pic, either have to lower it more or you will be limited to the lid not opening past 90* before it hits the grab handle, thought that is the normal mounting direction. Does the lid snap close? If horizontal like 2 and 3rd pic, will the lid flap open?
__________________
Some people are like Slinkies - Not really good for anything, but they
bring a smile to your face when pushed down the stairs.
Some people are like Slinkies - Not really good for anything, but they
bring a smile to your face when pushed down the stairs.
04-12-2014 | 05:38 PM
#4
Thread Starter
Registered
Joined: Mar 2012
Posts: 1,230
Likes: 27
From: Clearwater, Mn
No real room to move it down due to transom in the way, witch the top cap over laps. Yes the lid dose snap closed and yep it will open flat if I mount it horizontal. More and more I think it will have to mount horizontal. The emblem will look more like a bright light vs a shower
04-18-2014 | 09:32 AM
#5
Thread Starter
Registered
Joined: Mar 2012
Posts: 1,230
Likes: 27
From: Clearwater, Mn
Well Easter day is looking like decent weather to get back working on the boat.
Question: When drilling the 2 3/4" hole threw the swim deck, how can I keep the wood/fiberglass from blowing out on the back side? There is no room to mount a backer plate. Just slow and steady?
I know to keep the gel coat from chipping/cracking Ill run the saw in reverse untill it threw the gel.
Once the wood is exposed what should i put on it from rotting away? Just cover in the 3m 4200? I want the cup to be removable some day just in case it would get broken or something happens to it and needs to be replaced.
04-18-2014 | 08:40 PM
#6
Ginger or Mary Ann?
Joined: Oct 2000
Posts: 11,030
Likes: 9
From: L
Push very lightly when you feel it's about to pop thru to minimize splintering the wood/glass backside. Let the hole saw teeth do the cutting, not pressure. And low RPM. Slow enough you can see each rev. Go to Autozone or Menards and pick up a cheap can of fiberglass resin/hardner and seal the exposed cut out.
__________________
Some people are like Slinkies - Not really good for anything, but they
bring a smile to your face when pushed down the stairs.
Some people are like Slinkies - Not really good for anything, but they
bring a smile to your face when pushed down the stairs.
04-21-2014 | 10:52 AM
#7
Thread Starter
Registered
Joined: Mar 2012
Posts: 1,230
Likes: 27
From: Clearwater, Mn
Well drilled the hole, wish i would have went 1/8" lower since the lid scrapes the grab bar a little.) There isn't much to the swim deck. Looks to be all fiberglass no wood.

I mounted it horizontal because when i had it normal (lid opening up) the hose rubbed big time on the latch and cover.


I forgot to get a photo of the inside but will get that later today.

I mounted it horizontal because when i had it normal (lid opening up) the hose rubbed big time on the latch and cover.


I forgot to get a photo of the inside but will get that later today.
04-22-2014 | 07:21 AM
#8
Ginger or Mary Ann?
Joined: Oct 2000
Posts: 11,030
Likes: 9
From: L
Looks good. Can you slot the rail mounting holes upwards enough to clear?
__________________
Some people are like Slinkies - Not really good for anything, but they
bring a smile to your face when pushed down the stairs.
Some people are like Slinkies - Not really good for anything, but they
bring a smile to your face when pushed down the stairs.
Last edited by US1 Fountain; 04-22-2014 at 07:44 AM.
04-22-2014 | 08:01 AM
#9
Thread Starter
Registered
Joined: Mar 2012
Posts: 1,230
Likes: 27
From: Clearwater, Mn
Thank you. Good thinking, I might be able to just loosen the bolts holding the grab rail on and wiggle it up just a smig. We all know baja construction and i'm guessing there is a little wiggle room in the mounting holes.

