

Proper Transom Buildup
 04-18-2023 | 06:32 PM
#1
Thread Starter
Registered
Joined: Mar 2021
Posts: 83
Likes: 59
From: NW Suburban Chicago
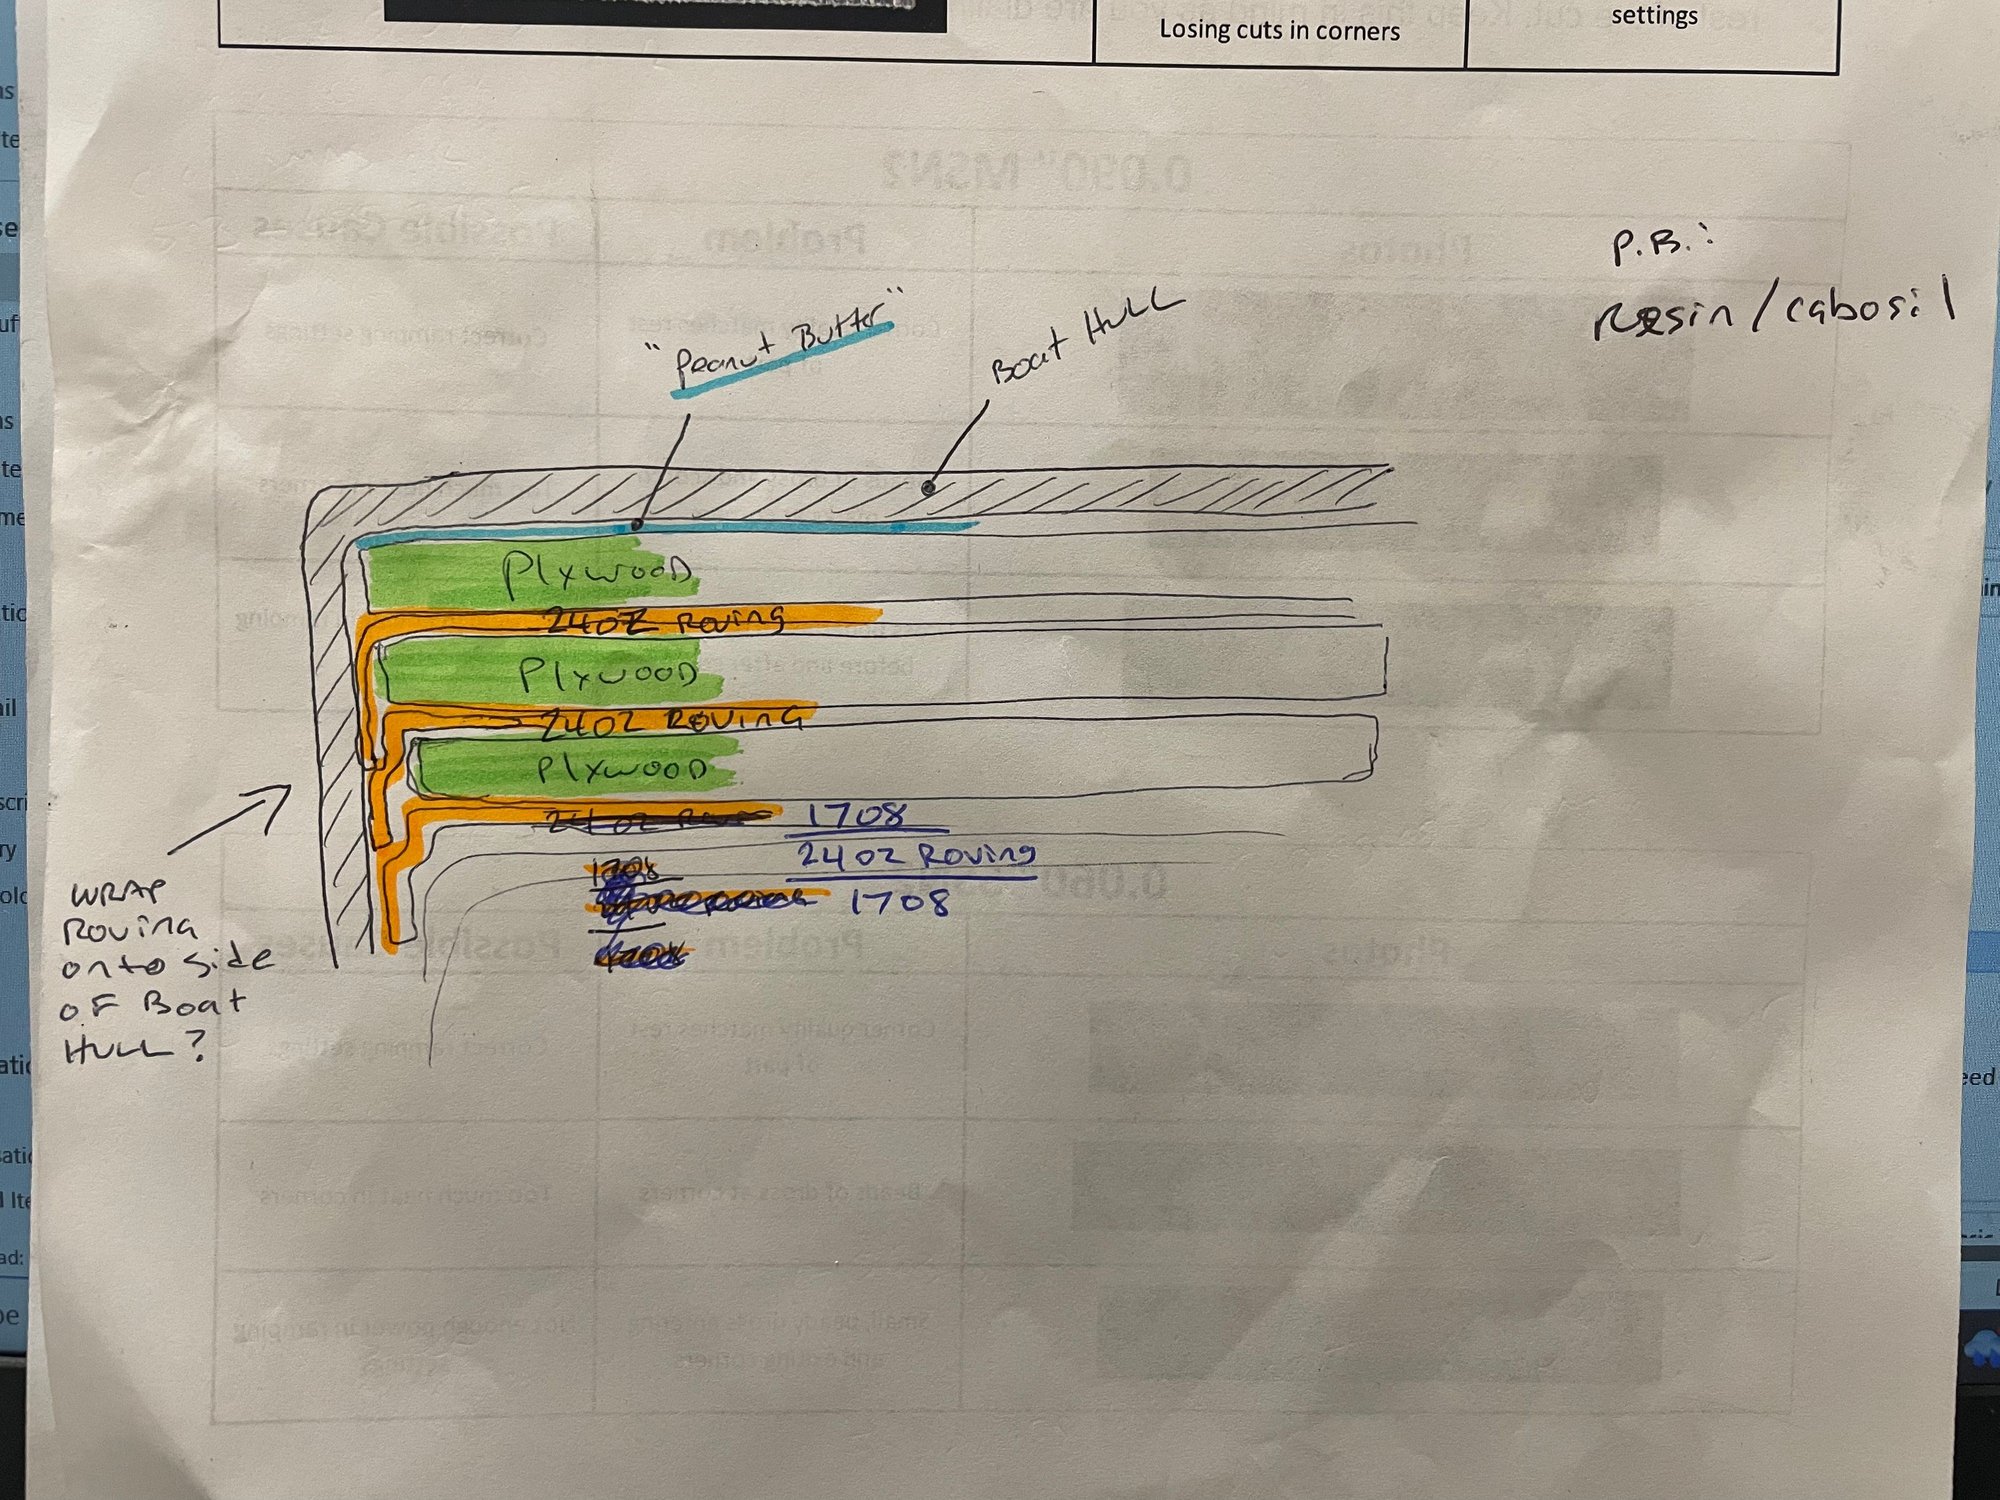
So I decided (at the recommendation of Mr. Glass Dave) to build my transom from three layers of 1/2” Marine grade plywood, with each plywood layer having a layer of old-school 24oz Roving between them.
Should the transom be built:
a) on the bench with this layup as one thick piece to be installed at once,
or
b) should each individual plywood layer be wrapped into the boat hull with the roving, as in the photo attached
Should the transom be built:
a) on the bench with this layup as one thick piece to be installed at once,
or
b) should each individual plywood layer be wrapped into the boat hull with the roving, as in the photo attached

 04-19-2023 | 11:39 AM
#3
Registered
Joined: Jul 2018
Posts: 36
Likes: 17
From: Evansville, Indiana
Glassdave will tell you don't be afraid to improve upon the design/engineering of your boat. If you think it'll make it stronger, then do it. I'll be honest, it was really surprising the shortcuts that the manufacturer used in building my boat. I KNOW that the work I'm doing is so much stronger and will last longer than from the factory.
*Disclaimer - this is my first time doing a transom or major fiberglass repair on a boat. I only have experience with automotive repair work and fabrication using composites. I had training in a trade school elective in high school for autobody, where I learned the fundamentals of resin and glass work*
I built my transom out of 2 pieces of 3/4" marine grand plywood on my garage floor with 1.5oz CSM between. The flattest surface possible, with weights on it and 1-1/4" screws holding it together.
Removed screws
Drilled 3/8" holes in 6" grids to allow the LBI Bonding compound to squeeze through to avoid bulges and voids. (optional)
Used LBI 945 Vinylester Bonding compound to adhere the transom core to the hull (you're choosing to use peanut butter, a 2:1 ratio of Fumed Silica aka Cab-o-sil to resin)
1708 Tabbing
1708 face layer
1708 Tabbing
1708 face layer
Reversed 1708 face layer with CSM to the outside for easier sanding and fairing.
Very similar to Dave's old layup image but slightly modified.
By using the bonding compound, I was able to skip the CSM face layer on the core. Just make sure you do a good primer coat of resin prior to the layup or bonding so it doesn't suck the resin out of the material and into the wood. This causes delamination and poor adhesion.
Don't get in a rush; take your time, measure twice, cut once, make lots of reference points for everything, and use your camera on your phone to refer back to anything. It's not as hard as you think it is once you start cutting into it. I STRONGLY suggest a full-face respirator for grinding/sanding and a tyvex with nitrile gloves under work gloves.
04-23-2023 | 01:47 PM
#4
Neno the mind boggler

Joined: Sep 2001
Posts: 13,080
Likes: 320
From: toledo oh
Glassdave will tell you don't be afraid to improve upon the design/engineering of your boat. If you think it'll make it stronger, then do it. I'll be honest, it was really surprising the shortcuts that the manufacturer used in building my boat. I KNOW that the work I'm doing is so much stronger and will last longer than from the factory.
*Disclaimer - this is my first time doing a transom or major fiberglass repair on a boat. I only have experience with automotive repair work and fabrication using composites. I had training in a trade school elective in high school for autobody, where I learned the fundamentals of resin and glass work*
I built my transom out of 2 pieces of 3/4" marine grand plywood on my garage floor with 1.5oz CSM between. The flattest surface possible, with weights on it and 1-1/4" screws holding it together.
Removed screws
Drilled 3/8" holes in 6" grids to allow the LBI Bonding compound to squeeze through to avoid bulges and voids. (optional)
Used LBI 945 Vinylester Bonding compound to adhere the transom core to the hull (you're choosing to use peanut butter, a 2:1 ratio of Fumed Silica aka Cab-o-sil to resin)
1708 Tabbing
1708 face layer
1708 Tabbing
1708 face layer
Reversed 1708 face layer with CSM to the outside for easier sanding and fairing.
Very similar to Dave's old layup image but slightly modified.
By using the bonding compound, I was able to skip the CSM face layer on the core. Just make sure you do a good primer coat of resin prior to the layup or bonding so it doesn't suck the resin out of the material and into the wood. This causes delamination and poor adhesion.
Don't get in a rush; take your time, measure twice, cut once, make lots of reference points for everything, and use your camera on your phone to refer back to anything. It's not as hard as you think it is once you start cutting into it. I STRONGLY suggest a full-face respirator for grinding/sanding and a tyvex with nitrile gloves under work gloves.
*Disclaimer - this is my first time doing a transom or major fiberglass repair on a boat. I only have experience with automotive repair work and fabrication using composites. I had training in a trade school elective in high school for autobody, where I learned the fundamentals of resin and glass work*
I built my transom out of 2 pieces of 3/4" marine grand plywood on my garage floor with 1.5oz CSM between. The flattest surface possible, with weights on it and 1-1/4" screws holding it together.
Removed screws
Drilled 3/8" holes in 6" grids to allow the LBI Bonding compound to squeeze through to avoid bulges and voids. (optional)
Used LBI 945 Vinylester Bonding compound to adhere the transom core to the hull (you're choosing to use peanut butter, a 2:1 ratio of Fumed Silica aka Cab-o-sil to resin)
1708 Tabbing
1708 face layer
1708 Tabbing
1708 face layer
Reversed 1708 face layer with CSM to the outside for easier sanding and fairing.
Very similar to Dave's old layup image but slightly modified.
By using the bonding compound, I was able to skip the CSM face layer on the core. Just make sure you do a good primer coat of resin prior to the layup or bonding so it doesn't suck the resin out of the material and into the wood. This causes delamination and poor adhesion.
Don't get in a rush; take your time, measure twice, cut once, make lots of reference points for everything, and use your camera on your phone to refer back to anything. It's not as hard as you think it is once you start cutting into it. I STRONGLY suggest a full-face respirator for grinding/sanding and a tyvex with nitrile gloves under work gloves.
 there are a few variations and you can even drop down to three layers of half inch ply if you are holding big power or boxes. As i always say . . . my eager students
  . . . if you can picture a better way that is different from the way it was originally built then it probably is a better way. One thing important to keep in mind is that many of our boats (projects lol) were built by production staff that really just wanted to punch a clock and go home, not boaters and hobbyists. Its not until you get into very high end boats that this starts to differ. We are owners and enthusiasts that want to preserve and improve these things so we look at things like layup schedule and balancing laminates much differently, improve them in any way a DIY guy can.
__________________
Throttles- Cleveland Construction 377 Talon
08 OPA Class 1 National Champion
08 Class 1 Geico Triple Crown Champion
08 OPA High Points Champion
10 OPA Class 1 National Champion ( happy now Ed! )
Throttles- Cleveland Construction 377 Talon
08 OPA Class 1 National Champion
08 Class 1 Geico Triple Crown Champion
08 OPA High Points Champion
10 OPA Class 1 National Champion ( happy now Ed! )
04-23-2023 | 02:01 PM
#5
Neno the mind boggler
Joined: Sep 2001
Posts: 13,080
Likes: 320
From: toledo oh
So I decided (at the recommendation of Mr. Glass Dave) to build my transom from three layers of 1/2” Marine grade plywood, with each plywood layer having a layer of old-school 24oz Roving between them.
Should the transom be built:
a) on the bench with this layup as one thick piece to be installed at once,
or
b) should each individual plywood layer be wrapped into the boat hull with the roving, as in the photo attached
Should the transom be built:
a) on the bench with this layup as one thick piece to be installed at once,
or
b) should each individual plywood layer be wrapped into the boat hull with the roving, as in the photo attached
 with the roving it will be a very stiff transom and about the only place i really ever use the stuff. Its an outdated fabric by todays standards but lends itself well for just this type of thing. I prefer to build on the bench and install as one piece. You might also use a good spec poly for the roving inbetween the sheets. Only reason i say this is if you have any Hydrogen outgassing in the VE it could be a problem the do-it-yourselfer might struggle with correcting on the fly and having poly in those two laminates isnt going to affect anything at the end of the day. The problem is you fully encapsulating those laminates, you could also drill some vent holes but youd have to do them separate.
__________________
Throttles- Cleveland Construction 377 Talon
08 OPA Class 1 National Champion
08 Class 1 Geico Triple Crown Champion
08 OPA High Points Champion
10 OPA Class 1 National Champion ( happy now Ed! )
Throttles- Cleveland Construction 377 Talon
08 OPA Class 1 National Champion
08 Class 1 Geico Triple Crown Champion
08 OPA High Points Champion
10 OPA Class 1 National Champion ( happy now Ed! )


