

Transom and Stringer work - 233

 01-19-2013, 10:08 AM
#12
Registered
Thread Starter
 01-19-2013, 02:48 PM
#13
Thanks for the info Dave. I got a scrapper and was able to slowly peel back the thin layer that was bonded to the fiberglass. I only got about half of it done at this point, but it was coming off. It appears to have bonded to the wood well before, is this an indication that it is not uneven? I'm assuming this transom has already been redone at one point, because it is repowered to a 454/bravo, but who knows what has been done in the last 30 years.
I'm not familiar with CoreBond, I will have to do some research into it. What does it consist of? Once I get it cleaned up a little more, I think I will have a better idea of what it looks like. I'm located just south of Grand Rapids, MI...
I'm not familiar with CoreBond, I will have to do some research into it. What does it consist of? Once I get it cleaned up a little more, I think I will have a better idea of what it looks like. I'm located just south of Grand Rapids, MI...
Corebond is used to set any core materials like foam or balsa sheets in the build process but can be used to set a transom in the case of very un even surfaces. It works very well but i still prefer csm (fiberglass mat) bedding when doing a transom replacement
i would cut that lip back flush and tab up over the top although you could do it either way. I generally do what ever leaves the cleanest most uniform result. Whatever allows me to get a good consistent bond and a good fit with the new transom. A lot of techniques while doing glasswork aren't from any set rules but rather just thinking ahead a bit. Sometimes ya gotta get creative and figure out what works best for a given project.
__________________
Throttles- Cleveland Construction 377 Talon
08 OPA Class 1 National Champion
08 Class 1 Geico Triple Crown Champion
08 OPA High Points Champion
10 OPA Class 1 National Champion ( happy now Ed! )
Throttles- Cleveland Construction 377 Talon
08 OPA Class 1 National Champion
08 Class 1 Geico Triple Crown Champion
08 OPA High Points Champion
10 OPA Class 1 National Champion ( happy now Ed! )
Last edited by glassdave; 01-19-2013 at 02:55 PM.
01-20-2013, 12:02 PM
#14
Registered
Join Date: Jul 2012
Posts: 130
Likes: 0
Received 0 Likes
on
0 Posts
Check out my thread in the restoration/upgrades forum. I aint a professional and this is my first boat but I think I'm doing a pretty clean job with her. I got ALOT of help watching Friscoboater's videos on youtube. He re did a sea ray bowrider that was completely rotted and his videos do a great job of showing how things are done.
01-22-2013, 11:06 AM
#15
Registered
Thread Starter
Thanks for trying to help out with materials Dave. I wish I was closer. I have been looking for some materials locally, and found a couple options but haven't purchased any yet.
I will check out your thread. I have watched Friscoboater's videos and they have given me a good heads up for what is to come. Thanks for the tip.
Right now, I am laying out all my materials and cutting the wood. I have a little more cleanup of the old fiberglass to do yet. Hopefully in the next week or two I will be fiberglassing.
What are you guys using to bond the two pieces of transom wood together and what should it be coated with before installing it in the boat? I have seen/got a handful of opinions, so thought I would ask.
Thanks for all the help so far...
Dean
Seebold265NJ Check out my thread in the restoration/upgrades forum. I aint a professional and this is my first boat but I think I'm doing a pretty clean job with her. I got ALOT of help watching Friscoboater's videos on youtube. He re did a sea ray bowrider that was completely rotted and his videos do a great job of showing how things are done.
Right now, I am laying out all my materials and cutting the wood. I have a little more cleanup of the old fiberglass to do yet. Hopefully in the next week or two I will be fiberglassing.
What are you guys using to bond the two pieces of transom wood together and what should it be coated with before installing it in the boat? I have seen/got a handful of opinions, so thought I would ask.
Thanks for all the help so far...
Dean
01-29-2013, 04:40 PM
#16
Hi Dean, couldnt send this reply through the IM thingy, to many characters. 2000 limit and this was 3044 lol
Hi Dean, no problem i will address them as above and i also have an illustration that will be in my book in the future that i will put up in your thread.
1. yes, cut and grind everything out. I fit both pieces individually then bond them together with a layer of ounce and a half mat and poly or vinylester resin and let cure completly then re fit one more time. I prefer vinylester but if you are looking to keep it budget conscious poly is perfectly file. Vinyl gives you a leg up on bond quality and has physicals almost that of epoxy for just a few bucks more.
2. see above
3. I just bond both pieces in out of boat on the shop floor and put them in with no holes pre cut. You really need to map those out at the end to be perfect.
4. basically yea, pre wet the inside of the transom and put in a layer of 1.5 oz mat. Wet the back of the new transom and give it a few minutes to soak up some resin (not to long though the clock is ticking on the resin) Install the transom and clamp it down tight. For the clamping process you will just have to be creative and use every hole in the back of the boat with drywall screws and large fender washers. Ease the pressure on progressively around the screws to allow resin to squish out a bit. In areas where there are no holes i have a few of those adjustable cargo bars from harbor freight to apply pressure from the bulkhead inside. These things
http://www.harborfreight.com/ratchet...bar-96811.html
or these but i think the first have more pressure. I have an older screw version i could not find a link to
http://www.harborfreight.com/2-in-1-...bar-66172.html
5. yep use a mixture of cabosil and resin about the consistancy of peanut butter.
6. See illustration in your thread. cap the transom with only 1708 and tabbing, no mat necessary.
Not a bother at all, as you get closer to lay up and if you need more in depth feel free to call any times fine (check PM for phone number).
heres the illustration from my upcoming epic novel soon to be on the New York Times best seller list lol
Originally Posted by Deanrw3
1.Prep transom area and grind down all fiberglass edges. Cut wood transom to fit.
2.Glue two pieces of transom wood together with PL.
3.Fit wood into boat and trace key hole and exhaust holes. Cut out the holes and coat the wood in resin, let dry out of boat.
4.Wet the back skin and wet back of wood transom with resin, wet out 1.5 CSM on back skin and clamp wood to the back skin lining up all the holes.
5.Use putty around all the edges then tab out the transom to the hull with 1708.
6.Cover the entire area with 1.5 or 1708
1. yes, cut and grind everything out. I fit both pieces individually then bond them together with a layer of ounce and a half mat and poly or vinylester resin and let cure completly then re fit one more time. I prefer vinylester but if you are looking to keep it budget conscious poly is perfectly file. Vinyl gives you a leg up on bond quality and has physicals almost that of epoxy for just a few bucks more.
2. see above
3. I just bond both pieces in out of boat on the shop floor and put them in with no holes pre cut. You really need to map those out at the end to be perfect.
4. basically yea, pre wet the inside of the transom and put in a layer of 1.5 oz mat. Wet the back of the new transom and give it a few minutes to soak up some resin (not to long though the clock is ticking on the resin) Install the transom and clamp it down tight. For the clamping process you will just have to be creative and use every hole in the back of the boat with drywall screws and large fender washers. Ease the pressure on progressively around the screws to allow resin to squish out a bit. In areas where there are no holes i have a few of those adjustable cargo bars from harbor freight to apply pressure from the bulkhead inside. These things
http://www.harborfreight.com/ratchet...bar-96811.html
or these but i think the first have more pressure. I have an older screw version i could not find a link to
http://www.harborfreight.com/2-in-1-...bar-66172.html
5. yep use a mixture of cabosil and resin about the consistancy of peanut butter.
6. See illustration in your thread. cap the transom with only 1708 and tabbing, no mat necessary.
Not a bother at all, as you get closer to lay up and if you need more in depth feel free to call any times fine (check PM for phone number).
heres the illustration from my upcoming epic novel soon to be on the New York Times best seller list lol
__________________
Throttles- Cleveland Construction 377 Talon
08 OPA Class 1 National Champion
08 Class 1 Geico Triple Crown Champion
08 OPA High Points Champion
10 OPA Class 1 National Champion ( happy now Ed! )
Throttles- Cleveland Construction 377 Talon
08 OPA Class 1 National Champion
08 Class 1 Geico Triple Crown Champion
08 OPA High Points Champion
10 OPA Class 1 National Champion ( happy now Ed! )
Last edited by glassdave; 01-29-2013 at 04:54 PM.
01-30-2013, 01:51 PM
#17
Registered
Thread Starter
Thanks a lot Dave, that really helps me understand it better. I apprciate all the advice and pictures are great. I'm sure that is going to be a great book.
Do I cut the outdrive/exhaust holes out when I'm completely done fiberglassing then coat the inside of the holes to protect the wood?
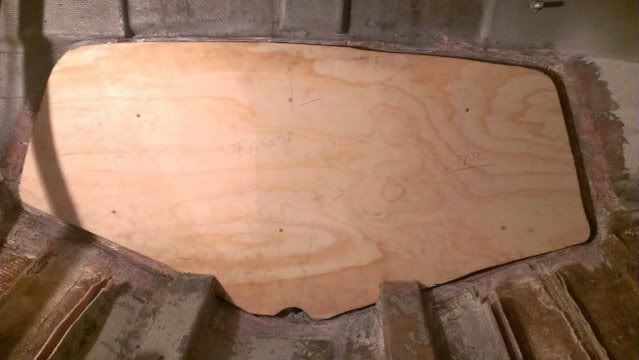
Here is where I'm at right now. I think I need to cut the Port side (wrote "star" on the wrong side of the wood, i was upside down) and the bottom a little more to get it away from the bottom of the hull. I have most of the glass shaved back around the sides and the bottom, but still need to do the top.
Do I cut the outdrive/exhaust holes out when I'm completely done fiberglassing then coat the inside of the holes to protect the wood?
Here is where I'm at right now. I think I need to cut the Port side (wrote "star" on the wrong side of the wood, i was upside down
) and the bottom a little more to get it away from the bottom of the hull. I have most of the glass shaved back around the sides and the bottom, but still need to do the top.
01-30-2013, 02:35 PM
#18
yes cut them after everything is all laminated. Test fit the drive before you coat everything sometimes you need to do a little fine tuning. Looks good, i wright the wrong side bout every other time i do one lol.
__________________
Throttles- Cleveland Construction 377 Talon
08 OPA Class 1 National Champion
08 Class 1 Geico Triple Crown Champion
08 OPA High Points Champion
10 OPA Class 1 National Champion ( happy now Ed! )
Throttles- Cleveland Construction 377 Talon
08 OPA Class 1 National Champion
08 Class 1 Geico Triple Crown Champion
08 OPA High Points Champion
10 OPA Class 1 National Champion ( happy now Ed! )
01-30-2013, 07:56 PM
#19
Registered
Thread Starter
Ok thanks Dave, I was asking about the holes because I was planning on using the exhaust holes and outdrive hole to feed my all thread through to clamp the two pieces together. I will probably trace the cut out area and just drill a hole for the clamp bolts then finish the cut outs when it is glassed in. Or is it acceptable to use wood screws to pull the two pieces together?
One of my last concers I see right now is how to tie in the main stringers since I'm leaving the existing ones. I was thinking I would cap off the end of the stringer to isolate it, then put the transom in and glass back around the stringer. My concer is the uncoated part of the wood that would be behind the stringer, or should I not worry about it because it should be completely enclosed.
Thanks for the help.
02-24-2013, 08:50 PM
#20
Registered
Thread Starter
It has been slow going but finally got the transom and motor mounts all glassed in. I just need to finish up the floor.
I test fitted the motor today and got it aligned. Two questions I have as I have been going along.
What is the best way to cut / map out the hole for the steering arm? Tips and tricks for cutting it out?
Are you guys drilling the holes for the gimbal housing studs through the transom bigger than needed and then filling them or just adding sealant to the correct size hole? Looks like most people are using 4200.
Thanks.

