Engine Alignment help please!
 08-16-2018 | 10:11 PM
#1
Thread Starter
Registered

Joined: Aug 2008
Posts: 40
Likes: 0
Hi There
i am trying to align my 2006 bravo one/350 mag mpi. I stripped an aluminum coupler in the first 150 hours of the boat. I bought it used with only 20 hours on it. So i bought an actual merc alignment bar and the 91-863372 adapter i believe that fits in the bellhousing. I have moved my engine fully up/down and the gap on the top of the tool doesnt change! And to make things worse im having no luck reading the grease marks. Seems no matter where i move it the grease marks are heavy on top and port side. I tried moving the engine side to side a tiny with a porta power and still no change. I also have a digital protractor and the transom angle is 14 degrees. I read on here that merc uses a 13 degree offset so i tried to set the height all around 13.5-12.5 and the bar would barely go in after trying to center gimbal bearing. The bar goes in fairly good around 14.2-13.9 degree angle. I just cant get it to a 2 finger pull. And its not the bar, it goes in nice to my spare couplers and gimbal bearings! Its driving me nuts why does the adapter tool in the bellhousing not working? Am i doing something wrong? The bellhousing hinge pins are tight and so is the top and lower gimbal ring pins. Anyone have any advice? I prob have 40 hrs into trying to get this alignment perfect. And jumping in/out of the boatba million times is getting old. I attached a pic of the adapter at a point of when the bar was a 2 finger pull and i shouldnt have moved it but i was trusting the tool.... i kept track of how many turns i moved it and put it back but no luck. Im close but want perfect!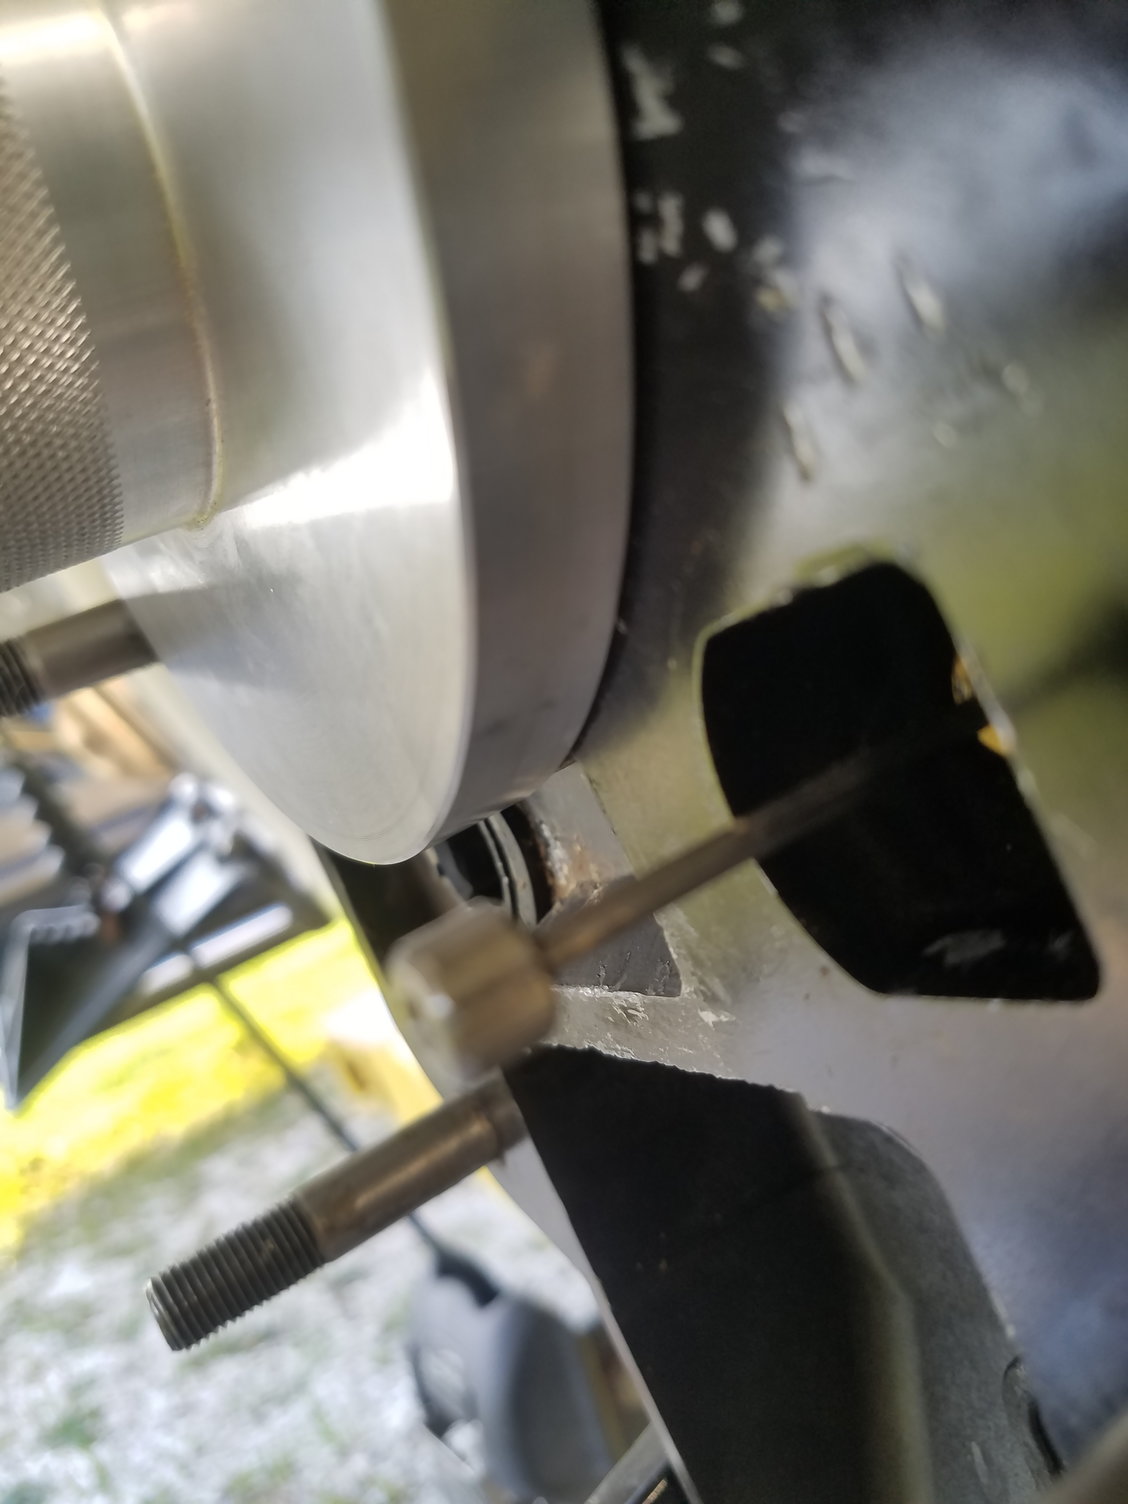
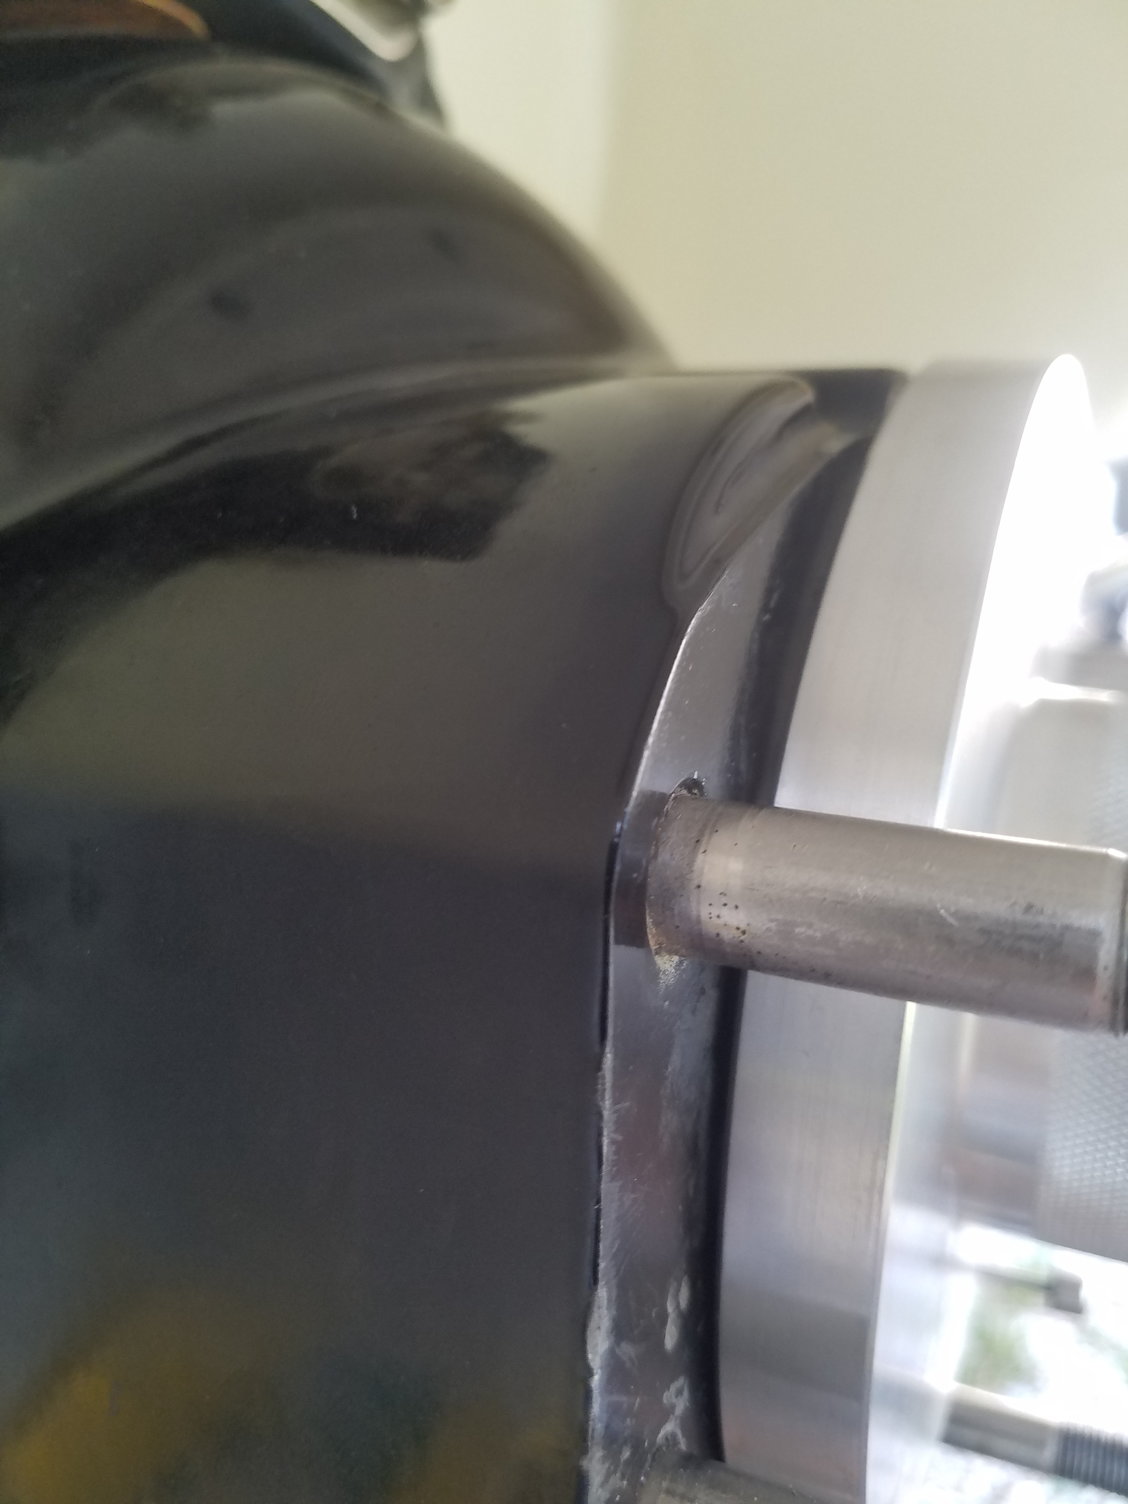

i am trying to align my 2006 bravo one/350 mag mpi. I stripped an aluminum coupler in the first 150 hours of the boat. I bought it used with only 20 hours on it. So i bought an actual merc alignment bar and the 91-863372 adapter i believe that fits in the bellhousing. I have moved my engine fully up/down and the gap on the top of the tool doesnt change! And to make things worse im having no luck reading the grease marks. Seems no matter where i move it the grease marks are heavy on top and port side. I tried moving the engine side to side a tiny with a porta power and still no change. I also have a digital protractor and the transom angle is 14 degrees. I read on here that merc uses a 13 degree offset so i tried to set the height all around 13.5-12.5 and the bar would barely go in after trying to center gimbal bearing. The bar goes in fairly good around 14.2-13.9 degree angle. I just cant get it to a 2 finger pull. And its not the bar, it goes in nice to my spare couplers and gimbal bearings! Its driving me nuts why does the adapter tool in the bellhousing not working? Am i doing something wrong? The bellhousing hinge pins are tight and so is the top and lower gimbal ring pins. Anyone have any advice? I prob have 40 hrs into trying to get this alignment perfect. And jumping in/out of the boatba million times is getting old. I attached a pic of the adapter at a point of when the bar was a 2 finger pull and i shouldnt have moved it but i was trusting the tool.... i kept track of how many turns i moved it and put it back but no luck. Im close but want perfect!
 08-16-2018 | 11:18 PM
#2
Registered
Joined: Sep 2009
Posts: 285
Likes: 51
From: Livermore, Ca
I just use a bar on my 350/alphas..not familiar with adapter..but the new couplers were hard for me to align as well.
Did you use the new rear motor mounts with no spring washers (or alternate one flat washer) at rear of motor? I replaced mounts and engine a bit low in rear for alignment (my experience) Merc provided a flat washer which I did not use...next engine I probably will.
Maybe that is your issue...changes at front are hard to read as rear is too low (thus the heavy reads on top). Maybe check engine for level as a place to get grounded...I feel your pain..in & out of the boat ...
Lane
08-17-2018 | 07:10 AM
#3
Thread Starter
Registered
Joined: Aug 2008
Posts: 40
Likes: 0
The oem 2006 chaparral setup didnt use the washers. For the heck of it i replaced the rear mounts and made sure they were the same depth as orig by using a starrett depth mic. The coupler wore in 100 hrs so obviously something was not correct out of the dactory. I had it good at one point so i know its possible. Just having trouble reading where to move it. Thats why i bought the plate adapter for the bar. But i can move the engine mounts 13 turns and the gap on top doesnt change.
08-17-2018 | 07:36 AM
#4
Registered

Joined: Sep 2013
Posts: 2,320
Likes: 1,040
From: Wisconsin
The bearing itself pivots. If you stick the bar into just the bearing, not all the way into the coupler, you can move the bearing around with the alignment bar. You could also try turning the motor over 180 for chits and see what happens, but that’s usually only a issue on a old coupler. You should have either the fiber washers or the double wound lock washers between the inner transom assembly and the engine bellhousing.
 08-17-2018 | 09:16 AM
#6
Banned
Joined: Aug 2018
Posts: 6
Likes: 0
There is a procedure for putting the coupler on, found that out when i did mine i had to use bolts with tapered heads I think they are called flat head.
Next is the bearing, i didnt trust mercury and used the adapter to verify the bearing was aligned on a new transom assembly ( smack it with a hammer like f2 said above) From that point i started alignment,
i kept getting top tight as well, but but it to me it was the gimbal housing, a liitle pressure on the bottom pulling it out To counteract the bellows yanking it down and it went away.
I started a thread. coupler runout ?? Here on offshore, it has some pics of what had to be done but i cant figre out how to attach it to this thread, cant copy paste drag drop on a tablet Or at least i cant
Last edited by onsafari; 08-17-2018 at 09:24 AM.
08-17-2018 | 09:22 AM
#7
Thread Starter
Registered
Joined: Aug 2008
Posts: 40
Likes: 0
i have the fiber washers. Yes i smack the bar up/down/left/right after every single movement of the engine mounts to align the gimbal bearing. I think i've done this process 200 times or more! Then insert the bar many times before judging if i have to move it again. The new coupler is not out of round. When i had the engine out and after i centered the coupler using tapered bolts i used a dial indicator to check the flywheel runout and the total runout at the end of the splines. There is .005 total runout at the coupler. Has anyone used this adapter plate before?
08-17-2018 | 03:29 PM
#8
Registered
Joined: Nov 2009
Posts: 4,198
Likes: 500
From: KY
The plate is used to determine which way to adjust the mounts. It is held firmly against the bell housing with the alignment bar full seated. Alignment is check by sliding the plate back away from the bell housing or removing it from the bar.
Are you pushing and holding the plate against the bell housing, with the alignment bar fully seated?
From the pics it looks like there is a gap all around, is this correct?
Are you pushing and holding the plate against the bell housing, with the alignment bar fully seated?
From the pics it looks like there is a gap all around, is this correct?
08-17-2018 | 03:42 PM
#9
Thread Starter
Registered
Joined: Aug 2008
Posts: 40
Likes: 0
There is a gap on the top and touching at the bottom. That particular picture is at a point where the bar slid in nice and easy. Bar fully seated and adapter pushed against bellhousing. It stays that same gap no matter where i move front mounts. Ive gone fully up and down. Should i try the stainless washers? Would lifting the rear close the gap. Ill use a depth mic to see how big the gap is but its probably close to the .100 shims i have.
thank you everyone for taking the time to respond!
Brian
thank you everyone for taking the time to respond!
Brian