

Bbc 454 gen 4 overhaul
 11-10-2020 | 08:57 PM
#111
Registered

Joined: Mar 2020
Posts: 372
Likes: 183
From: East Tennesseee
Did you account for piston rock on the ones with big difference inside VS outside measurements? So you could probably safely cut it .015". If you cut it .050" you'll have them all out of the hole and a real mess. Once you bring any of them flush you need to run the .039 gasket.
When not starting from scratch there's gonna be compromise. That's the biggest problem starting with an unknown already rebuilt piece. You just have to decide what you'll live with. Since it's gonna be there you may as well have it decked the .015 and make sure to tell them which gasket type your using so they leave the correct finish.
When not starting from scratch there's gonna be compromise. That's the biggest problem starting with an unknown already rebuilt piece. You just have to decide what you'll live with. Since it's gonna be there you may as well have it decked the .015 and make sure to tell them which gasket type your using so they leave the correct finish.
 11-10-2020 | 10:03 PM
#112
Platinum Member

Joined: Sep 2001
Posts: 5,769
Likes: 151
From: tn
Some of those measurements have got too much "fixture rock" going on.
1) take a clean file (like a 10"-12" medium mill bastard) without a handle and "flat file" the deck surface to get all traces of residual gasket and burrs knocked off. Hold the file flat with the palm of your hand and push the file (files only work in one direction, don't pull it against the cut).
2) I'm guessing your indicator is on a magnetic base? Flat file the mag base as well. Then stick the mag base to a larger flat (preferably surface ground) piece of steel like 1/2" x 3" x 4" to slide around on the deck. This plate will keep your indicator perpendicular to the deck.
3) adjust the indicator mount so that the probe tip is very close to the edge of the sliding plate (the farther the tip is from the edge, the more induced error you get from any tilt or debris under the sliding plate.
4) make sure the indicator is adjusted perpendicular to the plate.
5) with the sliding plate on the deck surface, set the indicator so that you are only using the first 0.100 of travel and set your dial to zero. Move it around several places and verify that you get zero every time you sit it in another spot (you may have a few thousandths variation but it should be very minimal).
NOW start measuring pistons. The first hole you showed was 0.033 something on the intake side, and 0.018 something on the exhaust side. This is impossible.
Clean, flat deck.
Stable, repeatable indicator setup.
You really are looking for a max/min on the quench pad area with piston rock. The pad on the intake side SHOULD be the same height as the pad on the exhaust side - the differences in the measurements you took are the clues that your measuring rig is inconsistent.
And there are motors out there that run pistons sticking UP out of the block as well. There's no rule against the piston protruding. Your pistons can stick out .003" and with a .039 gasket you are at a perfect .036 squish.
But let's make sure the indicator rig is stable, the deck is clean with no burrs, and you are probing a piston at a spot that is not eroded or pitted or built up with carbon.
Go have fun and remeasure.
Last edited by mcollinstn; 11-10-2020 at 10:14 PM.
11-11-2020 | 06:47 PM
#113
Thread Starter
Registered
Joined: Sep 2020
Posts: 216
Likes: 15
From: Kentucky
I used the same dial indicator setup I use at work on caterpillar, cummins and paccar diesel engine liner height I used a carbide scraper first then hit with a wire wheel and wiped clean with a tag before measuring the pistons I cleaned all spots with wire wheel I made sure gauge was on 0 every time if I'm in the wrong please tell me also what do u recommend for piston rock I thought usually u do 2 measurements across from each other then find the middle point and that's what u could possibly cut off block
11-11-2020 | 07:09 PM
#114
Registered
Joined: Mar 2020
Posts: 372
Likes: 183
From: East Tennesseee
Just put the indicator on it like you've been doing and rock the piston top to bottom and see how far it moves. Take the average of the high and low for your measurement. With out a ring machined the entire way around the piston it's as close as your gonna get.
11-11-2020 | 09:53 PM
#118
Platinum Member
Joined: Sep 2001
Posts: 5,769
Likes: 151
From: tn
Diesels typically have a lot more deck surface to provide a platform for the indicator. The only reason I'm suspect of the data is due to the big difference on intake/exhaust on a couple of them.
Yes, removing the rings will make it easier to rock the piston. It's not usually necessary to do it "ringless" but since the numbers are weird, it will remove one more source of deviation from the mix.
Rod length deviation from a clumsy job of resizing is expected to account for some deviation. But crooked pistons aren't typical.
But if you are looking for the way to determine BLOCK SQUARENESS, you have to use the SAME piston and rod on all 4 corners. That will show you how SQUARE the block is. You can then note that when you figure out how much to tell the machine shop to cut.
Since you plan to hone and re-ring with new rod bearings, you can mix and match the pistons into different holes if you need to (after final machining).
Here's what I do.
Label all piston/rod 1-8.
I pick a hole that gives me a good spot to anchor the indicator. I try one piston/rod, turn to TDC. Measure the quench pad max/min while rocking. Note the measurements.
Replace with another piston/rod and do the same. All 8.
Now, you can see which one is longest, shortest,, and what the variance is..
Then put longest into all 4 corners and measure. Note the measurements, to figure out block squareness. You can now mark the LOWEST POINT on bank 1 and figure how much it needs cut to stick the piston out .003". Mark the lowest point on bank 2 and figure the same.
Now, when the machinist "touches off" that point, he knows how much more to take (assuming he uses the mains to square the block).
When you get the block back, you can mock up that same longest piston/rod in all 4 corners to see where it is in "reality" and then you can shuffle pistons and rods around to best equalize everything.
Save your old main bearings (numbered of course) for post machining mockup. That way after you know for sure whats going where, and all mocking up and testing is complete you can polish up the crank and drop it into fresh bearings.
Obviously, nobody who is paid by how many motors they can get out the door will bother with this level of anal precision,, but when it's yours and only costs some time, pads of paper, and some ink I just think it's worthwhile.
Getting sloppy gets us all in trouble.
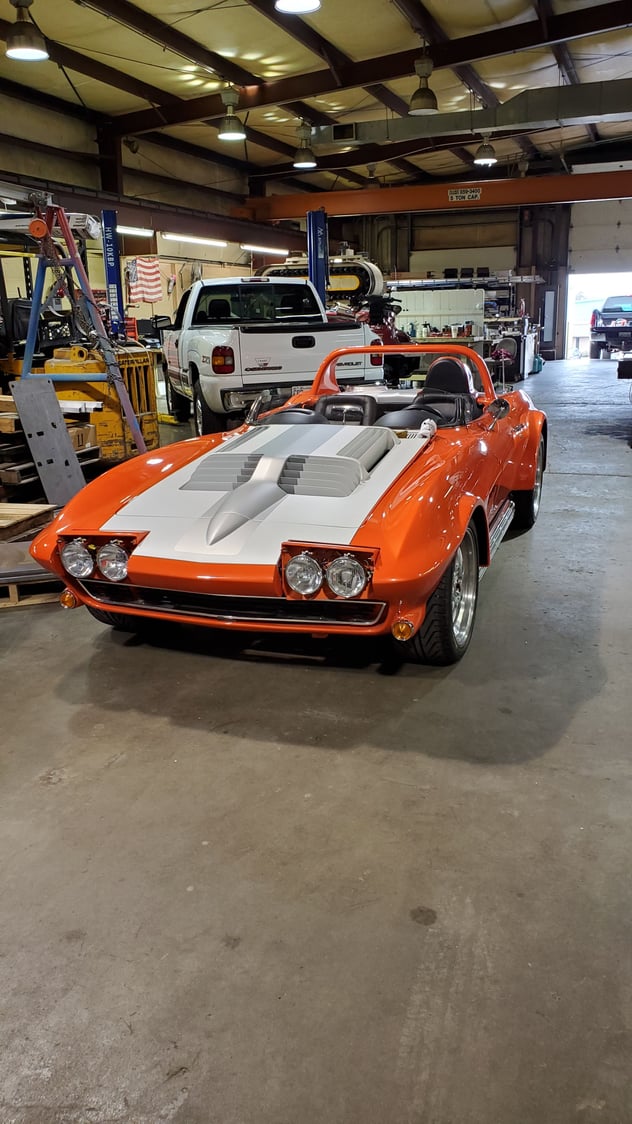
A friend has been building a C2 Grand Sport Corvette. He has been reasonably meticulous in most areas, but he used a friend "who builds race motors" to help with the "rigging" and setup.
It's a GMPP ZZ502 Deluxe (carb to oil pan and distributor). It's a fairly mild, fairly trouble-free, well-sorted crate motor. Shouldn't have any problems with that.
Guess what - "race motor builder" made some recommendations...
Oh, you need roller rockers. Those stamped steel rockers are crap. Oh, and you'll either need valve cover spacers or different valve covers.
A set of Crane gold rockers and a $600 pair of GMPP cast bow tie valve covers and "race guy" was happy. Oh, you're gonna run this on pump gas? Better set max timing at 34 to be safe. Oh. You don't want a big round air filter on this cool motor. Let's put a stubstack on it with no filter.
What was a "ready to run" setup barely idled, smoked out the exhaust, would lean out and start popping at 30-50mph, and used oil like crazy. When hot, there was valvetrain ticking from both sides.
When we got it, the idle screw slots were darn near mauled they had been wrenched on so much.
Here's a list of what we found...
1) #1 plug wire was loose on the plug. Intermittent miss. Easy to find, easy to fix.
2) the pcv valve was stuffedstuffed oversize hole clumsily drilled into the $600 valve covers. Oil was drooling out and down the motor. It was routed to the unsorted vacuum tap on the back of the 850 vacuum sec Holley. There was oil drooling down the back of the carb as well.
Pulled the pcv valve out. Hmm, no baffle. Pulled the valve covers, welded the hole smaller and redrilled it the right size. Made a sheet metal baffle, welded tapped posts to the cover and bolted in the baffle.
3) Marked the rocker nuts where they were. Backed them all off and readjusted to the GM Service Manual recommended 1/8 turn past zero. Some had been a full "flat" (1/6 turn) loose. Hence the valve rattle. Some had been a full flat too tight (which probably wasn't problematic, but noteworthy).
4) welded up a catch tank for the pcv. I like steel wool in them to condense hot oil out of the mist. Catch tank has a drain valve on the bottom.
5) Disassembled and cleaned the carb. It was puking oil. Jetting was verified to be "as delivered", so we felt good about the starting point.
6) the Stubstack left the bowl vents exposed to airflow from the massive hood louvers. We put on a drop base and a K&N with a pleated top we had laying around. Weird fuel mix changes disappeared. We ordered a deeper drop base and a 4"tall filter with full-diameter pleated top (it hasn't arrived yet). The substack went into a box.
7) we put timing tape on the dampener, o2 sensor in the bung, and AEM afr meter in the passenger seat. Initial was 10 degrees. Full advance came in at 4,000 and was 34 degrees. Vacuum advance started in at 7mm, full in at 14. We put lighter springs on the advance, comes in full by 2800 now. Vacuum gage showed the motor liked 18 degrees initial, and that gave us 42 total and 62 with full vacuum.. Couldn't make it spark knock no matter what we did. Ran strong everywhere. Lugged it, stomped it, it liked it. On 91 octane E10.
Put some travel limiters in the mech advance and vacuum pot. Ended up at 16 initial, 38 total, 56 vacuum.
Air fuel was really good. The 2700# car with a 550 ft-lb 502 spent most of its time barely into the transition slots, but mid cruise was around 13.4 so we swapped the 78 primary mains out to 76 and it loved it. Gonna wait for the "permanent" air filter to finish tweaking, but this was a really great setup on the carb the way it came from GM. No need to mess with bleeds or anything. 12.5 WOT, and happy everywhere. The secondaries snap open ultra fast with zero bog anywhere.
Bottom line - the motor came really close to spot-on but "race guy" ditched the "perfectly adequate" stamped rockers and baffled valve covers for "improved parts" and essentially made it barely drivable and spewing oil.
Attention to detail is always helpful.
When people say "don't sweat the small stuff" I'm convinced they don't build and tune motors.
Here's the Vette
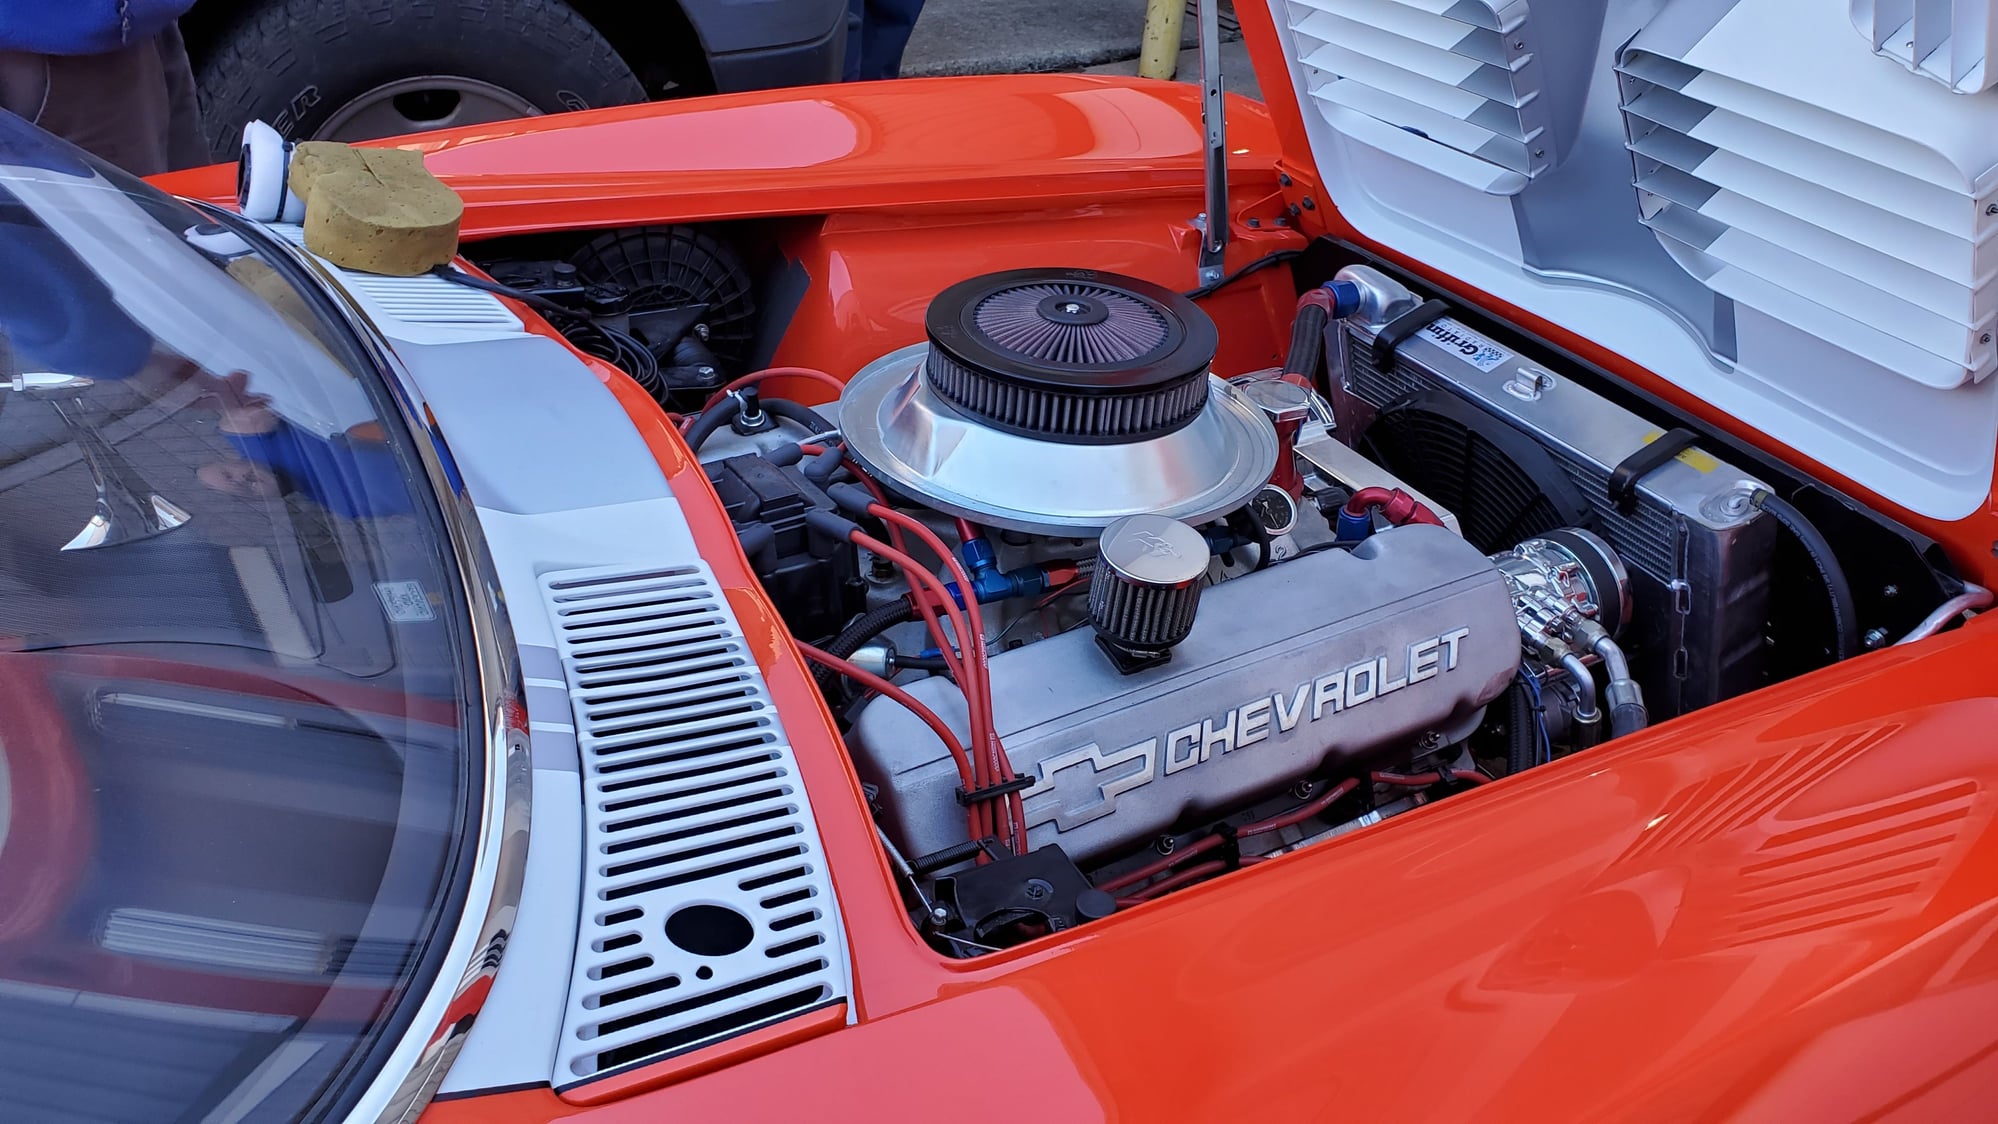

Puke tank
Yes, removing the rings will make it easier to rock the piston. It's not usually necessary to do it "ringless" but since the numbers are weird, it will remove one more source of deviation from the mix.
Rod length deviation from a clumsy job of resizing is expected to account for some deviation. But crooked pistons aren't typical.
But if you are looking for the way to determine BLOCK SQUARENESS, you have to use the SAME piston and rod on all 4 corners. That will show you how SQUARE the block is. You can then note that when you figure out how much to tell the machine shop to cut.
Since you plan to hone and re-ring with new rod bearings, you can mix and match the pistons into different holes if you need to (after final machining).
Here's what I do.
Label all piston/rod 1-8.
I pick a hole that gives me a good spot to anchor the indicator. I try one piston/rod, turn to TDC. Measure the quench pad max/min while rocking. Note the measurements.
Replace with another piston/rod and do the same. All 8.
Now, you can see which one is longest, shortest,, and what the variance is..
Then put longest into all 4 corners and measure. Note the measurements, to figure out block squareness. You can now mark the LOWEST POINT on bank 1 and figure how much it needs cut to stick the piston out .003". Mark the lowest point on bank 2 and figure the same.
Now, when the machinist "touches off" that point, he knows how much more to take (assuming he uses the mains to square the block).
When you get the block back, you can mock up that same longest piston/rod in all 4 corners to see where it is in "reality" and then you can shuffle pistons and rods around to best equalize everything.
Save your old main bearings (numbered of course) for post machining mockup. That way after you know for sure whats going where, and all mocking up and testing is complete you can polish up the crank and drop it into fresh bearings.
Obviously, nobody who is paid by how many motors they can get out the door will bother with this level of anal precision,, but when it's yours and only costs some time, pads of paper, and some ink I just think it's worthwhile.
Getting sloppy gets us all in trouble.
A friend has been building a C2 Grand Sport Corvette. He has been reasonably meticulous in most areas, but he used a friend "who builds race motors" to help with the "rigging" and setup.
It's a GMPP ZZ502 Deluxe (carb to oil pan and distributor). It's a fairly mild, fairly trouble-free, well-sorted crate motor. Shouldn't have any problems with that.
Guess what - "race motor builder" made some recommendations...
Oh, you need roller rockers. Those stamped steel rockers are crap. Oh, and you'll either need valve cover spacers or different valve covers.
A set of Crane gold rockers and a $600 pair of GMPP cast bow tie valve covers and "race guy" was happy. Oh, you're gonna run this on pump gas? Better set max timing at 34 to be safe. Oh. You don't want a big round air filter on this cool motor. Let's put a stubstack on it with no filter.
What was a "ready to run" setup barely idled, smoked out the exhaust, would lean out and start popping at 30-50mph, and used oil like crazy. When hot, there was valvetrain ticking from both sides.
When we got it, the idle screw slots were darn near mauled they had been wrenched on so much.
Here's a list of what we found...
1) #1 plug wire was loose on the plug. Intermittent miss. Easy to find, easy to fix.
2) the pcv valve was stuffedstuffed oversize hole clumsily drilled into the $600 valve covers. Oil was drooling out and down the motor. It was routed to the unsorted vacuum tap on the back of the 850 vacuum sec Holley. There was oil drooling down the back of the carb as well.
Pulled the pcv valve out. Hmm, no baffle. Pulled the valve covers, welded the hole smaller and redrilled it the right size. Made a sheet metal baffle, welded tapped posts to the cover and bolted in the baffle.
3) Marked the rocker nuts where they were. Backed them all off and readjusted to the GM Service Manual recommended 1/8 turn past zero. Some had been a full "flat" (1/6 turn) loose. Hence the valve rattle. Some had been a full flat too tight (which probably wasn't problematic, but noteworthy).
4) welded up a catch tank for the pcv. I like steel wool in them to condense hot oil out of the mist. Catch tank has a drain valve on the bottom.
5) Disassembled and cleaned the carb. It was puking oil. Jetting was verified to be "as delivered", so we felt good about the starting point.
6) the Stubstack left the bowl vents exposed to airflow from the massive hood louvers. We put on a drop base and a K&N with a pleated top we had laying around. Weird fuel mix changes disappeared. We ordered a deeper drop base and a 4"tall filter with full-diameter pleated top (it hasn't arrived yet). The substack went into a box.
7) we put timing tape on the dampener, o2 sensor in the bung, and AEM afr meter in the passenger seat. Initial was 10 degrees. Full advance came in at 4,000 and was 34 degrees. Vacuum advance started in at 7mm, full in at 14. We put lighter springs on the advance, comes in full by 2800 now. Vacuum gage showed the motor liked 18 degrees initial, and that gave us 42 total and 62 with full vacuum.. Couldn't make it spark knock no matter what we did. Ran strong everywhere. Lugged it, stomped it, it liked it. On 91 octane E10.
Put some travel limiters in the mech advance and vacuum pot. Ended up at 16 initial, 38 total, 56 vacuum.
Air fuel was really good. The 2700# car with a 550 ft-lb 502 spent most of its time barely into the transition slots, but mid cruise was around 13.4 so we swapped the 78 primary mains out to 76 and it loved it. Gonna wait for the "permanent" air filter to finish tweaking, but this was a really great setup on the carb the way it came from GM. No need to mess with bleeds or anything. 12.5 WOT, and happy everywhere. The secondaries snap open ultra fast with zero bog anywhere.
Bottom line - the motor came really close to spot-on but "race guy" ditched the "perfectly adequate" stamped rockers and baffled valve covers for "improved parts" and essentially made it barely drivable and spewing oil.
Attention to detail is always helpful.
When people say "don't sweat the small stuff" I'm convinced they don't build and tune motors.
Here's the Vette
Puke tank
02-14-2021 | 09:15 AM
#119
Thread Starter
Registered
Joined: Sep 2020
Posts: 216
Likes: 15
From: Kentucky
Got my assembled short block and heads back today along with arp head bolt kit and gaskets as soon as I get my parts from Tigweldersm (Jeff Wallace) no sign yet but I'm thinking positive thoughts it's only been 3 1/2 months since I sent him 6k but when they all arrive I will begin assembly of the old girl, I have been working on other projects on the boat in mean time like dash
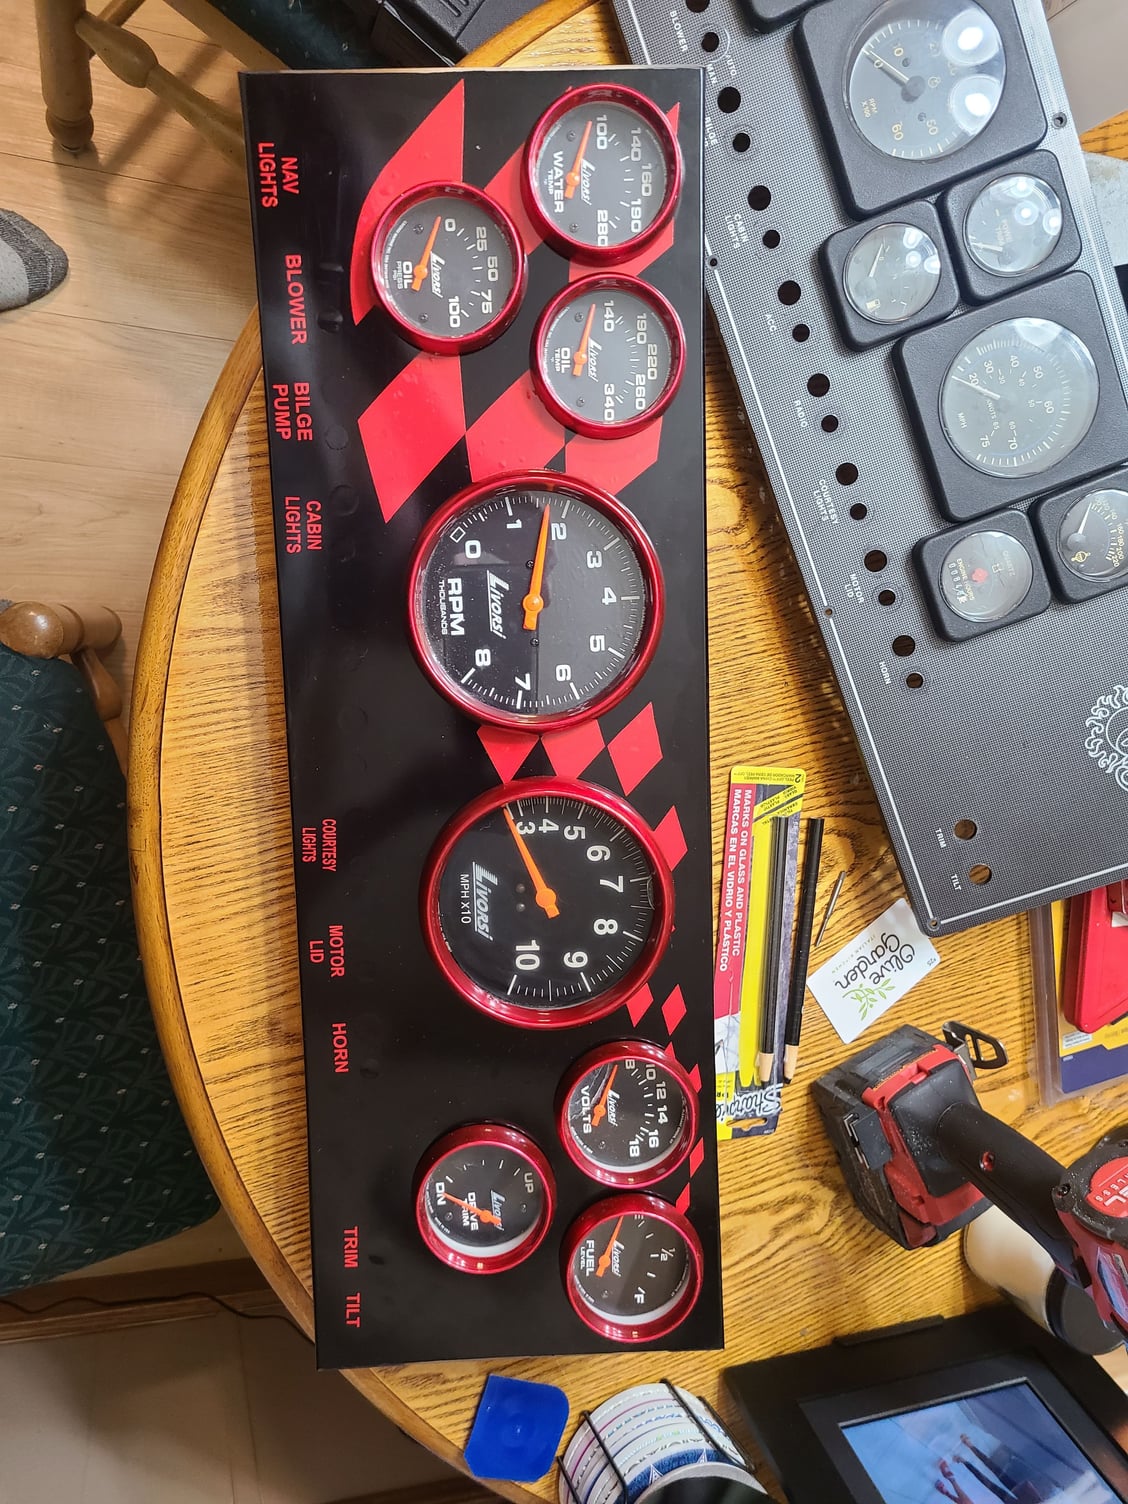
Don't pay attention to the straight letters i have to redo them nothing crazy i made it all myself peice of aluminum some simple measurements a hole saw and some vinyl i don't think it looks to bad
Don't pay attention to the straight letters i have to redo them nothing crazy i made it all myself peice of aluminum some simple measurements a hole saw and some vinyl i don't think it looks to bad
03-01-2021 | 02:49 PM
#120
Thread Starter
Registered
Joined: Sep 2020
Posts: 216
Likes: 15
From: Kentucky
Ok guys back to the build with an 0.39 gasket my cr by using summits cr calculator I'm 9.25 cr any thoughts run what I got get tuned by a professional and hope it stays together ??????????

