


My new project - 86 - 272 LS
 02-26-2012 | 08:37 PM
#31
Thread Starter
Registered
Joined: Jan 2011
Posts: 956
Likes: 2
From: NE Indiana
You will regret spray painting the vinyl and seats! I tried that approach last year with vinyl paint and it was a disaster!!!! Once you start using the boat the paint will crack and peel off leaving the vinyl looking like crap! You will then go into maintenance mode of continually painting it and eventually you will give up and accept the fact that they need to be recovered. It will be embarrasing when you bring people on board too because you will see paint flakes on the floor (get ready to do LOTS of vacuuming).
My advice is to recover them now (especially the seats which will get alot of use and wear). If you decide to wait due to budget I understand but just remember this post once the vinyl paint starts to crack and peel.
My advice is to recover them now (especially the seats which will get alot of use and wear). If you decide to wait due to budget I understand but just remember this post once the vinyl paint starts to crack and peel.
Definately will not be embarrassed by flaking vinyl on this boat. I paid less that $6500 for it on a 30' roller trailer and should be boating in it this summer with new 350 vortecs for $10k to $12k total. Nothing embarrasing about that to the crowd I hang with (Wife and kids!)
Thank you for the heads up though, I am sure many here will like to hear about the results, good or bad and I will share them all.
Brian
 03-01-2012 | 05:05 PM
#32
Thread Starter
Registered
Joined: Jan 2011
Posts: 956
Likes: 2
From: NE Indiana
Good joke, the words boat and budget in the same sentence!
Well, just added it up and I broke the $10,0000 mark on this boat with my latest purchase today. Picked up two very nice looking Alpha drives, two transom assemblies, one set of rams, one trim pump and a stainless steel 19p prop for $800.
So far I have gotten:
Two like new vortec 350's with mercruiser roller cams and the start of a third spare motor.
two nice alpha drives with transom assemblies
Couple of props
Some new vinyl and some touched up vinyl
Some new carpet
materials to redo bulk heads and center stringer.
Oh, and a 1986 - 272 that "needs nothing mechanical - just a good cleaning"
Over half of the extra money is in the motors, where it should be I guess. yeah, budgets......
Still, I will have some extra motor parts to sell before this is all over, so that will help some. Some.....
03-01-2012 | 08:28 PM
#33
Registered
Joined: Jan 2011
Posts: 3,066
Likes: 8
From: Ocala, Fl
Good joke, the words boat and budget in the same sentence!
Well, just added it up and I broke the $10,0000 mark on this boat with my latest purchase today. Picked up two very nice looking Alpha drives, two transom assemblies, one set of rams, one trim pump and a stainless steel 19p prop for $800.
So far I have gotten:
Two like new vortec 350's with mercruiser roller cams and the start of a third spare motor.
two nice alpha drives with transom assemblies
Couple of props
Some new vinyl and some touched up vinyl
Some new carpet
materials to redo bulk heads and center stringer.
Oh, and a 1986 - 272 that "needs nothing mechanical - just a good cleaning"
Over half of the extra money is in the motors, where it should be I guess. yeah, budgets......
Still, I will have some extra motor parts to sell before this is all over, so that will help some. Some.....
Well, just added it up and I broke the $10,0000 mark on this boat with my latest purchase today. Picked up two very nice looking Alpha drives, two transom assemblies, one set of rams, one trim pump and a stainless steel 19p prop for $800.
So far I have gotten:
Two like new vortec 350's with mercruiser roller cams and the start of a third spare motor.
two nice alpha drives with transom assemblies
Couple of props
Some new vinyl and some touched up vinyl
Some new carpet
materials to redo bulk heads and center stringer.
Oh, and a 1986 - 272 that "needs nothing mechanical - just a good cleaning"
Over half of the extra money is in the motors, where it should be I guess. yeah, budgets......
Still, I will have some extra motor parts to sell before this is all over, so that will help some. Some.....
Boat and Trailer $3500
2:NEW Vortec 355 $4500
2: Bravo T/A's A~Z $1800 (50 hours of fresh water use)
1: NEW Trailer $4000
2: McLeod Bolsters $1000
Total to Date $14800
Budgeted remaining as follows:
2:Used Bravo I drives $2000~2500
Cooling and exhaust $1500~2000
Upholstery $1000~1500
Misc $1000
Total Estimate
Remaining/Complete $5500~6000
Grand Total $20,300~$20,800
My original goal was to build a reliable, sea worthy, high performance classic cruiser that will give me 5 years+ of service boating year round in South Florida, Florida Keys and The Bahamas. My original budget was $20K~$25K.
I still have electronics to purchase and install and I have already gotten a years use from the boat....plus I figure I can get $1500~$2000 for the old engines, transom assemblies and drives.
I think I'm on track and I am having fun.
I especially enjoy comparing notes with you guys and learning from your experiences...Great Forum!!
Last edited by sprink58; 03-01-2012 at 08:33 PM.
03-14-2012 | 08:15 AM
#34
Thread Starter
Registered
Joined: Jan 2011
Posts: 956
Likes: 2
From: NE Indiana
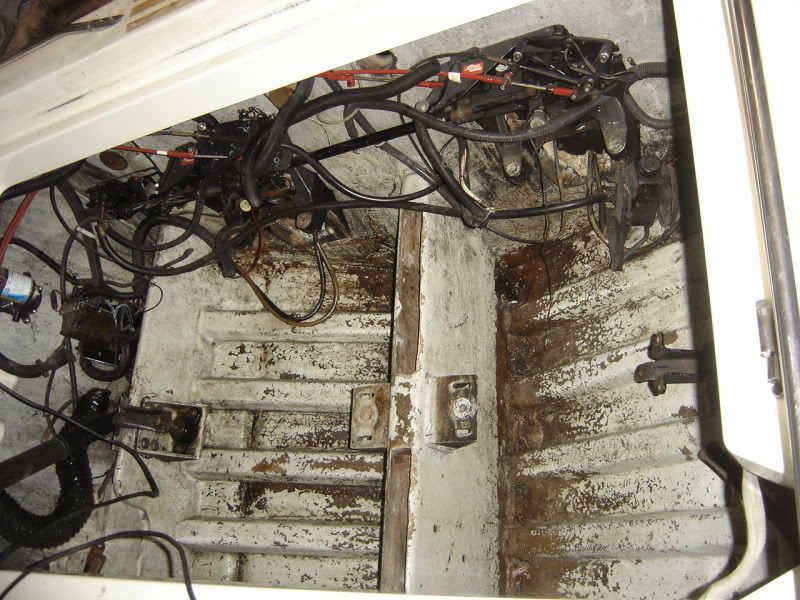
Center stringer repair project. So, when I bought this boat, the center stringer sounded pretty solid so I had high hopes. Well, once the motors were out and I got into it further, it did not sound so solid. Drilled a couple of test holes and it didn�t go well. Half way up the stringer, a �� bit went through the fiberglass and then it just plunged into the other side. From the top, it went into about 1� of solid wood and then hit mushy wood. Not good, so I decided to replace it. Now, I did not want to remove the fiberglass and have to reposition the engine mounts, so I decided I would do a poured stringer replacement. I have read some favorable reviews so I started doing some research and started on the stringer.
The center stringer is 48� long, 18� high and I found out 3� thick of wood. I cut two rectangular holes in the top of the stringer, one each in front and behind the motor mounts, about 2.5� wide x 12� long. From these holes I started to clean out all the wood. What I found really surprised me. Unless my Formula was unique, I bet all the ones built this way are very wet and starting to rot. There is an opening against the keel at the two ends of the stringer allowing water to flow from one side to the other. It also allows it to flow through the stinger! The stringer was constructed of two pieces of �� ply separated by a 2x2 on the bottom and a 2x6 (maybe, hard to tell the way I removed it) on the top. The remainder of the middle was left wide open. Over 1.5� of water in the bilge and it freely flowed into the stringer soaking up the two pieces of plywood on either side.
Now the interesting part is the transom wood about 9� up from the keel is also exposed in the middle where the stringer is, but the stringer wood did not go all the way to the transom. I think the top piece might of, that is how it would have been held in place while glassing, but you can see there was about �� gap between the plywood and transom due to the stringer glass being pushed in-between them. I believe this is the only thing that saved my transom as it is really dry. A bit of moisture in the outer layer where the center stringer was, but the drain plug hole, exhaust holes and drive holes are all dry and solid! The front bulk head is also in pretty good shape in the middle even though it is rotted out right in front of each engine where the cockpit water would drain out and the wood was left unprotected. Different post topic there though.
Center stringer with access holes cut in top emptied of old wood.
03-14-2012 | 08:20 AM
#35
Thread Starter
Registered
Joined: Jan 2011
Posts: 956
Likes: 2
From: NE Indiana
I bought this boat in the fall of 2011 and it was last registered in New York in 2009. Boat came from Long Island, so salt water which could have also been a blessing with the wood. Some of the center stringer wood came out easy, some of it came out really hard. I mean really hard, but it was all sopping wet so I removed it all. Then I put a dehumidifier in the engine compartment (scrubbed to remove any traces of fuel vapors) and let it pull moisture out for about 6 weeks. It seemed to work even though this was more for the bulk head which will be covered later.
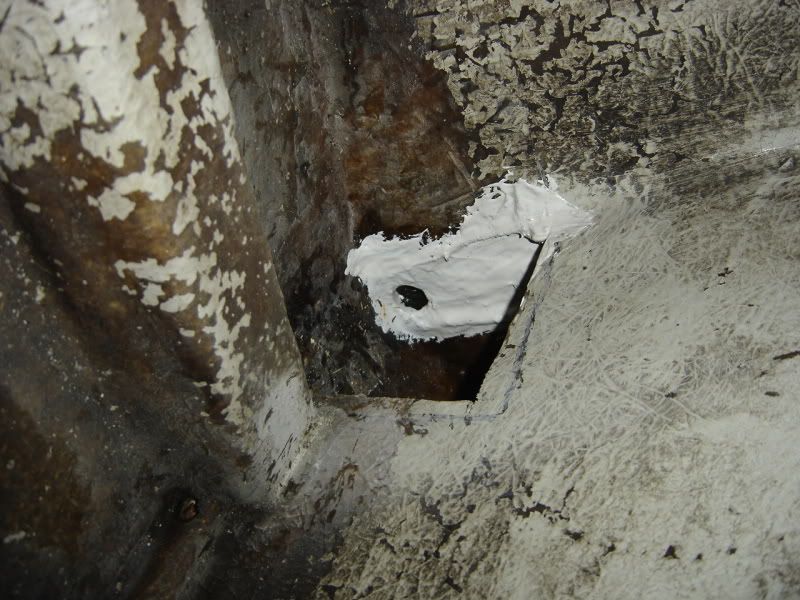
The other place that concerned me was the drain plug area, so I pealed back some of the glass where it covered the wood there and left it open also just incase. I then scrubbed and wire brushed out the drain hole and cleaned it well. Once I was sure it was dry (not sure if was ever wet there actually), I epoxied the wood in the drain hole and the center of the transom up into the stringer. I glassed over the middle of the transom up past the point where the new poured stringer would cover. Once cured, I brushed on a nice thick layer of epoxy surface coat. I also trimmed the center stringer openings to a nice uniform opening of 6� tall x 5.5� long, front and back. It was at this point that the old glass got solid and I did not want to remove anymore, everything I had removed was very thin and did not lend any strength. The other thing I did was drill several �� holes about a �� into the transom and about �� into the front bulk head. I figured this would allow a very solid bite for the poured transom to lock into the bulk head and transom. .
The next thing I needed to take care of was the open ends of the stringer so I could seal them up for pouring. I laid up the pieces of 90 degree fiberglass and trimmed them to 3� wide so they could be glassed into the bottom of the stringer. At this point I used a thickened mixture of resin to secure the stinger end caps I made into place sealing it up. I also patched the couple of holes in the stringer side from where I had drilled my original test holes. Everything was now cleaned out and dry, ready to go. At this point it was awhile before I actually poured the stringer due to the work I was also doing on the engine room bulk head.
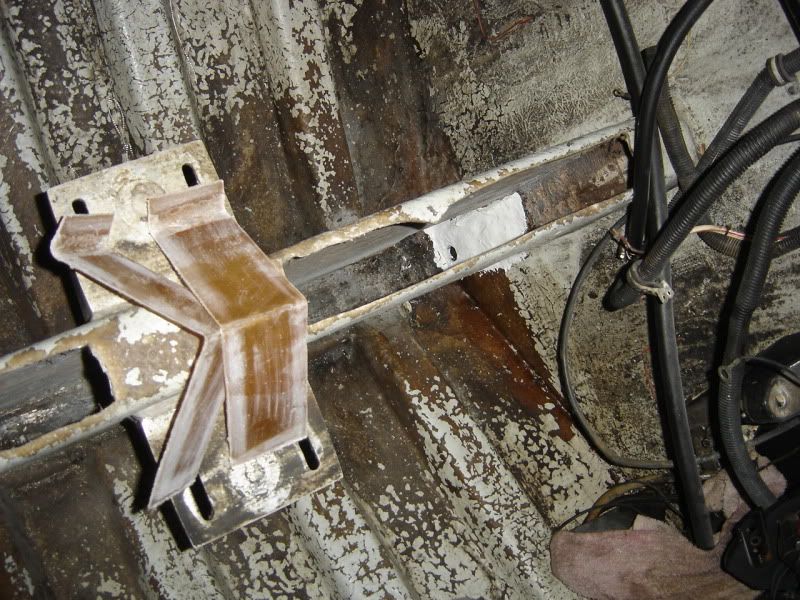
Drain plug hole in transom glassed and coated over
End openings capped off, behind and underneath this part is the drain plug
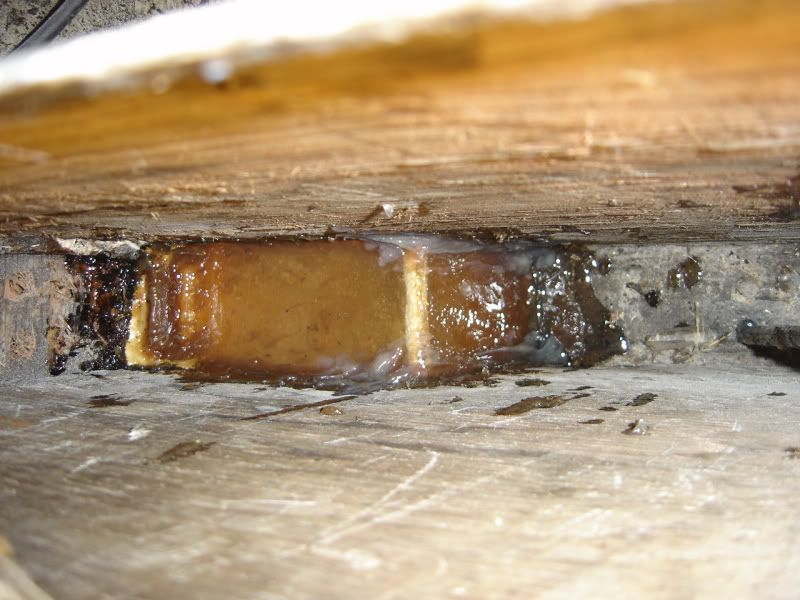
The other place that concerned me was the drain plug area, so I pealed back some of the glass where it covered the wood there and left it open also just incase. I then scrubbed and wire brushed out the drain hole and cleaned it well. Once I was sure it was dry (not sure if was ever wet there actually), I epoxied the wood in the drain hole and the center of the transom up into the stringer. I glassed over the middle of the transom up past the point where the new poured stringer would cover. Once cured, I brushed on a nice thick layer of epoxy surface coat. I also trimmed the center stringer openings to a nice uniform opening of 6� tall x 5.5� long, front and back. It was at this point that the old glass got solid and I did not want to remove anymore, everything I had removed was very thin and did not lend any strength. The other thing I did was drill several �� holes about a �� into the transom and about �� into the front bulk head. I figured this would allow a very solid bite for the poured transom to lock into the bulk head and transom. .
The next thing I needed to take care of was the open ends of the stringer so I could seal them up for pouring. I laid up the pieces of 90 degree fiberglass and trimmed them to 3� wide so they could be glassed into the bottom of the stringer. At this point I used a thickened mixture of resin to secure the stinger end caps I made into place sealing it up. I also patched the couple of holes in the stringer side from where I had drilled my original test holes. Everything was now cleaned out and dry, ready to go. At this point it was awhile before I actually poured the stringer due to the work I was also doing on the engine room bulk head.
Drain plug hole in transom glassed and coated over
End openings capped off, behind and underneath this part is the drain plug
03-14-2012 | 08:23 AM
#36
Thread Starter
Registered
Joined: Jan 2011
Posts: 956
Likes: 2
From: NE Indiana
The pourable mixture I used is a 3M product called Nida-bond pourable transom repair. I purchased 3 � 5 gallon pails for $367 delivered from apdmro.com which would give me enough for the stringer, the engine compartment bulkhead and a few gallons left over for any other work. (Note: Nida-bond came without MEKP hardener, but I had plenty from my other composite projects in the past, but 1-2% is needed.) I mixed up the Nida-Bond per the instructions and poured it into the cavity. Once full, I floated the original two pieces of fiberglass that I cut out back into their original holes sealing everything back up better than new. Once everything was set up, I continued on the bulk head repair project before going back to the cleaning project to paint the bilge and start on replacing the worn transom assembly with the newer replacement I had purchased. It is nice to be at a point that I am no longer tearing it apart, but starting to put it together.
I was worried about the strength of the new stringer, but after seeing how the stringer was originally built and what I am doing, this is going to be way stronger. Didn�t run any finite element analysis on it, but my engineering background made it pretty easy to see the improvements over a hollow stringer that was only tabbed into the transom and bulkhead. If that worked for the last 25 years, this would be stronger and never rot. I am sure there will be some who will question the poured stringer or if it was worth the cost, but I am rather happy with it and very impressed
Would I do another pour like this? I think I would. Of course now with my experience of tearing it apart and seeing how it was put together, I really wouldn�t hesitate to cut one out and just replace it with a new wood one. The old one lasted 25 years and I could have built a solid one out of wood for cheaper and probably faster, but the Nida-bond project wasn�t too bad.
Not much to show, the duct tape is still on from holding the cut out glass pieces on while the Nida-bond cured.
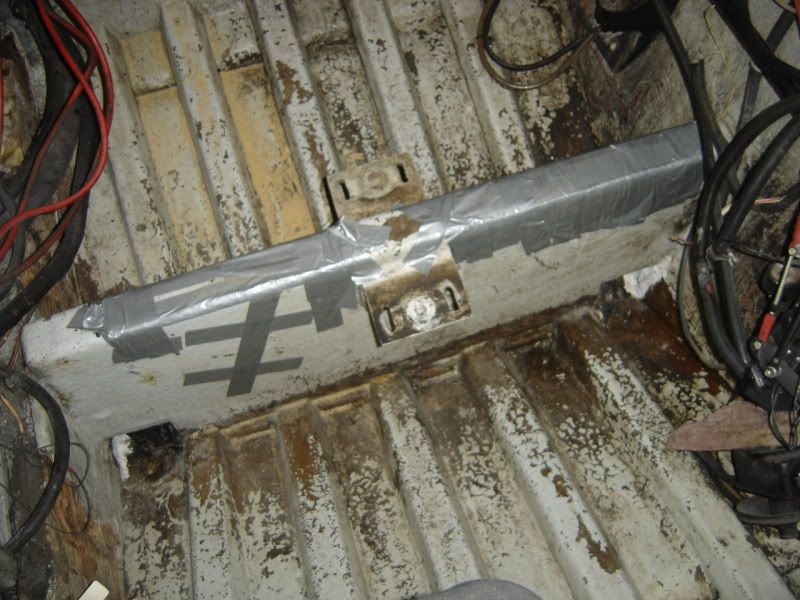
03-14-2012 | 08:26 AM
#37
Thread Starter
Registered
Joined: Jan 2011
Posts: 956
Likes: 2
From: NE Indiana
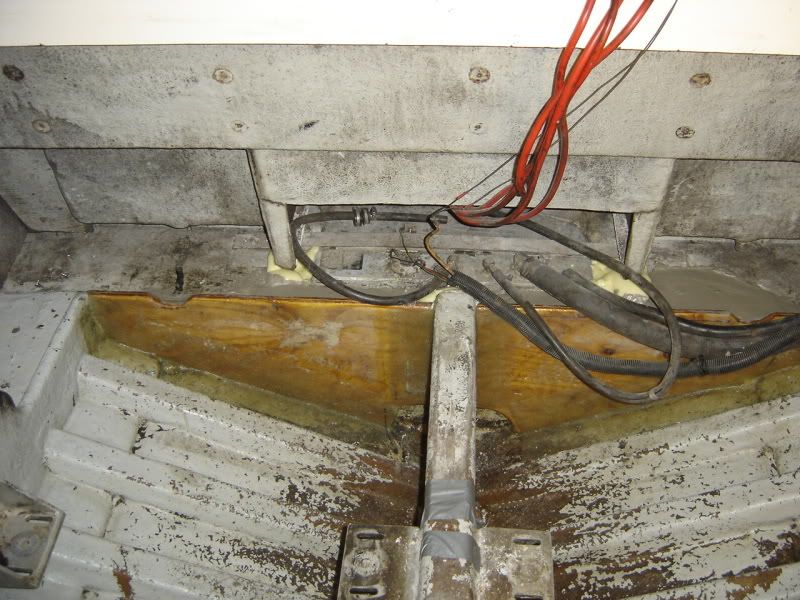
The bulkhead on this 272 was the one project I knew going into it I had to do. I have personally seen some on boats I looked at as well as have read several people post about the bulk heads in their 272�s and 311�s from this era that had problems with rot. It seems Formula did not seal the bulk head well. It is glassed in all around the edge and to the center stringer, but the middle part on each side was left open and only painted. On mine, this became a problem from the cockpit drains on either side dripping down onto this piece of wood. Both pieces were rather wet and rotted in this area. I started chipping this wood out until it got to solid wood. It was still somewhat moist, but it was not rotten or falling apart. Wet, but just was not going to come out. In the pictures you can see the sections where it has been removed exposing the glass and foam behind it. I really would have thought that a company like formula would have fully wrapped all the wood in the boat, but nope! The other problem that I ran into was with how they constructed the wood reinforcement before glassing. The stringers going forward under the cockpit were butted up against the bulk head and nailed in before glassing. This exposed the end grain of the stringers to the engine bulk head giving water a nice path. If this was not bad enough, they put a 2x2 in the corner of the joint and nailed them together. This piece of wood was very wet, sucking water out of the plywood bulk head and transferring it to the stringer quite well. If your bulk head was wet, I would really look at the end of the stringers where they meet the bulk head. I think they almost have to be wet.
To fix this, as mentioned I removed the wet rotted wood of the bulk head in this area. This exposed the 2x2 joiner which popped out rather easily exposing the end of the stringer going forward. This is a bit harder as you can not get to this stringer without separating the deck and hull, or removing the gas tank and attacking it that way (this is my plan next winter). For now what I did was remove the end of the wood that was rotted on the end until it got to strong wood in the stringer. Very wet, but strong. I then used an 18� long �� spade drill bit to eat away the foam on the outboard side of the stringer and vacuumed it out. This formed a nice hollow alongside the stringer and exposed some of the wood. At this point the boat sat for the six weeks with the dehumidifier going in it as mentioned in the center stringer repair section pulling any water out of the boat that I could. I realized I would not be able to dry the stringer out, but that was not my intention. I wanted to dry any wood out as much as possible around it and then isolate it as much as possible so water would not seep back.
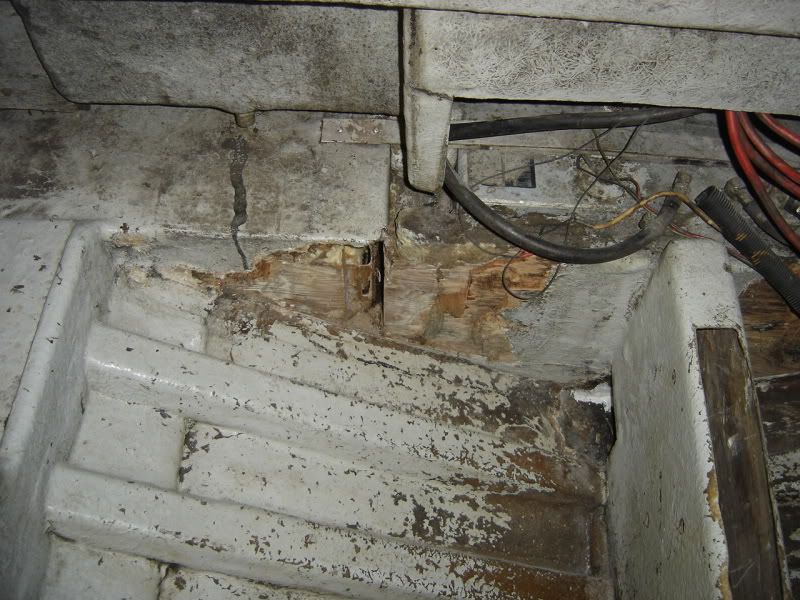
To fix this, as mentioned I removed the wet rotted wood of the bulk head in this area. This exposed the 2x2 joiner which popped out rather easily exposing the end of the stringer going forward. This is a bit harder as you can not get to this stringer without separating the deck and hull, or removing the gas tank and attacking it that way (this is my plan next winter). For now what I did was remove the end of the wood that was rotted on the end until it got to strong wood in the stringer. Very wet, but strong. I then used an 18� long �� spade drill bit to eat away the foam on the outboard side of the stringer and vacuumed it out. This formed a nice hollow alongside the stringer and exposed some of the wood. At this point the boat sat for the six weeks with the dehumidifier going in it as mentioned in the center stringer repair section pulling any water out of the boat that I could. I realized I would not be able to dry the stringer out, but that was not my intention. I wanted to dry any wood out as much as possible around it and then isolate it as much as possible so water would not seep back.
03-14-2012 | 08:32 AM
#38
Thread Starter
Registered
Joined: Jan 2011
Posts: 956
Likes: 2
From: NE Indiana
I made up two new bulk heads for each side of the center stringer from �� plywood. These have been wrapped in fiberglass also sealing them from the outside air and water as well as from any other wood they but up against. Normally I would not do this, splitting a bulk head, but the old bulk head is still solid for about 24� in the middle and these two new halves will be bonded to the old one. The new ones will also butt up against the new poured middle stringer which will be solid right up to the old bulk head. The new bulk heads will also be tabbed into the hull and the outer and center stringers. Installing the new bulk heads this way will leave a small gap in front of it where the parts of the old bulk head were removed. This cavity will be poured with Nida-bond as well bonding the new bulk heads to the old bulk heads, filling in the voids and flowing up along the old forward stringers for 18�. The old forward stringers will be isolated by the Nida-bond from any new wood so water cannot travel back.
This whole process will take my solid dry transom and further seal it from water intrusion while keying it to a new stronger center stringer. The old outer stringers are strong and these are then all keyed to the new reinforced bulk head with the new resin stinger �fingers� going forward a little bit under the cockpit. I feel really good about how strong the rear 5� assembly of this boat is now. As I am completely redoing the front cabin to include the bulk head in front of the gas tank, the two cockpit stringers along the gas tank are the only two items that cause me any concern. They are not rotted, but are very wet so they will need to be replaced. I plan on removing the gas tank and all the foam to get to these stringers in the future. I feel these have been wet for years and the boat was used then and shows no signs of stress on the hull so I am not overly concerned on the time line for getting them done. I may do it next winter when I have time to open it up and let it dry for 2 or 3 months before putting in new wood. I am only going to do this once to this boat so it has to be right!
It was much more of a project than I originally intended, but it has been a fun experience. If we like this hobby and want a larger boat, I am considering looking for a larger project boat like a 311 formula or 31 Thunder Scarab and doing a complete restore starting with separating the deck from the hull. We will see, I had better get this one going first.
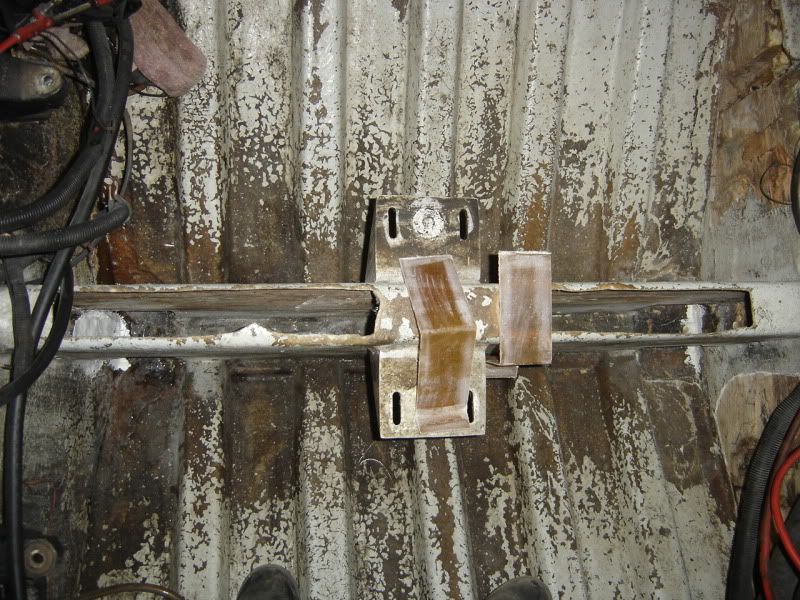
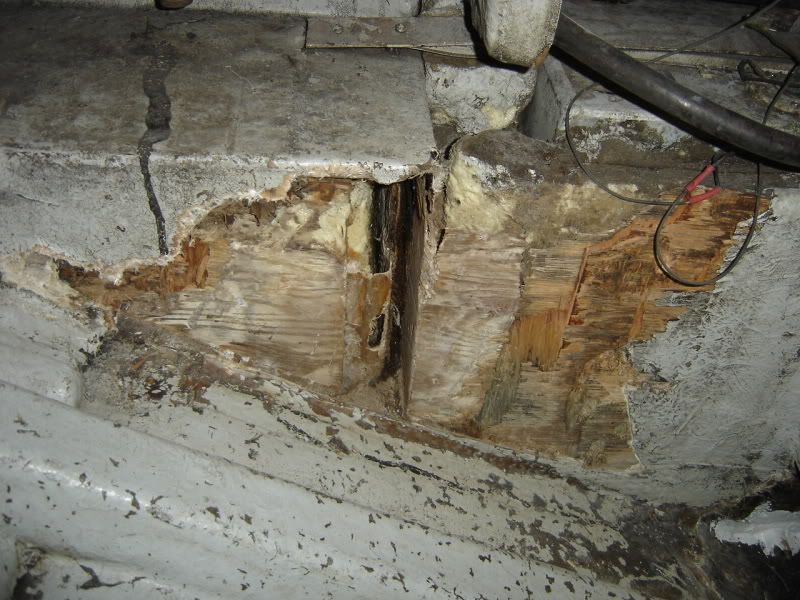
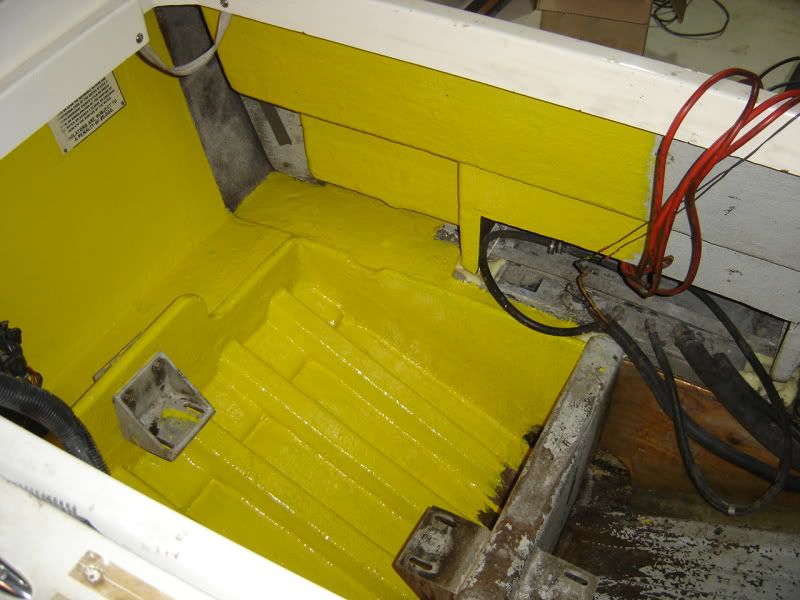
Lots of cleaning in the bilge with degreaser and scrubbing. Sanding and wiping with solvents but it is getting clean. enough so that I could throw the first coat of paint on it, decided to go a bit "wilder" and use yellow oil based enamel with the hardener added to it. It is BRIGHT!
New bulk head pieces wrapped in glass
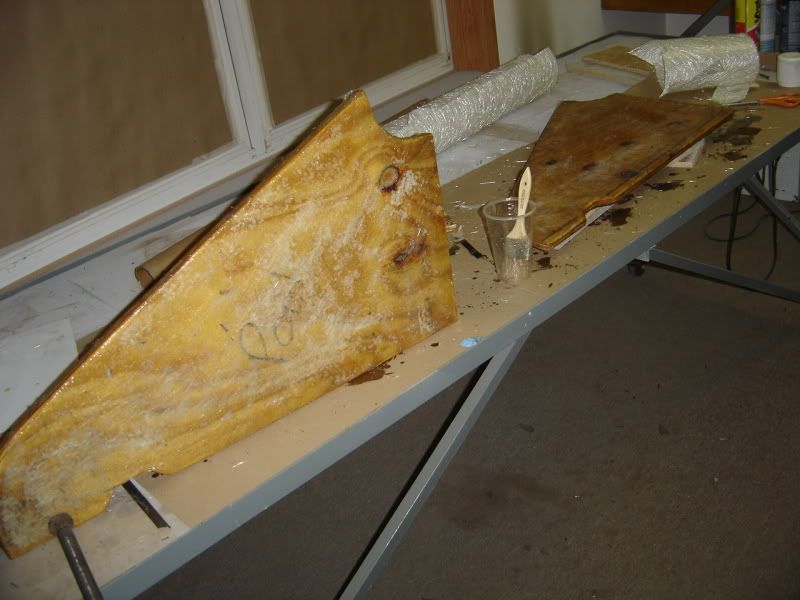
Pieces glassed in. The grey stuff that looks like concrete is the Nida-bond after it had been poured in and set up.
First coat of paint
This whole process will take my solid dry transom and further seal it from water intrusion while keying it to a new stronger center stringer. The old outer stringers are strong and these are then all keyed to the new reinforced bulk head with the new resin stinger �fingers� going forward a little bit under the cockpit. I feel really good about how strong the rear 5� assembly of this boat is now. As I am completely redoing the front cabin to include the bulk head in front of the gas tank, the two cockpit stringers along the gas tank are the only two items that cause me any concern. They are not rotted, but are very wet so they will need to be replaced. I plan on removing the gas tank and all the foam to get to these stringers in the future. I feel these have been wet for years and the boat was used then and shows no signs of stress on the hull so I am not overly concerned on the time line for getting them done. I may do it next winter when I have time to open it up and let it dry for 2 or 3 months before putting in new wood. I am only going to do this once to this boat so it has to be right!
It was much more of a project than I originally intended, but it has been a fun experience. If we like this hobby and want a larger boat, I am considering looking for a larger project boat like a 311 formula or 31 Thunder Scarab and doing a complete restore starting with separating the deck from the hull. We will see, I had better get this one going first.
Lots of cleaning in the bilge with degreaser and scrubbing. Sanding and wiping with solvents but it is getting clean. enough so that I could throw the first coat of paint on it, decided to go a bit "wilder" and use yellow oil based enamel with the hardener added to it. It is BRIGHT!
New bulk head pieces wrapped in glass
Pieces glassed in. The grey stuff that looks like concrete is the Nida-bond after it had been poured in and set up.
First coat of paint
03-14-2012 | 08:48 PM
#40
Thread Starter
Registered
Joined: Jan 2011
Posts: 956
Likes: 2
From: NE Indiana
I am going to remove the gas tank next winter to reinforce/replace the stringers that run along it as they are the last thing to be fixed, replaced or strengthened.
thank you for the heads up though!
Brian

