

1990 454 mag lost power

 10-24-2022 | 04:06 PM
#52
Thread Starter
Registered

Joined: Jul 2018
Posts: 156
Likes: 9
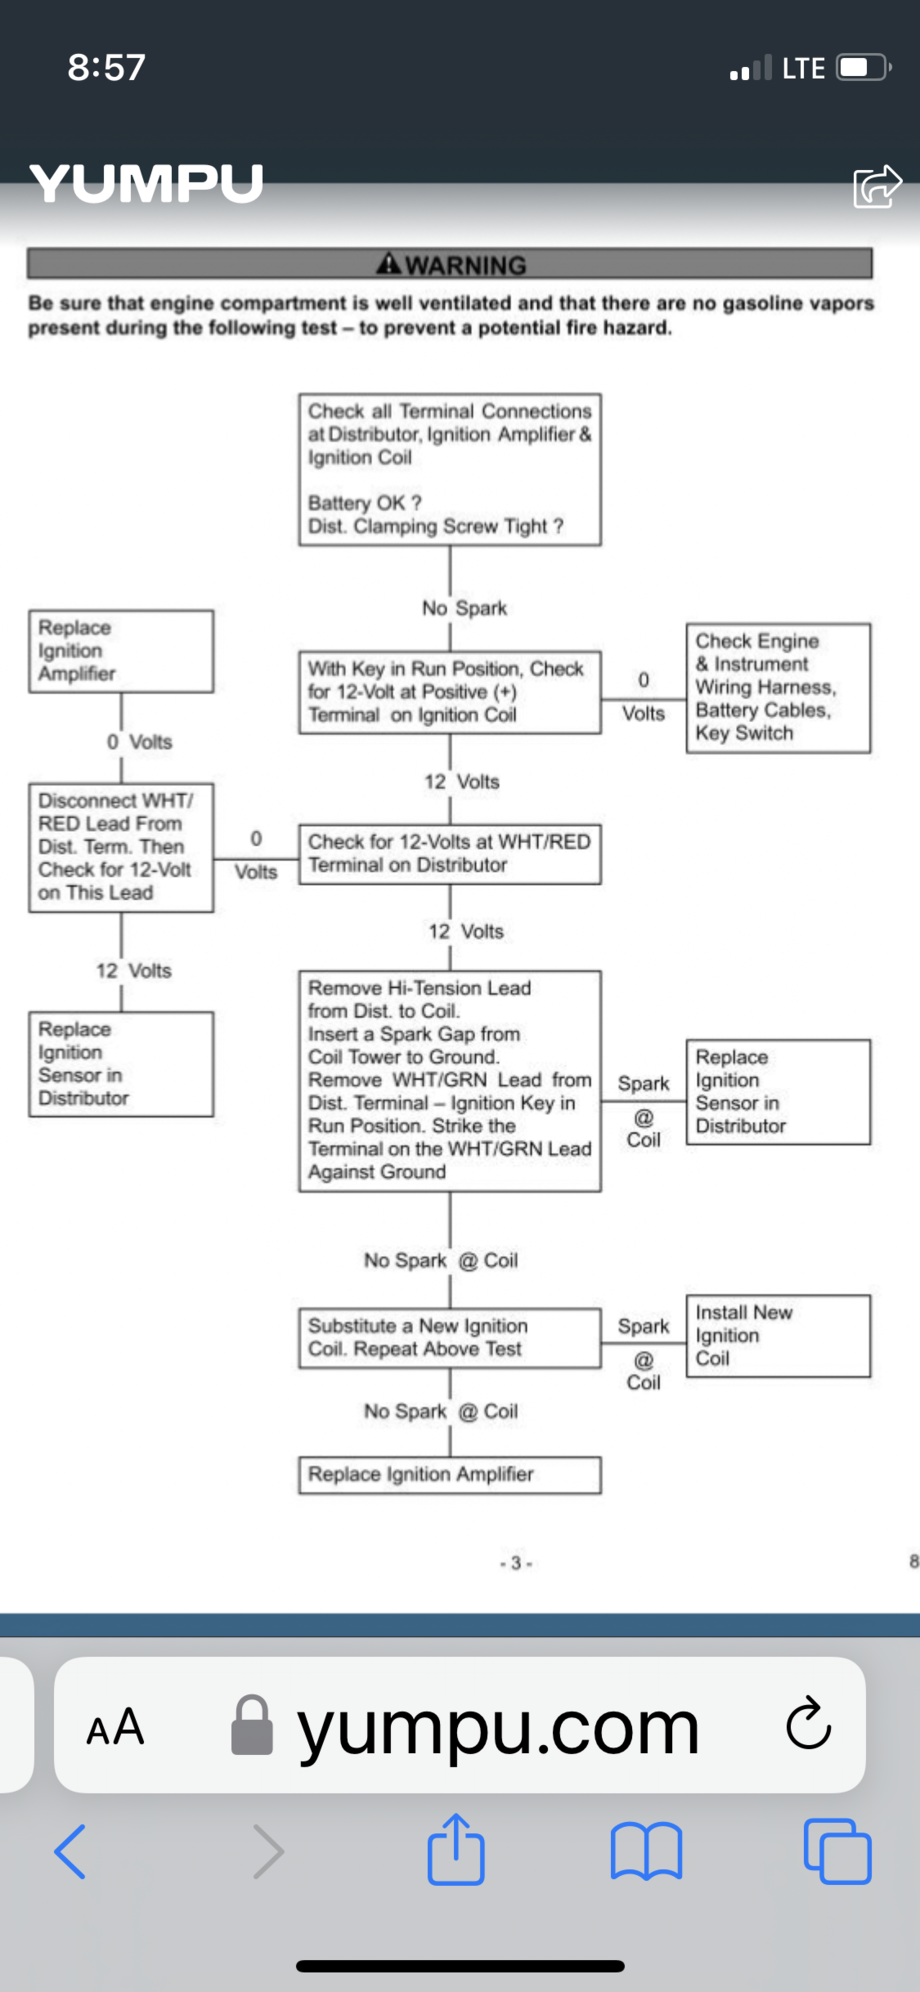
So, this is typical comments with suggested diagnostics:
�if there is No voltage present at white/red wire, disconnect the white/red wire and check it again for 12 volts. If 12 volts is present, replace the ignition sensor inside the dist. cap. If no 12 volts present w/it disconnected--ignition amplifier is faulty and must be replaced.�
I have not run into a low volt issue with distributor sensors, just zero volts. Fyi: i�ve only run into three bad dist sensors, so i don�t have much good data on readings with failed units.
10-24-2022 | 09:58 PM
#53
Charter Member # 55

Joined: Oct 2000
Posts: 20,273
Likes: 2,514
From: Omaha/LOTO
10-24-2022 | 10:05 PM
#54
Thread Starter
Registered
Joined: Jul 2018
Posts: 156
Likes: 9
Yeah, that was basically my next question. I�ve only replaced a few things on my boat like the trim solenoids, water pump impeller, and spark plugs. Nothing in the distributor. I�ll order both. I�m definitely learning.
10-25-2022 | 05:58 PM
#55
Registered

Joined: Nov 2004
Posts: 14,155
Likes: 3,714
From: On A Dirt Floor
Yeh, sounds like sensor.
I�m working on a boat tomorrow with two small blocks and tbiv distributors. One has original distributor sensor and the other the new style. Both motors run great. I�ll check voltage on white / red both ways (connected and not connected) with key on run. Both engines. Anything else ? Last boat i need to winterize, so this will be last chance for me to check something till next late spring.
I�m working on a boat tomorrow with two small blocks and tbiv distributors. One has original distributor sensor and the other the new style. Both motors run great. I�ll check voltage on white / red both ways (connected and not connected) with key on run. Both engines. Anything else ? Last boat i need to winterize, so this will be last chance for me to check something till next late spring.
Last edited by SB; 10-25-2022 at 06:08 PM.
10-26-2022 | 05:39 PM
#56
Registered
Joined: Nov 2004
Posts: 14,155
Likes: 3,714
From: On A Dirt Floor
Okay, one motor 11.8 on the white/red hooked up and disconnected. Battery on it�s terminals was 12.4
0ther motor 12.2 on the white/red hooked up and disconnected. Battery on it�s terminals was 12.6.
0ther motor 12.2 on the white/red hooked up and disconnected. Battery on it�s terminals was 12.6.
Last edited by SB; 10-26-2022 at 05:42 PM.
10-28-2022 | 04:34 PM
#58
Thread Starter
Registered
Joined: Jul 2018
Posts: 156
Likes: 9
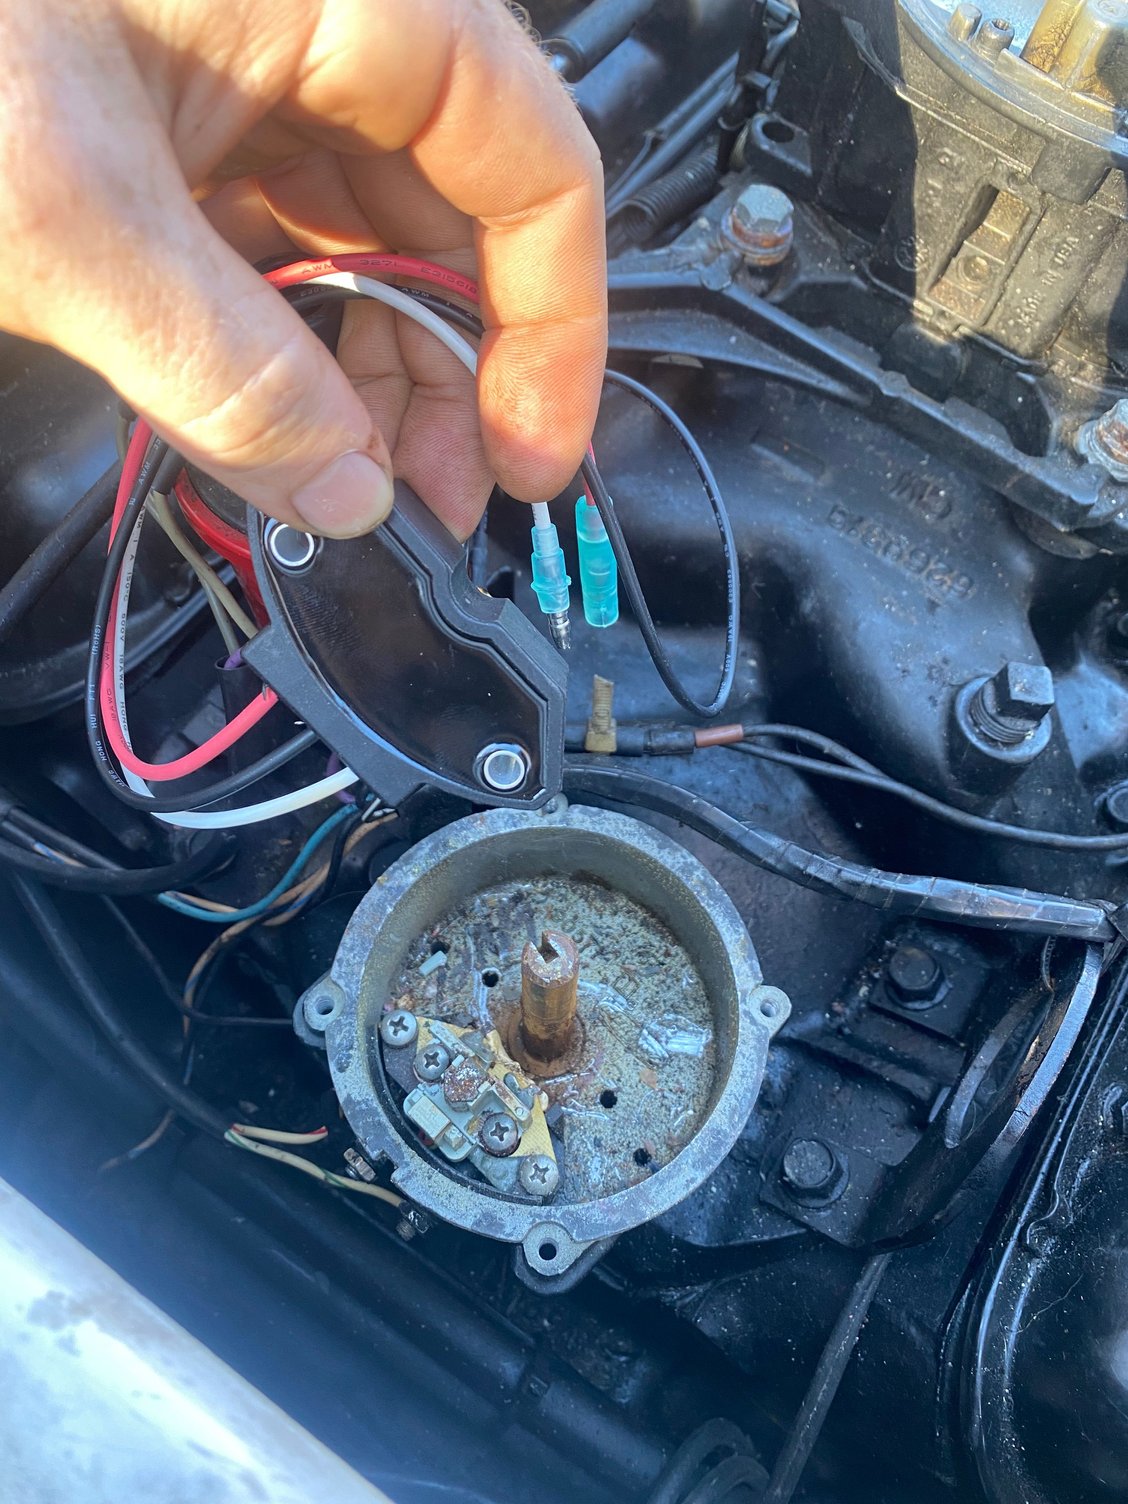
Just waiting on parts to come in. But the rotor, you basically just destroy it to get it off? I�ll replace it Sunday if my parts get here tomorrow. Planned on Saturday but my work decided to force me in. The sensor came in today but waiting on cap and rotor.
10-29-2022 | 08:48 AM
#59
Registered
Joined: Nov 2004
Posts: 14,155
Likes: 3,714
From: On A Dirt Floor
For rotor/cap Follow instructions here:
http://download.brunswick-marine.com...8613281_4b.pdf
I will add:
1) with rotor off, lightly sand top, top 2� of side, and in groove of distributor shaft the rotor goes into. The ritor is very tight fitting. 3m pad is fine too. Blow out debris that falls from sanding.
2) You do not have to apply the blue loctite to top of dist shaft groove. If you do, put light amt grease around shaft where it enters dist body. This will keep any loctite from entering there.
3) when you push rotor down, do not push on unsupported parts of the reluctor wheel. This wheel is the shiny metal round part of rotor with square �teeth�. Deforming the reluctor wheel will cause it to hit the dist sensor as it passes thru it while rotating when engine runs.
4) The 2 large bladed screw driver trick to removing rotor works well. When the rotor gets high rnough the screw drivers no longer reach, place another one under them to take up the distance.
5) If you have tough time and need to take a break, i�m sure utube has decent videos on it.
edit in 6) very important. Dist cap screws, sometimes they fall out when removing and they�ll fall where you probably can�t see or reach them. They are nit standard screws you can get anywhere but merc deslers. So, remove each one and put somewhere they won�t fall.
When you reinstall screws put dab of grease in end of them or spray threads with wd40 or other lube . Sometimes they corrode to the distributor body and make your next cap removal alot more interesting.
Last edited by SB; 10-29-2022 at 08:53 AM.
10-29-2022 | 02:03 PM
#60
Thread Starter
Registered
Joined: Jul 2018
Posts: 156
Likes: 9
For rotor/cap Follow instructions here:
http://download.brunswick-marine.com...8613281_4b.pdf
I will add:
1) with rotor off, lightly sand top, top 2� of side, and in groove of distributor shaft the rotor goes into. The ritor is very tight fitting. 3m pad is fine too. Blow out debris that falls from sanding.
2) You do not have to apply the blue loctite to top of dist shaft groove. If you do, put light amt grease around shaft where it enters dist body. This will keep any loctite from entering there.
3) when you push rotor down, do not push on unsupported parts of the reluctor wheel. This wheel is the shiny metal round part of rotor with square �teeth�. Deforming the reluctor wheel will cause it to hit the dist sensor as it passes thru it while rotating when engine runs.
4) The 2 large bladed screw driver trick to removing rotor works well. When the rotor gets high rnough the screw drivers no longer reach, place another one under them to take up the distance.
5) If you have tough time and need to take a break, i�m sure utube has decent videos on it.
edit in 6) very important. Dist cap screws, sometimes they fall out when removing and they�ll fall where you probably can�t see or reach them. They are nit standard screws you can get anywhere but merc deslers. So, remove each one and put somewhere they won�t fall.
When you reinstall screws put dab of grease in end of them or spray threads with wd40 or other lube . Sometimes they corrode to the distributor body and make your next cap removal alot more interesting.
http://download.brunswick-marine.com...8613281_4b.pdf
I will add:
1) with rotor off, lightly sand top, top 2� of side, and in groove of distributor shaft the rotor goes into. The ritor is very tight fitting. 3m pad is fine too. Blow out debris that falls from sanding.
2) You do not have to apply the blue loctite to top of dist shaft groove. If you do, put light amt grease around shaft where it enters dist body. This will keep any loctite from entering there.
3) when you push rotor down, do not push on unsupported parts of the reluctor wheel. This wheel is the shiny metal round part of rotor with square �teeth�. Deforming the reluctor wheel will cause it to hit the dist sensor as it passes thru it while rotating when engine runs.
4) The 2 large bladed screw driver trick to removing rotor works well. When the rotor gets high rnough the screw drivers no longer reach, place another one under them to take up the distance.
5) If you have tough time and need to take a break, i�m sure utube has decent videos on it.
edit in 6) very important. Dist cap screws, sometimes they fall out when removing and they�ll fall where you probably can�t see or reach them. They are nit standard screws you can get anywhere but merc deslers. So, remove each one and put somewhere they won�t fall.
When you reinstall screws put dab of grease in end of them or spray threads with wd40 or other lube . Sometimes they corrode to the distributor body and make your next cap removal alot more interesting.
edit: got it off but the sensors look a little different�
Last edited by Prestigeworldwideee; 10-29-2022 at 02:33 PM.

