


My new project - 86 - 272 LS
 07-25-2012, 08:00 AM
#101
Gold Member
Join Date: Jan 2011
Location: Syracuse, NY
Posts: 1,097
Likes: 0
Received 0 Likes
on
0 Posts
befu if I can offer advice... Went through this t-bolt IV crap earlier this year. Pull them off, drop HEI dizzy's on and rewire the tack and shift interrupt. It's $400 more now, and 10yrs of reliability. No trouble shooting and checking a million things.
 07-25-2012, 11:06 AM
#102
Should get a chance to see some results tomorrow.
Sprink, I do not know and no!
I pulled it through the parking lot out to the main road. Went 130 yards to the gas station and then back. Not sure if I hit 10 MPH! No plate, no lights, no brakes..... We are out in the country, so no problem. We will get the brakes working with the new 7 pin connector installed later this week or next week.
Time to make the wife cringe and go order more stuff...
Brian
07-25-2012, 06:09 PM
#103
Charter Member #232
With those older ignitions they often times had two wires go to the coil. One for when the boat was running that was at a lower voltage, Then one that came from the starter if memory serves that was a 12 volt while cranking to get a real hot spark to make it fire due to the lowered voltage while cranking. You can test with a jumper wire if you need to.
__________________
Put your best foot forward!
Put your best foot forward!
07-26-2012, 02:29 PM
#104
Got the starboard motor running, sounds good! Runs so well it wouldn't shut off! Had to turn out the idle screw to drop it low enough to stall it. So, something is not killing voltage to the ignition, will have to look into that one.
Port motor not getting fuel into the carb, so we are pulling it back off, I think I did something wrong with the float. First time, the carb flooded and leaked fuel out of it like the needle didn't close. Now it doesn't fill and is empty, odd.
Also had an issue with the fuel pump not priming where it is, so I think I am going to move it down to the bulk head right behind the fuel tank. Still have some issues to work on, but making progress.
Brian
08-08-2012, 04:43 PM
#105
Lots of stuff done.
Spent some time and got the drive pucks all dialed in. Both trim to the same height and stop. Both drive position gauges read pretty dang good. Put a layer of electrical tape over the puck spline before putting them back on the drive and that helped a lot. Before there was too much slop and the drive would have to move too far before the gauge moved. Now I can adjust the drives and they are within a half inch of each other. Not bad for the old 26 years old stuff!
Ran the Starboard motor again today and ran great. Had to tighten a couple of hoses, but it started well, good throttle response, put the new secondary jets in it also. Oil pressure is good, temp never came up but the water coming out of the thermostat housing got hot and the exhaust manifolds remained cold. Also running it on well water that is coming out of ground cold, so not surprised.
shifted the drive into forward and reverse, sounded fine and worked great.
Motor still not shutting off. Ignition kills voltage to coil, so I am back feeding from alternator. will post more on this later with pics.
Port motor is still no go. Took three tries, but got the float adjusted in the carb and it works great now. Just no spark at all. voltage on the coil, so we will have to start going through it. The motor did start and run last fall, so not sure what it is. Thought it was wired up correctly, we will have to see. Oh, no spark at the input to the distributor, so seems like coil or ignition module is stopping it due to wiring issue.
Also started gluing down the new carpet in the cabin section, makes a big improvement in the way it looks! also started to fix the seat side that my big a$$ broke when I sat down, will document that in a single post when done to show how I did it.
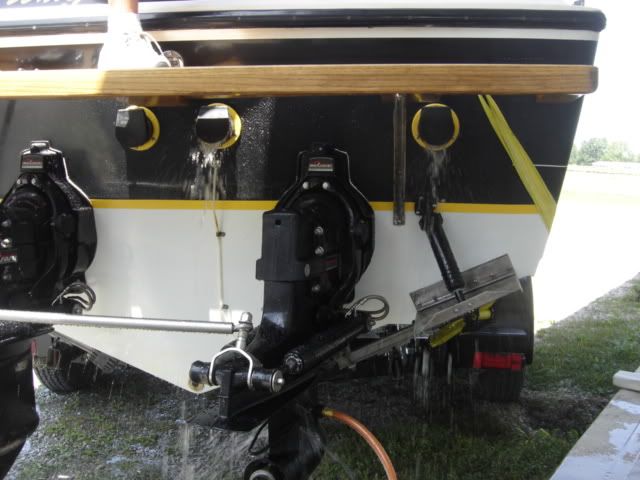
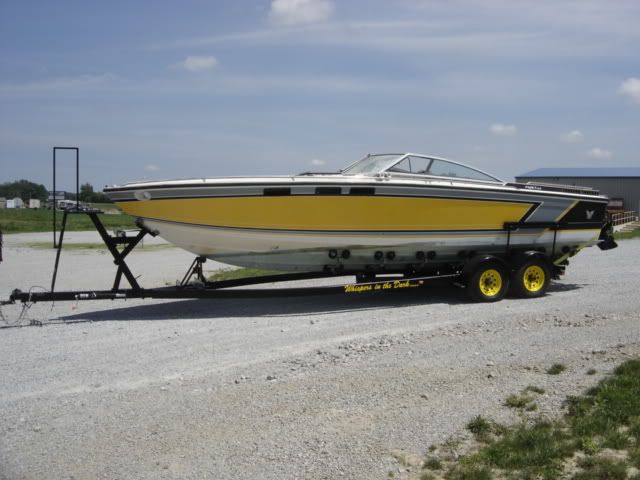
A couple of pics of it on the reworked trailer outside for the second time this year!
Brian
actually running
In the sun! man I need to remove that bottom paint!
Back end view
Spent some time and got the drive pucks all dialed in. Both trim to the same height and stop. Both drive position gauges read pretty dang good. Put a layer of electrical tape over the puck spline before putting them back on the drive and that helped a lot. Before there was too much slop and the drive would have to move too far before the gauge moved. Now I can adjust the drives and they are within a half inch of each other. Not bad for the old 26 years old stuff!
Ran the Starboard motor again today and ran great. Had to tighten a couple of hoses, but it started well, good throttle response, put the new secondary jets in it also. Oil pressure is good, temp never came up but the water coming out of the thermostat housing got hot and the exhaust manifolds remained cold. Also running it on well water that is coming out of ground cold, so not surprised.
shifted the drive into forward and reverse, sounded fine and worked great.
Motor still not shutting off. Ignition kills voltage to coil, so I am back feeding from alternator. will post more on this later with pics.
Port motor is still no go. Took three tries, but got the float adjusted in the carb and it works great now. Just no spark at all. voltage on the coil, so we will have to start going through it. The motor did start and run last fall, so not sure what it is. Thought it was wired up correctly, we will have to see. Oh, no spark at the input to the distributor, so seems like coil or ignition module is stopping it due to wiring issue.
Also started gluing down the new carpet in the cabin section, makes a big improvement in the way it looks! also started to fix the seat side that my big a$$ broke when I sat down, will document that in a single post when done to show how I did it.
A couple of pics of it on the reworked trailer outside for the second time this year!
Brian
actually running
In the sun! man I need to remove that bottom paint!
Back end view
08-16-2012, 08:33 PM
#107
Thanks machloosy, lots of good deals out there. Don't buy one like I did, ton of work into this one.
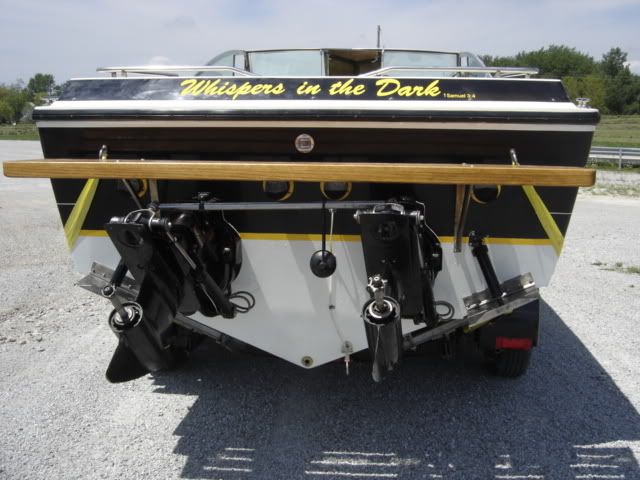
OK, pic of the transom - got the props installed. And no crap about the props OK, they are the 4 blade - 21 pitch for local lakes and tubing. I have a set of 23 SS ones for speed. All I need now on the transom is the drain plug.
Finished up the floor and bench carpet for the cabin area. Not great, but first time I tried this. Porti potti fits great and will now be usable for all my kids. I am going to recover the old bench cushions and reuse the foam. Where the old cooler and cupboards were I am going to build in some storage areas for towable toys, cooler, life jacket and such so it is not flying around. Front bulkheads will also be carpeted once I figure out how I am doing the front of the boat.
Maybe tomorrow, definately Monday I plan on trying the port motor out and see how it does. maybe spash it next week....
Brian
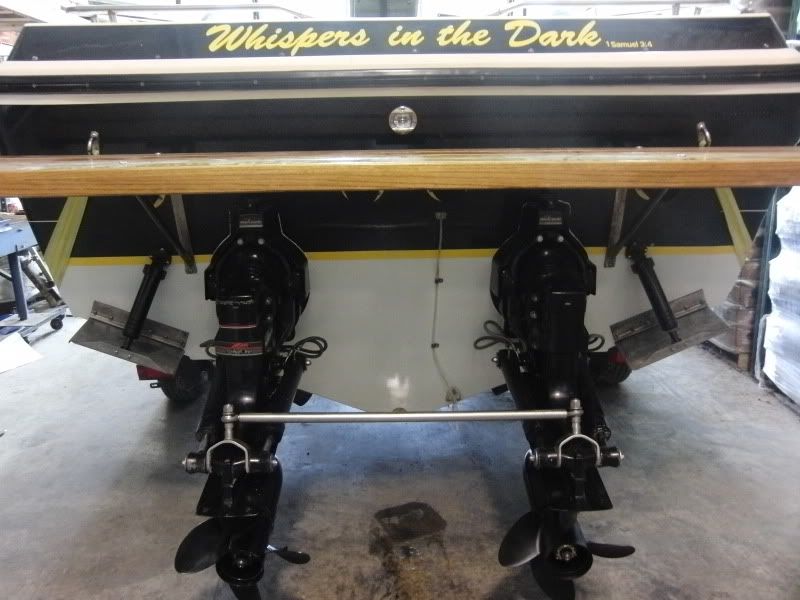
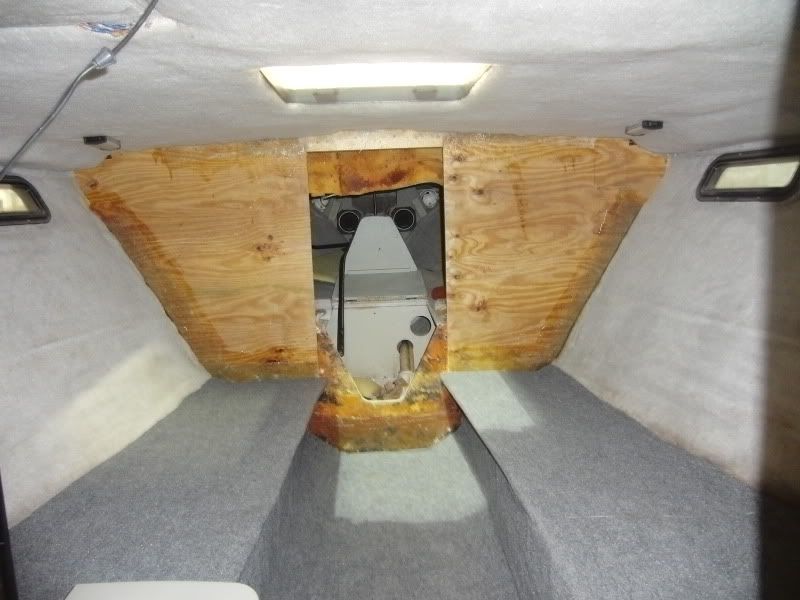
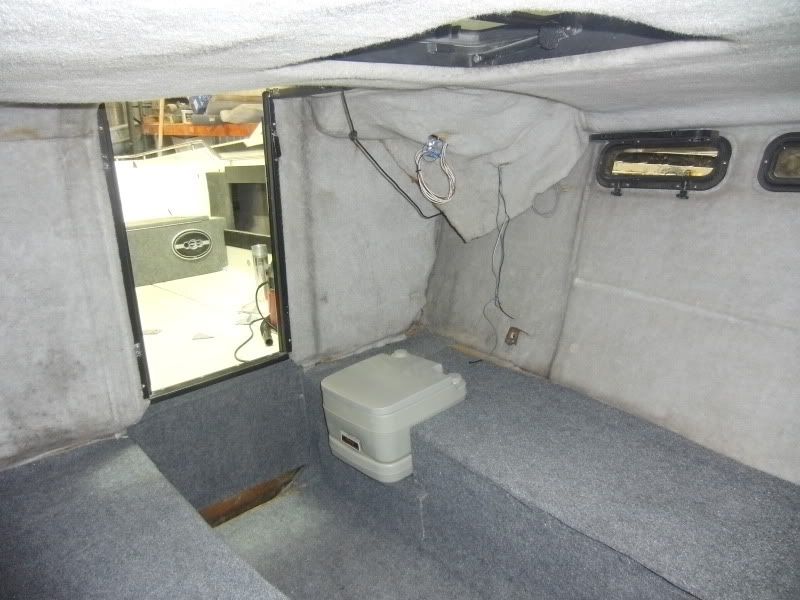
08-21-2012, 11:10 AM
#108
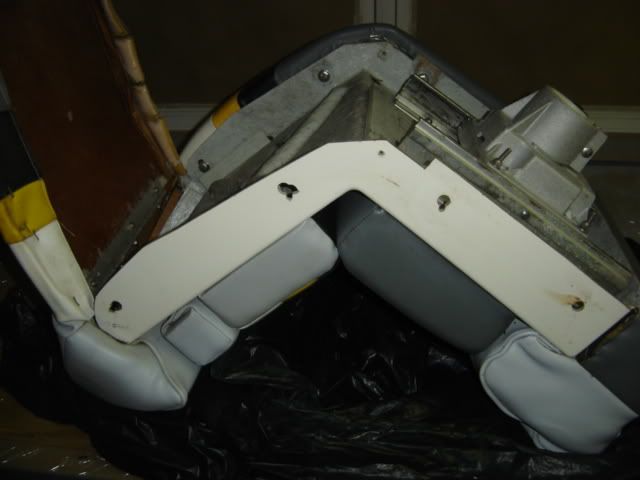
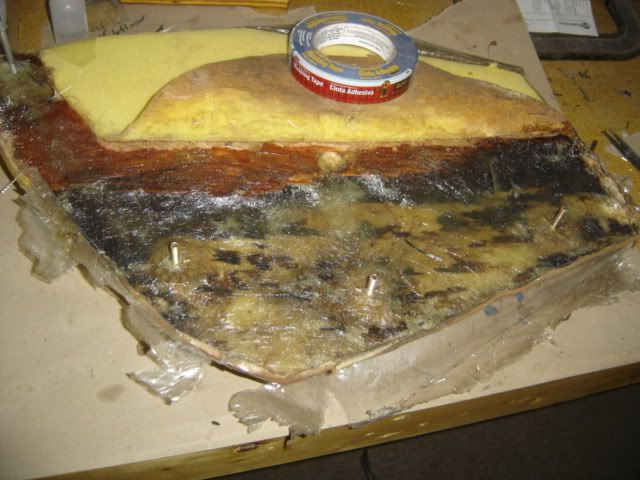
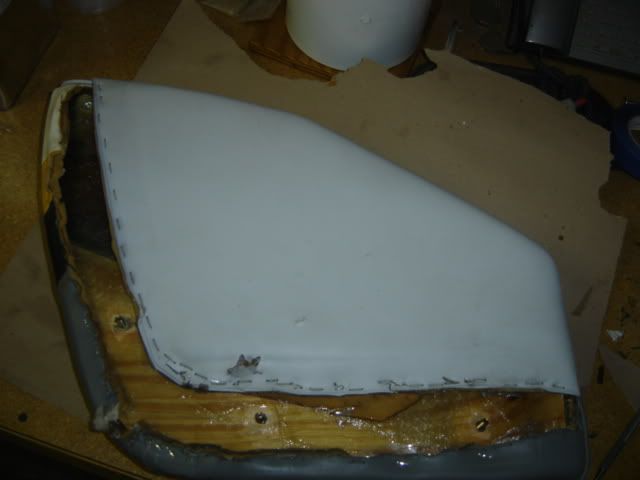
I had mentioned earlier that I would do a complete post on how I fixed one of the sides on my seats. On these, the main seat is all attached to a very solid piece of fiberglass in the overall shape of a L. The two sides then bolt to this with 4 bolts each. On mine, the wood had gotten wet so the retaining nuts had rusted away and the wood was soft allowing the remains to just spin or pull out - so I rebuilt them with new attachment nuts. Well, the first time I sat in one, the side of it popped right off, appears the repair was not as good as I hoped.
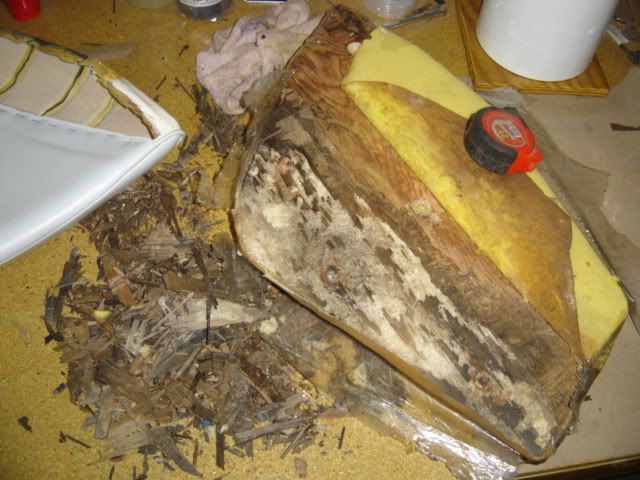
First thing I did was to remove all the staples from the back fo the side and remove the vinyl skin. This went pretty straight forward. What I found was a piece of molded expanding foam with a 1/2" piece of plywood on the inside of it. The whole thing was covered by that 1/8" foam and then the skin was put over it. Well, the bottom 1/2 of the plywood was so bad, the new attachment nuts just pulled out bigger pieces of wood. So I started digging and I removed all of the bad plywood down to the foam piece. I marked where the nuts were and ended up putting weld studs in three of them since the wood was 100% gone.
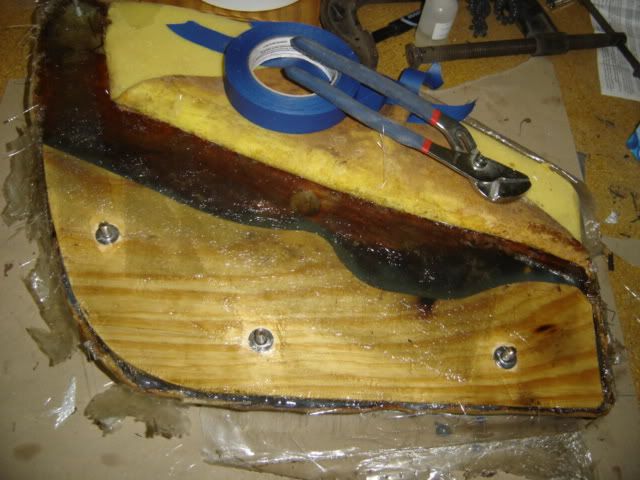
After the weld studs were in place and everything was cleaned up, I really saturated the remaining wood working resin into it. I wanted to following repair to really bite into the old good wood. I added a few layers of fiberglass over the foam and worked it over the top of the old wood. Once that was cured, I made up a thickened slurry of resin and used that to squish down a piece of 1/4" plywood to the first layers of glass.
Continued.....
The main part of the seat with the side panel removed
The seat filler with the bad wood removed. Plus you can use it in the flower bed as mulch!
Glass over the foam with new attachment hardware in there
1/4" ply set in place with a slurry mixture of thickened resin
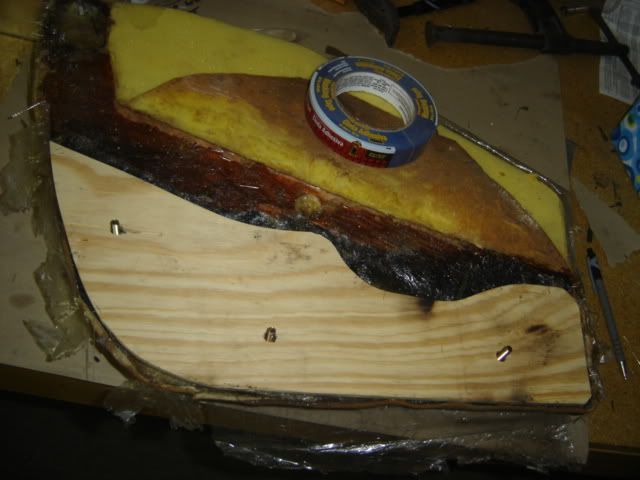
First thing I did was to remove all the staples from the back fo the side and remove the vinyl skin. This went pretty straight forward. What I found was a piece of molded expanding foam with a 1/2" piece of plywood on the inside of it. The whole thing was covered by that 1/8" foam and then the skin was put over it. Well, the bottom 1/2 of the plywood was so bad, the new attachment nuts just pulled out bigger pieces of wood. So I started digging and I removed all of the bad plywood down to the foam piece. I marked where the nuts were and ended up putting weld studs in three of them since the wood was 100% gone.
After the weld studs were in place and everything was cleaned up, I really saturated the remaining wood working resin into it. I wanted to following repair to really bite into the old good wood. I added a few layers of fiberglass over the foam and worked it over the top of the old wood. Once that was cured, I made up a thickened slurry of resin and used that to squish down a piece of 1/4" plywood to the first layers of glass.
Continued.....
The main part of the seat with the side panel removed
The seat filler with the bad wood removed. Plus you can use it in the flower bed as mulch!
Glass over the foam with new attachment hardware in there
1/4" ply set in place with a slurry mixture of thickened resin
08-21-2012, 11:23 AM
#109
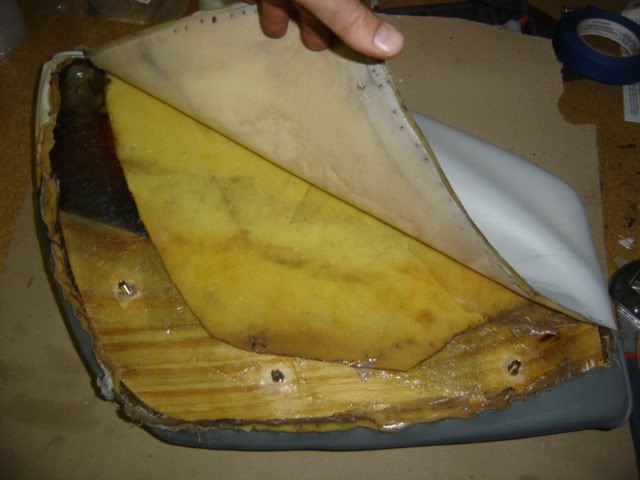
Once the filler piece of plywood was in, I used some more slurry to fill in around the edges. Then I added a few more layers of glass over the seam tapered down to one layer over the good wood. With that done, I let it cure again. Used some spray adhesive to hold down the piece of thin foam that I had pealed up, trimmed up any glass fibers sticking out and stuffed it back into the vinyl sleeve. It fits!
I pulled the vinyl tight and started stapling it in and this is where I discovered my mistake. The thing is so strong and solid, I can not staple the vinyl back on except for a few places. I even tried a brad nailer - it worked some but where the glass was too solid it just bent the brad. So I predrilled holes and used some small stainless screws to secure the vinyl skin.
It turned out really strong! I guess I didn't need to do that much work, but it is one thing I do not need to worry about breaking. I sat in the othe seat and bumped it around, appears solid so it looks like I get away with only rebuilding one of the sides.
And the project marches on.......
Plywood filler glassed over
stuffed back into the skin with foam glued down
Ready for install
08-21-2012, 11:29 AM
#110
Registered
Join Date: Aug 2012
Location: Alexandria Bay, NY
Posts: 93
Likes: 0
Received 0 Likes
on
0 Posts
Befu very nice work. Wish I had your talent for the upholstery work, I am a engine guy and I can do the wiring but I suck at upholstery work. I cannot wait to see the final pictures. I might have missed it but what are you running for power?

