

502 MPI HP Upgrades?


 07-10-2023 | 10:46 AM
#2
Registered

Joined: Mar 2020
Posts: 372
Likes: 183
From: East Tennesseee
Depending on what exhaust manifolds it has, a set of performance minded manifolds would be the best place to start. After that cylinder heads. With those done get the MEFI computer burned with a new tune on it to maximize the upgrades
07-10-2023 | 12:01 PM
#3
Registered
Joined: Aug 2022
Posts: 91
Likes: 56
If you're ok with not having fuel injection, bolting on a Edelbrock air gap, ( or comparable dual plane intake), and 850 Holley will usual get you at least 2 - 4 mph on almost any 502mpi application. Doesn't seem like much ,but most other bolt ons net zero gains (pro charger excluded)...
07-11-2023 | 09:29 AM
#5
Registered

Joined: Sep 2014
Posts: 870
Likes: 259
From: Portland, OR
Most everything you need to know in these two threads. Using this info I took my old 32' Fountain from 75 to 92mph and still prop testing when I sold it. I'd do it again in a heartbeat. Cheap and easy.
502 MPI upgrade results - Offshoreonly.com
modified 502mpi intake on 502 dyno session at my shop - Offshoreonly.com
502 MPI upgrade results - Offshoreonly.com
modified 502mpi intake on 502 dyno session at my shop - Offshoreonly.com
07-11-2023 | 09:37 AM
#6
Platinum Member

Joined: Feb 2001
Posts: 4,303
Likes: 1,459
From: Virginia Beach
If you're ok with not having fuel injection, bolting on a Edelbrock air gap, ( or comparable dual plane intake), and 850 Holley will usual get you at least 2 - 4 mph on almost any 502mpi application. Doesn't seem like much ,but most other bolt ons net zero gains (pro charger excluded)...
07-11-2023 | 10:49 AM
#7
Registered
Joined: Jul 2020
Posts: 323
Likes: 55
From: Cortlandt Manor NY
setup:
New GM performance 502 block bored .030 (509)
Stock crank & rods with new wrist pins & .030 SRP pistons
Stock iron heads all freshened up with new Inconel valves, valve springs, roller rockers
ARP head studs, main studs and rob bolts
Isky cam:
- Valve Lift Int/Ext. 0.553/0.578
- Valve Lash Hot Int/Ext. 0.000
- ADV Duration Int/Ext. 275/284
- 0.050 Duration Int/Ext. 228/238
- Lobe Center 112
Eddie marine thunder mainfolds and dry tail risers
 07-11-2023 | 11:35 AM
#8
Platinum Member
Joined: Feb 2001
Posts: 4,303
Likes: 1,459
From: Virginia Beach
I removed the injection harness and redid a little of the Merc harness to power the distributor and coil and extend wiring for the temp senders and warning horn. It was pretty easy to do. I had all of the correct color coded wiring so it came out looking factory.
The two-prong connector at the distributor is power (red wire) and coil negative (brown wire) and is all you need to get it running. Your start and charge harness should be able to accommodate this.
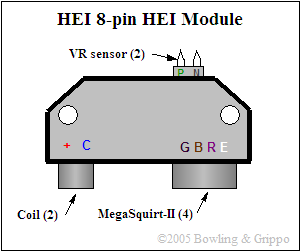
Pinouts for the EST module. You only need the coil connector (if you do not want to remove from your injection harness, the pigtail can be had on Amazon for less than $20).
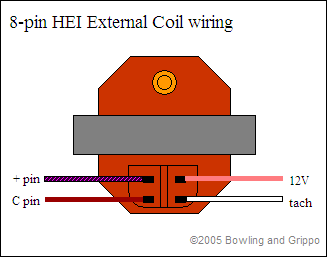
This is the factory coil connection for reference. The boat tach receives the signal from the ecm so you�ll need do a little surgery on that connector to get your tach signal connected properly. I cannot quite remember what I did on this side when I converted from the MPI. It�s not hard though.
I just did this swap last week on our Bullet using a coil similar to yours (from a TB-IV/MSD). I tied power from the harness (purple) to the positive on the coil. Red wire from the distributor to positive on the coil. Brown wire to the negative on the coil, and then the gray wire from the tach to the negative on the coil.
When it�s done, total timing is all you�ll need to worry about. 32 degrees with iron GM heads should be good. Check and adjust at 3k rpm. If your balancer isn�t marked, you�ll need a dial back light. Your MSD box may not work with some lights (honestly, I�d drop the MSD box - the EST is more than capable without it - just add a rev limiter).
Hope this helps. If you have any other questions, just ask.
**Images belong to MicroSquirt: http://www.useasydocs.com/details/GM_7pinHEI.htm
The two-prong connector at the distributor is power (red wire) and coil negative (brown wire) and is all you need to get it running. Your start and charge harness should be able to accommodate this.
Pinouts for the EST module. You only need the coil connector (if you do not want to remove from your injection harness, the pigtail can be had on Amazon for less than $20).
This is the factory coil connection for reference. The boat tach receives the signal from the ecm so you�ll need do a little surgery on that connector to get your tach signal connected properly. I cannot quite remember what I did on this side when I converted from the MPI. It�s not hard though.
I just did this swap last week on our Bullet using a coil similar to yours (from a TB-IV/MSD). I tied power from the harness (purple) to the positive on the coil. Red wire from the distributor to positive on the coil. Brown wire to the negative on the coil, and then the gray wire from the tach to the negative on the coil.
When it�s done, total timing is all you�ll need to worry about. 32 degrees with iron GM heads should be good. Check and adjust at 3k rpm. If your balancer isn�t marked, you�ll need a dial back light. Your MSD box may not work with some lights (honestly, I�d drop the MSD box - the EST is more than capable without it - just add a rev limiter).
Hope this helps. If you have any other questions, just ask.
**Images belong to MicroSquirt: http://www.useasydocs.com/details/GM_7pinHEI.htm
Last edited by TomZ; 07-11-2023 at 11:45 AM.
07-11-2023 | 12:28 PM
#9
Registered
Joined: Jul 2020
Posts: 323
Likes: 55
From: Cortlandt Manor NY
I removed the injection harness and redid a little of the Merc harness to power the distributor and coil and extend wiring for the temp senders and warning horn. It was pretty easy to do. I had all of the correct color coded wiring so it came out looking factory.
The two-prong connector at the distributor is power (red wire) and coil negative (brown wire) and is all you need to get it running. Your start and charge harness should be able to accommodate this.
Pinouts for the EST module. You only need the coil connector (if you do not want to remove from your injection harness, the pigtail can be had on Amazon for less than $20).
This is the factory coil connection for reference. The boat tach receives the signal from the ecm so you�ll need do a little surgery on that connector to get your tach signal connected properly. I cannot quite remember what I did on this side when I converted from the MPI. It�s not hard though.
I just did this swap last week on our Bullet using a coil similar to yours (from a TB-IV/MSD). I tied power from the harness (purple) to the positive on the coil. Red wire from the distributor to positive on the coil. Brown wire to the negative on the coil, and then the gray wire from the tach to the negative on the coil.
When it�s done, total timing is all you�ll need to worry about. 32 degrees with iron GM heads should be good. Check and adjust at 3k rpm. If your balancer isn�t marked, you�ll need a dial back light. Your MSD box may not work with some lights (honestly, I�d drop the MSD box - the EST is more than capable without it - just add a rev limiter).
Hope this helps. If you have any other questions, just ask.
**Images belong to MicroSquirt: General Motors 7-pin HEI Ignition Control
MSD 6M-3L marine ignition box
MSD Marine pro-billet distributer
MSD ignition coil
https://www.cpperformance.com/instru...structions.pdf
All I should need is batt power, key power & ground
07-11-2023 | 02:17 PM
#10
Platinum Member
Joined: Feb 2001
Posts: 4,303
Likes: 1,459
From: Virginia Beach
Not sure if I�d trust the MSD stuff. And the Delco stuff can be fixed with parts from the local parts store pretty easily (order a D1965A module from Sierra to keep as a spare).
I was a fan of MSD it not so much anymore. Too many problems with corrosion and faulty electronics.
Hope the above is useful for those reading.
I was a fan of MSD it not so much anymore. Too many problems with corrosion and faulty electronics.
Hope the above is useful for those reading.

