

Nose cone removal
 08-23-2023 | 05:41 AM
#41
Thread Starter
VIP Member

Joined: Jul 2009
Posts: 783
Likes: 51
From: NJ
I had a feeling this wasn't going to be easy..
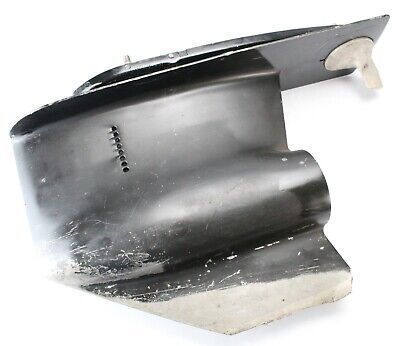
So it seems to me that on this bravo1 lower the water jacket part is to the left side of the inlet holes. To the right side of the inlet holes will be the vertical shaft and gears and prop spindle. So that pipe protruding out of my drive is just laying in the water passage leading to the holes on the side.. How could it be connected directly inside?. The inside water passage of the lower is not serviceable.. The pipe must just be a tight fit at the end of the drive. So now I need to figure out how to plug it so nothing travels through it and clogs anywhere. If the pipe was copper I would have no issues. I would just braze in a copper plug and re-insert it and epoxy it, cover it sand and paint..
any ideas?
Last edited by 35fountain; 08-23-2023 at 07:17 AM.
 08-23-2023 | 07:45 AM
#42
Thread Starter
VIP Member
Joined: Jul 2009
Posts: 783
Likes: 51
From: NJ
Before doing anything with the tube...I would open up the original water inlets. There are some good threads on the newer style and hole size/placement.
That way you can use the tube to flush out any metal filings etc from your work.
Large front tube...if it was me, I would likely clean it up the aluminum and weld it back up using a piece to cover the hole.
Without the equipment and costs, and not seeing it first hand. It's difficult to suggest a solution. Assuming the tube is aluminum? Or something like that?
Trying to get enough material (epoxy style JB Weld) in behind the opening to resist the hydro forces may block the water inlet flow in the hollow passage.
08-23-2023 | 08:28 AM
#43
Registered


Joined: Oct 2000
Posts: 1,508
Likes: 590
From: Lake Ozark, MO USA
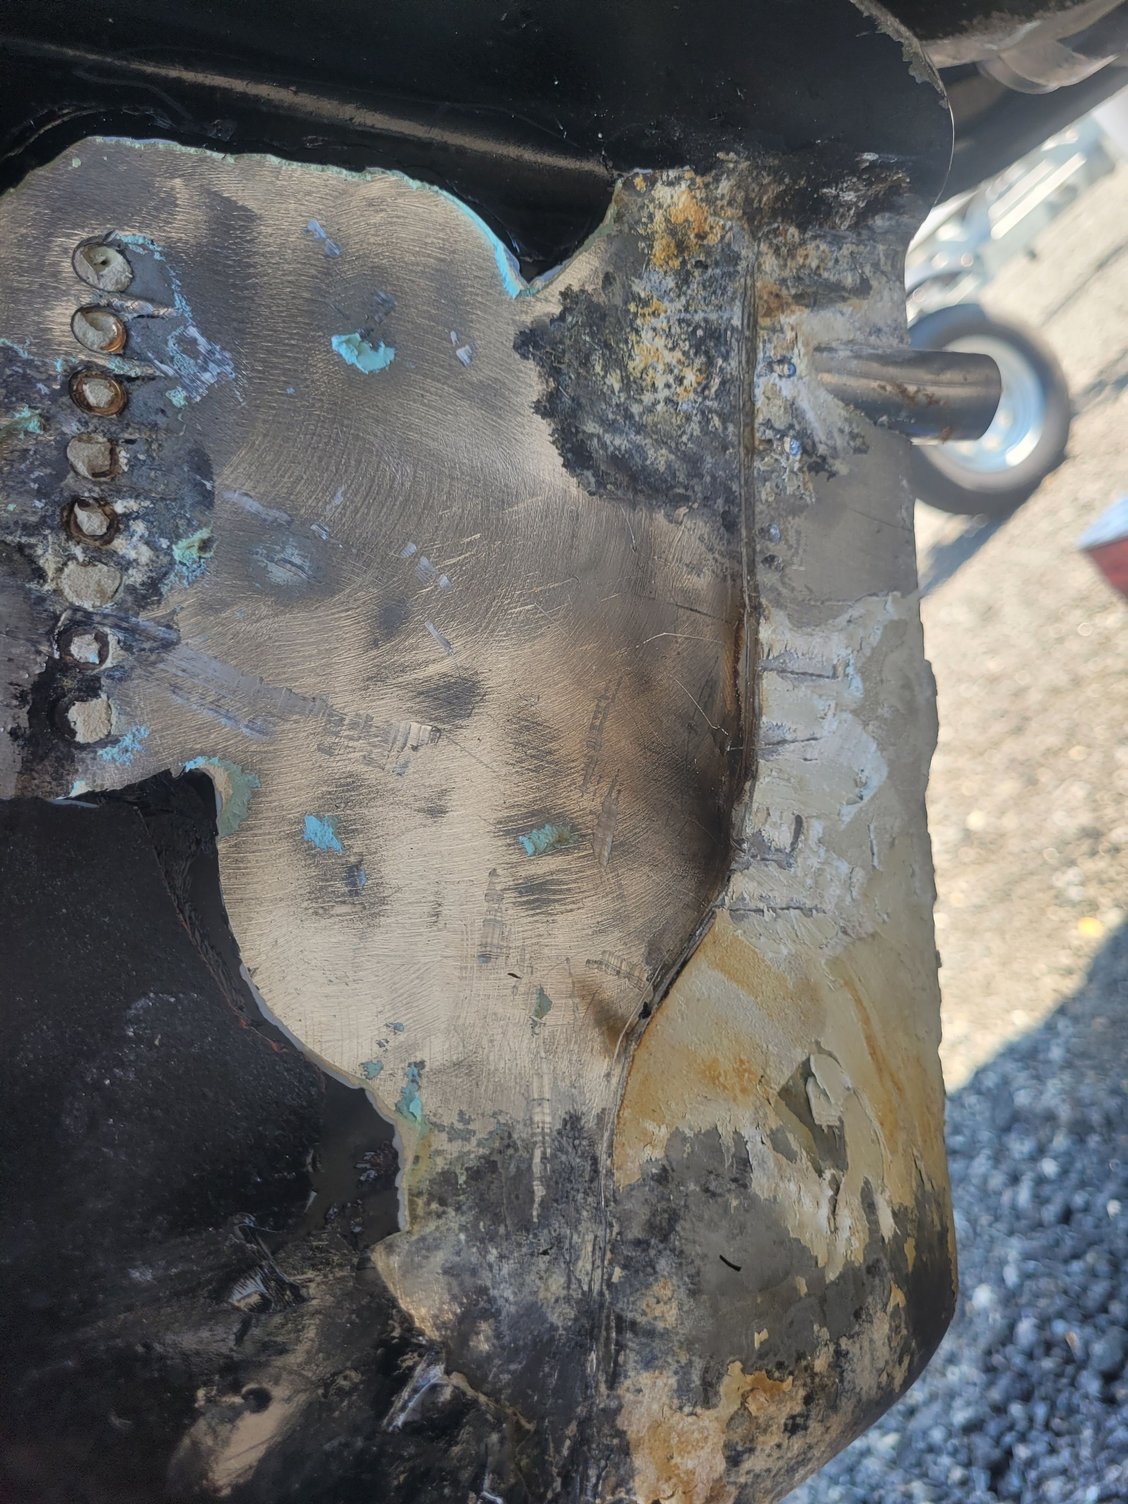
That looks like a shiite ton of bondo or other filler on there. Going to take a while to DA all that off. That lower probabaly weighs 2x the normal with all those plugs, cone, filler and paint.
08-23-2023 | 09:12 AM
#44
Registered


Joined: Aug 2019
Posts: 1,224
Likes: 415
From: BC
The pipe looks like it's stainless.
With the info now, just cut the pipe at the beveled angle and take it to a welding shop...have them weld on a stainless cap over the angle cut pipe. But find a shop first and let them cut it etc.
Just make sure all the debris is harvested from unplugging the 8 holes..you don't want that going through your impeller.
08-23-2023 | 09:44 AM
#45
Registered
Joined: Aug 2010
Posts: 1,384
Likes: 565
Those lowers are molested.
Wasn't it determined nose cones didn't do much or hindered performance??
Anyhow, I agree tube looks stainless. Is it pressed in, epoxied in? Who knows?
If I was tackling this to maybe save end of season, especially with those molested lowers, I'd remove brass plugs in side holes, then try to "sandwich" the end of the tube close as possible to the leading edge of the drive with hammer and dolly. (Like in picture)
Trim as needed. Grind or heat the rest of epoxy or Bondo off, DA the surface smooth, test as below before you even respray them.
Disclaimer: (don't try this at home) LOL
Myself, I'd try to run the boat with just the tube sandwiched if the flattened seam is very very tight.
See if any water pressure or overheat issues.
If any issues then remove lowers and have the flattened seam welded.
08-23-2023 | 09:57 AM
#46
Registered
Joined: Jul 2007
Posts: 3,336
Likes: 857
do as Cheech wrote... do you have a local prop shop that does case repairs? - get a quote to refurb the case if they would take it on.
Personally, I would get through the last of the season and then find another unmolested case and have your internals put into if you are not into buying another lower.
You would be starting next season with a clean slate and clean gear case/ resealed and re-shimmed - yours has been through hell and the work to go into cleaning it up and totally redo the paint so the paint doesn't fail/corrode in splotches should be taken into account as it's still a molested case underneath it all.
08-23-2023 | 11:33 AM
#47
Thread Starter
VIP Member
Joined: Jul 2009
Posts: 783
Likes: 51
From: NJ
Some sanding can clean up my molested case. I never heard that word used for an outdrive.
Talking to a friend at a drive shop, he said cap the pipe with a rubber cap and clamp. HE SAID THAT AREA DOESN'T GET WATER. Then leave the 2 top plugs in the drive on both sides and take the rest out. If it all works and no overheating then you can flatten the ss pipe cut and epoxy it so no air gets in
Talking to a friend at a drive shop, he said cap the pipe with a rubber cap and clamp. HE SAID THAT AREA DOESN'T GET WATER. Then leave the 2 top plugs in the drive on both sides and take the rest out. If it all works and no overheating then you can flatten the ss pipe cut and epoxy it so no air gets in
Last edited by 35fountain; 08-25-2023 at 07:15 AM.
08-23-2023 | 04:25 PM
#48
Registered
Joined: Jan 2007
Posts: 2,076
Likes: 1,195
From: Murrayville Georgia
probably doesnt help now but I have two XR lowers, one brand new from mercury and the other is used with a broken gear set. assuming the case is good on the used one but have not pulled it apart. both are low water pick up only.
08-24-2023 | 07:05 AM
#49
Thread Starter
VIP Member
Joined: Jul 2009
Posts: 783
Likes: 51
From: NJ
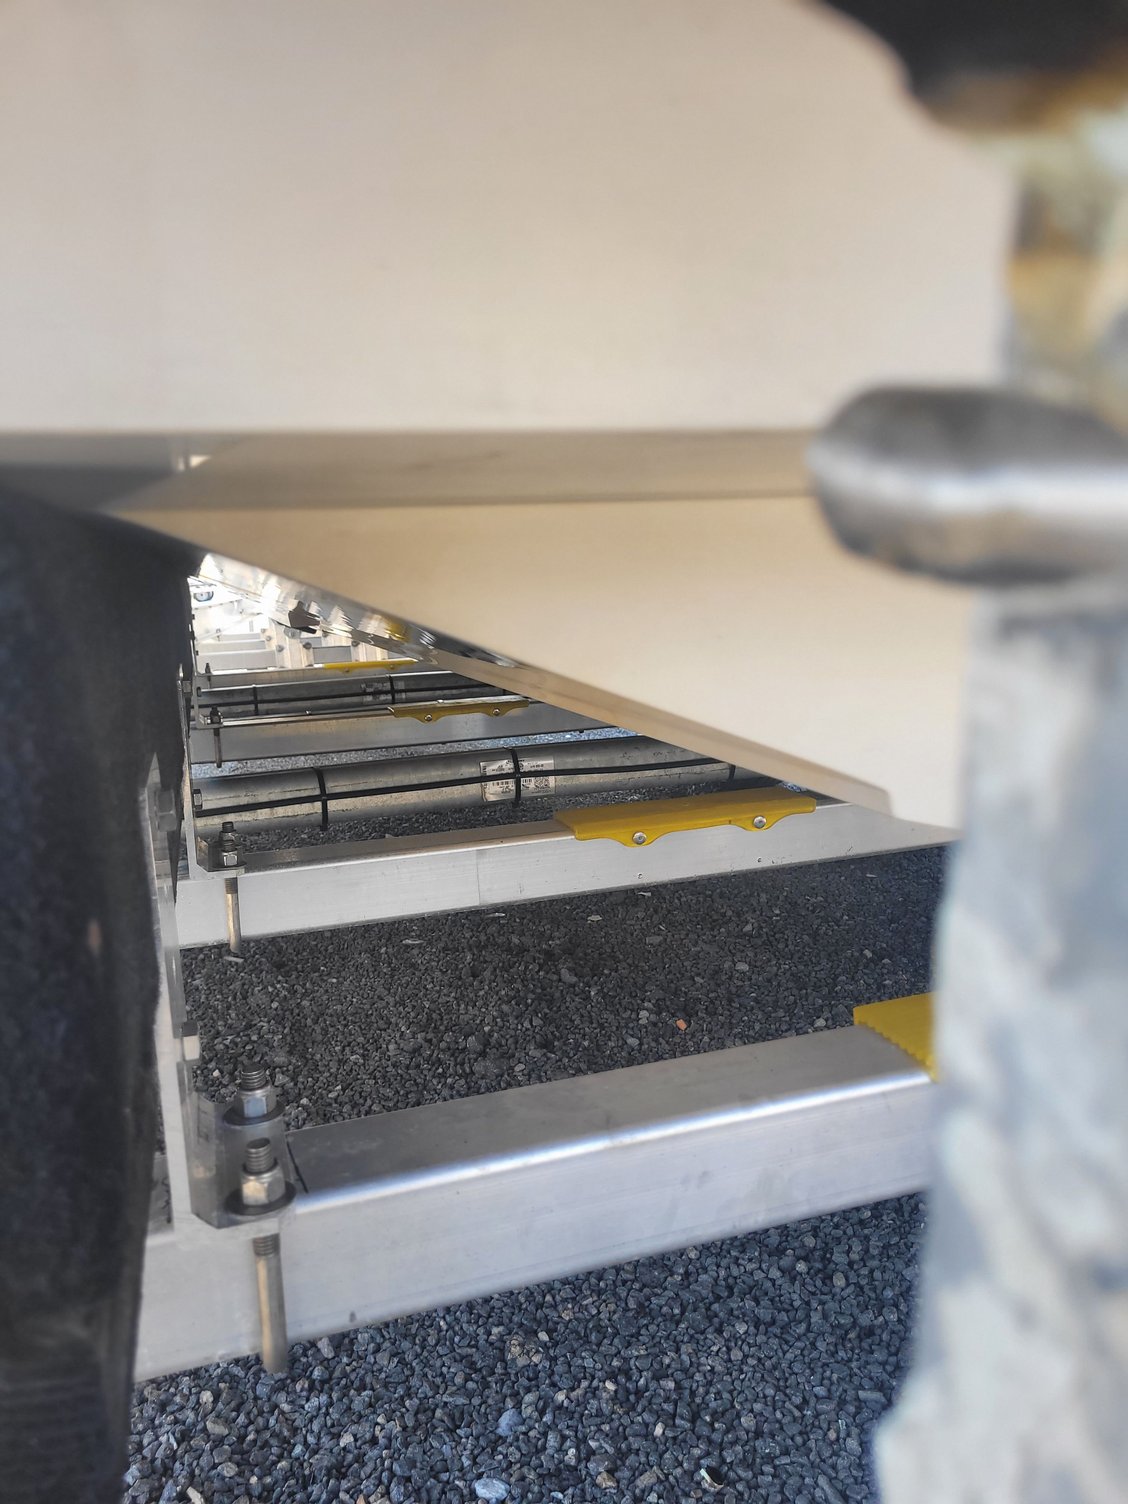
Bravo1 underwater at speed
Looks like the upper and lower are separating, maybe they forgot to tighten the bolts but there is no water or any hydro-force where the pipe is showing on my drive.
Last edited by 35fountain; 08-25-2023 at 06:48 AM.
08-24-2023 | 12:55 PM
#50
Thread Starter
VIP Member
Joined: Jul 2009
Posts: 783
Likes: 51
From: NJ
Half way there. I found a thick heavy duty rubber cap.it was 3/4" . I think after the test run if I apply some heat to the pipe and squeeze with a large plier it will flatten tight. Now I have to get the plugs out and clean up the drive.
i will add some JB where the tube meets the drive.

i will add some JB where the tube meets the drive.
Last edited by 35fountain; 08-26-2023 at 08:21 AM.


