

1998 280 velocity rebuild and updates
 03-24-2013 | 08:55 AM
#31
Crazy Energy
Joined: Aug 2007
Posts: 4,334
Likes: 1
From: Oklahoma God's country no one else wants it.


 03-26-2013 | 11:07 PM
#33
Thread Starter
Registered
Joined: Jun 2011
Posts: 907
Likes: 4
From: Baton Rouge, La
Just finished the cabin lighting. I think it adds a ton of light and gives it a cool look. This is all finished.
It also has white lights incase I need regular light.

This is looking from the bed back. You can see where the lights were put so its inderect lighting when your looking in to the cabin.

It also has white lights incase I need regular light.
This is looking from the bed back. You can see where the lights were put so its inderect lighting when your looking in to the cabin.
04-11-2013 | 08:02 AM
#36
Thread Starter
Registered
Joined: Jun 2011
Posts: 907
Likes: 4
From: Baton Rouge, La
Have some progress pictures to post. Finally feel like I'm making some forward progress with the long drawn out build. I didn't plan on this taking so long, but I also didn't plan on a blown 509 either.
After the block was prepped, dimple rods reconditioned using arp wave loc bolts and the rotating assembly balanced I was finally able to build the short block. I had bought a set if king p bearings, but that was when I was doing a rebuild. Since I went with the blower I ended up with clevite 77 h bearings.

With the short block done I startedon the heads. I'm using the 088 factory rectangle port heads, but I'm adding 2.25 Manley extreme duty intake valves and ferrea 1.88 inconel exhaust valves. My heads cc'd at 113cc so I took some material out of the combustion chambers and then polished the chambers to help prevent detonation. While in the area, I did some bowl blending and short radius work. The exhaust was absolutely horrible to start off. There was no radius, more like a 90 degree turn. Next was to port match the intake ports with the felpro gaskets. This was another chore, because it was off by over a 1/4" in some spots as the pictures will show. I can tell you that I was so happy to be done with these heads!!!! What a major pain, but hopefully it will pay off.


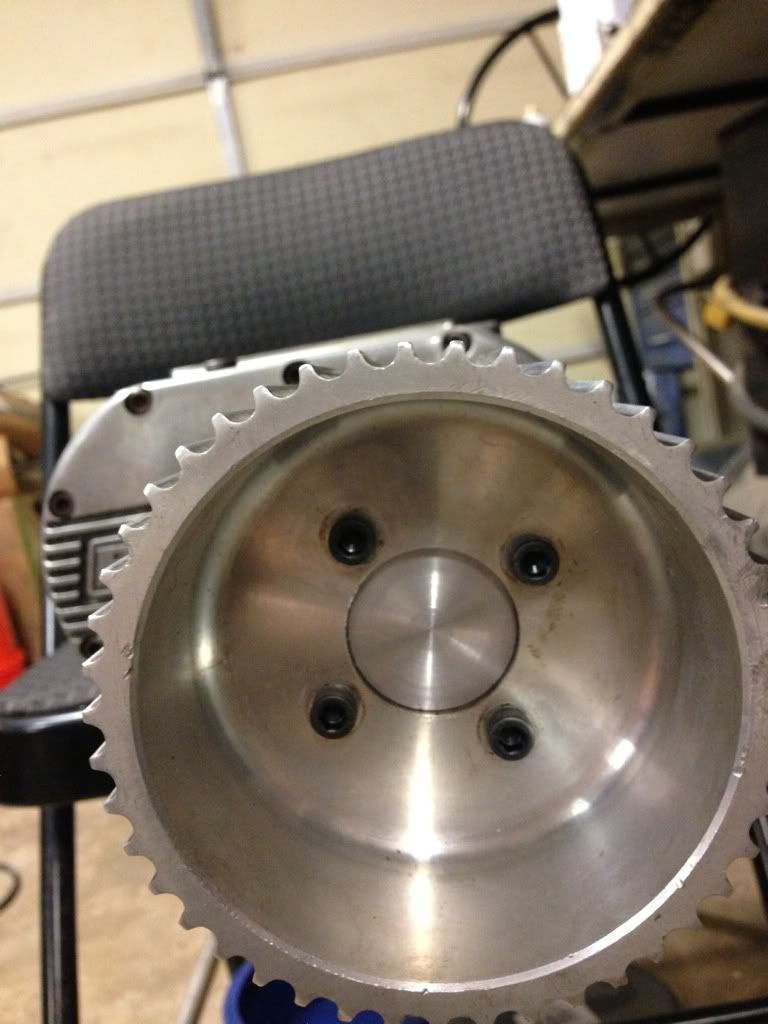
I'm running a serpentine setup so my lower blower pulley needed a custom spacer. So I am making it out of 6061 and the spacer will bolt to the new power bond balancer along with the acc pulley. The blower pulley will then bolt to the spacer. I haven't finished the spacer because I don't know what the total length will be until I get the blower mounted and can take some measurements. But here are some pics I have of what's done with it thus far.


The last pics I have are of me machining out the back side of the timing cover for the double roller timing set.


I'm trying to finish the motor today and tomorrow and plan to install it on Saturday. Then Sunday I will start to modify the dry tails to fit my boat.
I'll have more pics in the next couple days. Getting close to finishing this project up!!!!
After the block was prepped, dimple rods reconditioned using arp wave loc bolts and the rotating assembly balanced I was finally able to build the short block. I had bought a set if king p bearings, but that was when I was doing a rebuild. Since I went with the blower I ended up with clevite 77 h bearings.
With the short block done I startedon the heads. I'm using the 088 factory rectangle port heads, but I'm adding 2.25 Manley extreme duty intake valves and ferrea 1.88 inconel exhaust valves. My heads cc'd at 113cc so I took some material out of the combustion chambers and then polished the chambers to help prevent detonation. While in the area, I did some bowl blending and short radius work. The exhaust was absolutely horrible to start off. There was no radius, more like a 90 degree turn. Next was to port match the intake ports with the felpro gaskets. This was another chore, because it was off by over a 1/4" in some spots as the pictures will show. I can tell you that I was so happy to be done with these heads!!!! What a major pain, but hopefully it will pay off.
I'm running a serpentine setup so my lower blower pulley needed a custom spacer. So I am making it out of 6061 and the spacer will bolt to the new power bond balancer along with the acc pulley. The blower pulley will then bolt to the spacer. I haven't finished the spacer because I don't know what the total length will be until I get the blower mounted and can take some measurements. But here are some pics I have of what's done with it thus far.
The last pics I have are of me machining out the back side of the timing cover for the double roller timing set.
I'm trying to finish the motor today and tomorrow and plan to install it on Saturday. Then Sunday I will start to modify the dry tails to fit my boat.
I'll have more pics in the next couple days. Getting close to finishing this project up!!!!
04-11-2013 | 04:32 PM
#38
Thread Starter
Registered
Joined: Jun 2011
Posts: 907
Likes: 4
From: Baton Rouge, La
Thanks. Been a bigger project then I ever intended, but that's how I am. I get in there and keep adding to the build instead of sticking to the original plans. If I did I wouldn't have a spare set of dome pistons, victor jr intake and 850 Holley on the shelf.
04-19-2013 | 01:22 AM
#39
Thread Starter
Registered
Joined: Jun 2011
Posts: 907
Likes: 4
From: Baton Rouge, La
Time for an update. Motor has been coming along a bit slow, but today made some progress and finally on the down hill side of motor assembly. Over the last couple days I got a real nice 9 key way double roller timing set to go under the stock cover from eddie young so I could get the cam degreed and finish the bottom end with the new hv oil pump and new pickup, windage tray and oil pan. After that was done I was able to finally assemble the heads after getting all the parts needed and the valve job was finished. Heads ended up with Manley extreme duty 2.250 intakes and ferrea inconel 1.88 exhaust valves. The guides were machine down to put new valve stem seals. I built the heads with 150-155 lbs of seat pressure.


With the heads done, on the motor they went and tq with new arp head bolts. After checking for push rod length I got two sets of comp one piece .080 wall pushrods and was finally able to set the valve lash using crane gold rockers. I ended up having to machine down half of the locks because they were hitting the valve covers. I temporarily installed the blower so I could check belt alignment and that's when the fun began. I'm running a serpentine acc belt setup and that doesn't line up with the blower at all. In fact the blower belt was not out far enough in order to run the acc pulleys. I thought I would have to convert to v belts at the last minute, but a quick call to Eddie young (who has been a big help) and we came up with a solution to space the blower pulley it in order to run all the serpentine acc pulleys.


It's hard to tell from the pictures but the blower belt over laps the acc drive pulley an 1 1/4"
The spacer making begins.


Both spacers worked out great and run very true to the harmonic balancer and the blower input shaft. I wasn't fond of spacing the blower out off the snout, but I really have no option other then changing all the acc in the front of the block.
I'm installing the motor in the boat tomorrow so I'm hoping it all goes smooth. I did change the seal and installed the new gamble bearing so that is done before the engine goes in. I also found out my gimble assembly water neck where the water passes through is corroded closed. I got a new product from a company I was referred to from this site. I don't have pics but plan on posting them as soon as I get them. The hydraulic steering is also 60% done. I want to wait for the engine to be in the boat to finish it. I have been over every inch of the boat and hope it pays off.
I'll post pics with the motor installed this weekend (hopefully). I plan to start building the dry tails on Saturday.
Hopefully we will be headed to smokin the sound next weekend!!!
More to come.
With the heads done, on the motor they went and tq with new arp head bolts. After checking for push rod length I got two sets of comp one piece .080 wall pushrods and was finally able to set the valve lash using crane gold rockers. I ended up having to machine down half of the locks because they were hitting the valve covers. I temporarily installed the blower so I could check belt alignment and that's when the fun began. I'm running a serpentine acc belt setup and that doesn't line up with the blower at all. In fact the blower belt was not out far enough in order to run the acc pulleys. I thought I would have to convert to v belts at the last minute, but a quick call to Eddie young (who has been a big help) and we came up with a solution to space the blower pulley it in order to run all the serpentine acc pulleys.
It's hard to tell from the pictures but the blower belt over laps the acc drive pulley an 1 1/4"
The spacer making begins.
Both spacers worked out great and run very true to the harmonic balancer and the blower input shaft. I wasn't fond of spacing the blower out off the snout, but I really have no option other then changing all the acc in the front of the block.
I'm installing the motor in the boat tomorrow so I'm hoping it all goes smooth. I did change the seal and installed the new gamble bearing so that is done before the engine goes in. I also found out my gimble assembly water neck where the water passes through is corroded closed. I got a new product from a company I was referred to from this site. I don't have pics but plan on posting them as soon as I get them. The hydraulic steering is also 60% done. I want to wait for the engine to be in the boat to finish it. I have been over every inch of the boat and hope it pays off.
I'll post pics with the motor installed this weekend (hopefully). I plan to start building the dry tails on Saturday.
Hopefully we will be headed to smokin the sound next weekend!!!
More to come.
04-20-2013 | 10:31 PM
#40
Gold Member

Joined: Jan 2011
Posts: 1,482
Likes: 0
From: Omaha Ne
Looking good, I'm glad my whipple belt runs on the inside of the serp belt that looks like a lot of work. Looks like you have it handled though, keep up the good work looking forward to seeing pics on the water. Did you find a prop? Randy

