

290sc aka RE POSSESSED
 12-03-2011 | 03:36 PM
#11
Thread Starter
Registered

Joined: Jul 2011
Posts: 71
Likes: 0
From: Kansas City,MO.
The prop was run through rocks or gravel. It had lots of chips and dents. BBlades said I had 30 something % slip so they worked it over and said should be around 14% now. I should have paid more attention when on the phone with them.....Info is not on the invoice... I assumed that it would be so I didnt write it down or remember it. new boat owner thing I suppose. One thing I want to do before putting it back on is to clean and repaint the lower drive around where the prop sits. Ill add a pic or two.


Last edited by sparkie124; 12-03-2011 at 04:54 PM.
 12-22-2011 | 03:15 PM
#13
Thread Starter
Registered
Joined: Jul 2011
Posts: 71
Likes: 0
From: Kansas City,MO.
Thanks Suntimes that is exactly what i needed. Two questions;
1. Is the top ledge flat or taper towards the center of the opening.
2. Is there a support opposite to that one.
On a different note, where is you engine hatch actuator located and how does you hatch open(performance wise)
1. Is the top ledge flat or taper towards the center of the opening.
2. Is there a support opposite to that one.
On a different note, where is you engine hatch actuator located and how does you hatch open(performance wise)
12-31-2011 | 02:38 PM
#14
Registered
Joined: Feb 2005
Posts: 217
Likes: 2
From: FL
Thanks Suntimes that is exactly what i needed. Two questions;
1. Is the top ledge flat or taper towards the center of the opening.
2. Is there a support opposite to that one.
On a different note, where is you engine hatch actuator located and how does you hatch open(performance wise)
1. Is the top ledge flat or taper towards the center of the opening.
2. Is there a support opposite to that one.
On a different note, where is you engine hatch actuator located and how does you hatch open(performance wise)
The top ledge is flat around where the seat bottoms rest. There are two vertical supports up the front of the seat base, but I do not remember any up the back.
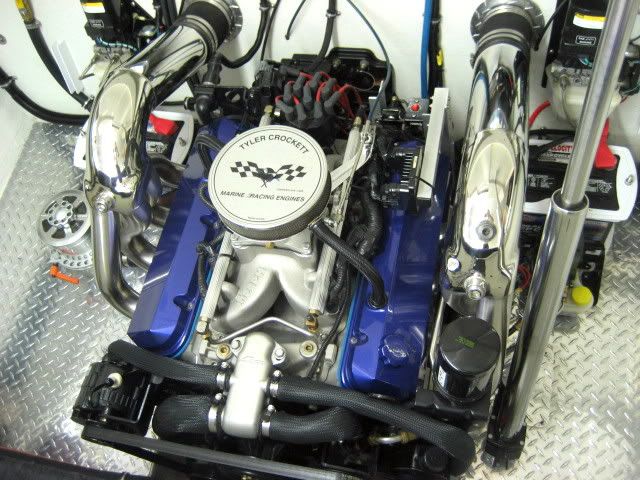
The hatch operator is pretty slow but it works fine-takes about 15-20 seconds to raise. I like where it is attached on the engine support angle mount as shown.
01-01-2012 | 06:39 PM
#15
Thread Starter
Registered
Joined: Jul 2011
Posts: 71
Likes: 0
From: Kansas City,MO.
Yea my actuator is mounted to the transom near the exhaust exit. I'm gonna move it and add a relay to help. I ordered some material to make braces. I couldn't see any existing mounting holes on the back side but just wanted to make sure. Im jealous of that power. Stock or swapped out? Looks great under the hatch though.
01-04-2012 | 07:31 PM
#16
Registered
Joined: Feb 2005
Posts: 217
Likes: 2
From: FL
Yea my actuator is mounted to the transom near the exhaust exit. I'm gonna move it and add a relay to help. I ordered some material to make braces. I couldn't see any existing mounting holes on the back side but just wanted to make sure. Im jealous of that power. Stock or swapped out? Looks great under the hatch though.
 I took the boat out on New Years and checked the back seat area--as suspected, no supports along the back...
01-04-2012 | 10:58 PM
I took the boat out on New Years and checked the back seat area--as suspected, no supports along the back...
01-04-2012 | 10:58 PM
#17
Registered

Joined: Jan 2001
Posts: 1,132
Likes: 54
From: Rockford, IL
Nice looking boat Sparkie. Nice looking engine suntimes!
Mine had that little hatch actuator when I bought it. It was too slow and noisy. I replaced it with a Hardin Marine unit. Much nicer and about twice the travel. The original one was mounted on the oil filter bracket. I did a little modifying and moved it to the floor.
Mine had that little hatch actuator when I bought it. It was too slow and noisy. I replaced it with a Hardin Marine unit. Much nicer and about twice the travel. The original one was mounted on the oil filter bracket. I did a little modifying and moved it to the floor.
01-06-2012 | 08:25 AM
#18
Thread Starter
Registered
Joined: Jul 2011
Posts: 71
Likes: 0
From: Kansas City,MO.
After seeing your actuators location I thought I would grab a quick pic of mine while i was working on the stereo install. Hit the button with one hand and lift up with the other as usual, about half way up i hear a pop and the hatch falls to one side. Hatch hinge broke, then pop the other and the hatch falls over till the actuator binds up and bends. I had to call some friends over to help get the hatch off the boat for repair. I am not at all impressed with Velocitys fabrication skills to say the least. Ive been in hot rods and bikes and even BBQ smokers, never seen such poor quality work and design. Dont get me wrong, I love the boat but every thing envolved with the hatch on my boat is trash. The hinge is bolted to a piece of 1 1/2x1 1/2 1/8 thick aluminum angle that one side has been trimed down some for fitment the angle is then bolted to the hatch plywood. The other side of the hinge is bolted to the transom lip. The angle broke at the corner and was bent where the bolts go through. That material is not correct for that usage. that and the location itsself show poor design quality to me. Now the craftsman ship, the angle wasnt cut stright any where and wasnt even the same length even though the hinges are the exact same size as each other. Maybe Im to particular but would have killed somebody to take a hand file and clean up the burrs left from cutting. It looks like a total hack job. for a boat that sells for what they do new I expected better. Again not bash Velocity, Just think they should have done better. Ill post some pics for you to see.


 01-06-2012 | 12:00 PM
#20
Registered
Joined: Jan 2001
Posts: 1,132
Likes: 54
From: Rockford, IL
Yes , that doesn't look like the best design. It makes it harder to lift at that angle . I think that little actuator would be better suited to for a power air scoop or something. Just too small.
I had to make a new bracket that mounts to the hatch when I installed my new actuator. I copied the original design and just made it a little bigger out of aluminum channel. I took the hatch apart and through bolted the bracket with large washers on the back side. The white caps you see are where the old one was mounted. The screw you see behind the bracket is attached to a little cable that is tethered to the removable pin. Just pull the pin and swivel the actuator out of the way if you need to work on the port side of the engine.

I had to make a new bracket that mounts to the hatch when I installed my new actuator. I copied the original design and just made it a little bigger out of aluminum channel. I took the hatch apart and through bolted the bracket with large washers on the back side. The white caps you see are where the old one was mounted. The screw you see behind the bracket is attached to a little cable that is tethered to the removable pin. Just pull the pin and swivel the actuator out of the way if you need to work on the port side of the engine.
Last edited by Revd Up; 01-06-2012 at 12:07 PM.

