


Catastrophic Engine failure. 454 gen 6

 07-26-2021 | 11:47 AM
#42
Thread Starter
Registered
Joined: Jan 2017
Posts: 315
Likes: 88
From: SE Virginia/NH

Also, fwiw, I spun the engine over probably 40 times degreeing the cam. It was nice and smooth. Nothing was touching until the valves pumped up probably.
Last edited by HawkX66; 07-26-2021 at 11:54 AM.
07-26-2021 | 02:25 PM
#43

Platinum Member


Joined: Feb 2001
Posts: 4,303
Likes: 1,459
From: Virginia Beach
That cam is so small in terms of lift that the only way it could have made contact was with it being grossly advanced. When you get it back together, put the stock GM timing chain and gear on there and install straight up. The GM timing set is less than $100 and comes with the retaining plate and screws. I’ve used these without any issues in a number of MK-IV and Gen V-VI builds. They just plain work. I wouldn’t even worry about degreeing it (it’s stock as stock can be and came out of my running 502 MPI). And throw that Summit pos in the garbage.
Also, noticed that you mentioned having cleaned up rods and pistons and reinstalled. You really should have them resized especially now that you had a major failure. I’d also check all the intake valves for straightness. I’m sure they all got tweaked.
Also, noticed that you mentioned having cleaned up rods and pistons and reinstalled. You really should have them resized especially now that you had a major failure. I’d also check all the intake valves for straightness. I’m sure they all got tweaked.
07-26-2021 | 07:01 PM
#44
Thread Starter
Registered
Joined: Jan 2017
Posts: 315
Likes: 88
From: SE Virginia/NH
That cam is so small in terms of lift that the only way it could have made contact was with it being grossly advanced. When you get it back together, put the stock GM timing chain and gear on there and install straight up. The GM timing set is less than $100 and comes with the retaining plate and screws. I’ve used these without any issues in a number of MK-IV and Gen V-VI builds. They just plain work. I wouldn’t even worry about degreeing it (it’s stock as stock can be and came out of my running 502 MPI). And throw that Summit pos in the garbage.
Also, noticed that you mentioned having cleaned up rods and pistons and reinstalled. You really should have them resized especially now that you had a major failure. I’d also check all the intake valves for straightness. I’m sure they all got tweaked.
Also, noticed that you mentioned having cleaned up rods and pistons and reinstalled. You really should have them resized especially now that you had a major failure. I’d also check all the intake valves for straightness. I’m sure they all got tweaked.
Before I pull it apart I'm going to know what happened. I want to know for sure what went wrong so I don't let it happen again. I won't be able to get back to it until next week though.
07-27-2021 | 01:09 AM
#45

Platinum Member

Joined: Sep 2001
Posts: 5,769
Likes: 151
From: tn
There are not several ways to check PTV clearance. There is only ONE way, although you do have several choices as to which compressible media you use.
The ONLY way to check PTV clearance is to mock up the motor with at least ONE piston and rod installed, the cam and timing set installed (at whatever position you plan to run it), something COMPRESSIBLE on top of the piston (I make a "snake" out of clay and run it across the center of each valve relief), the head and gasket (old head gasket is fine if it is the same compressed thickness as what you're reassembling with) torqued down, the lifters and pushrods installed, rockers installed - light springs or single springs are fine, especially if your hydraulic lifters are not bled.
Turn the engine over slowly for at least 2 full rotations.
Pull the head.
Use the depth probe on your dial/vernier calipers to find the thinnest clay for each valve. Also examine the clay around the notches to make sure the valve reliefs on the piston are giving enough clearance radially as well.
There is no such thing as measuring PTV clearance at TDC. I mean, you can measure that, but it is a totally meaningless number. Minimum PTV events will NEVER occur at TDC. Never ever.
So, learn 3 things from this..
1) before the motor goes into a vehicle, and really, before the intake and valve covers go on, prime the oiling system with a drill operated priming tool where the distributor goes. Make sure a gauge is hooked up so you can see the oil pressure. Prime until you see oil oozing everywhere its supposed to ooze, and make sure it isn't oozing anywhere it isn't supposed to ooze. Have a buddy turn the motor over with a breaker bar slowly while you prime - must do on any motor that has timed oiling..
2) always - always - always degree your cam. Pay somebody to let you watch how it's done, and never button up a domestic US engine without checking the ICL. Just don't do it.
3) plastigage is better than inaccurate measuring with precision equipment. I've honestly never heard a guy tell me he checked his bearing clearances with bore gages and micrometers who couldn't tell me off the top of his head exactly what his max and min clearances were, as well as how far out of round his main caps were. It doesn't appear that bearing clearances were the cause of any if this tragedy, but since you're back into the bottom end now, you need to check for any scuffing of the mains and rod bearings. Obviously, one rod journal will at least need polished.
Any time you need guidance on how to perform a necessary measurement or procedure, let us step you thru it.
The ONLY way to check PTV clearance is to mock up the motor with at least ONE piston and rod installed, the cam and timing set installed (at whatever position you plan to run it), something COMPRESSIBLE on top of the piston (I make a "snake" out of clay and run it across the center of each valve relief), the head and gasket (old head gasket is fine if it is the same compressed thickness as what you're reassembling with) torqued down, the lifters and pushrods installed, rockers installed - light springs or single springs are fine, especially if your hydraulic lifters are not bled.
Turn the engine over slowly for at least 2 full rotations.
Pull the head.
Use the depth probe on your dial/vernier calipers to find the thinnest clay for each valve. Also examine the clay around the notches to make sure the valve reliefs on the piston are giving enough clearance radially as well.
There is no such thing as measuring PTV clearance at TDC. I mean, you can measure that, but it is a totally meaningless number. Minimum PTV events will NEVER occur at TDC. Never ever.
So, learn 3 things from this..
1) before the motor goes into a vehicle, and really, before the intake and valve covers go on, prime the oiling system with a drill operated priming tool where the distributor goes. Make sure a gauge is hooked up so you can see the oil pressure. Prime until you see oil oozing everywhere its supposed to ooze, and make sure it isn't oozing anywhere it isn't supposed to ooze. Have a buddy turn the motor over with a breaker bar slowly while you prime - must do on any motor that has timed oiling..
2) always - always - always degree your cam. Pay somebody to let you watch how it's done, and never button up a domestic US engine without checking the ICL. Just don't do it.
3) plastigage is better than inaccurate measuring with precision equipment. I've honestly never heard a guy tell me he checked his bearing clearances with bore gages and micrometers who couldn't tell me off the top of his head exactly what his max and min clearances were, as well as how far out of round his main caps were. It doesn't appear that bearing clearances were the cause of any if this tragedy, but since you're back into the bottom end now, you need to check for any scuffing of the mains and rod bearings. Obviously, one rod journal will at least need polished.
Any time you need guidance on how to perform a necessary measurement or procedure, let us step you thru it.
07-29-2021 | 08:51 PM
#46
Registered
Joined: Oct 2005
Posts: 1,077
Likes: 254
From: Waldorf, Md

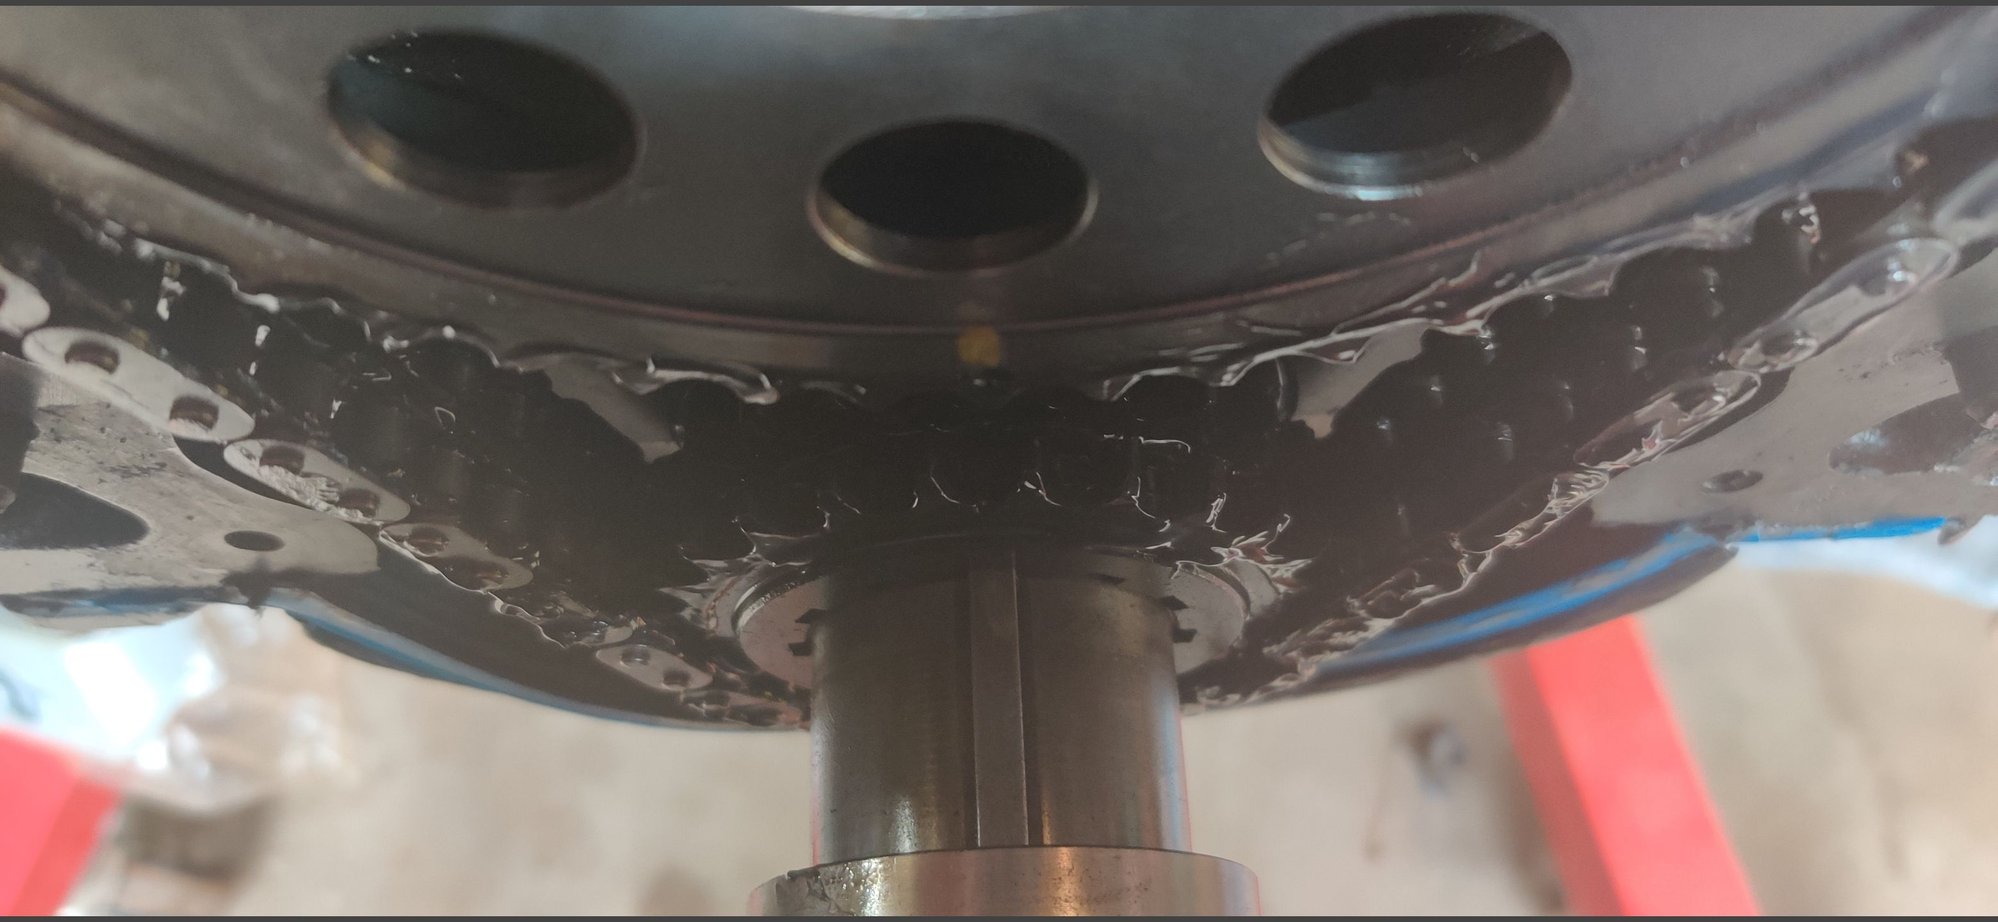
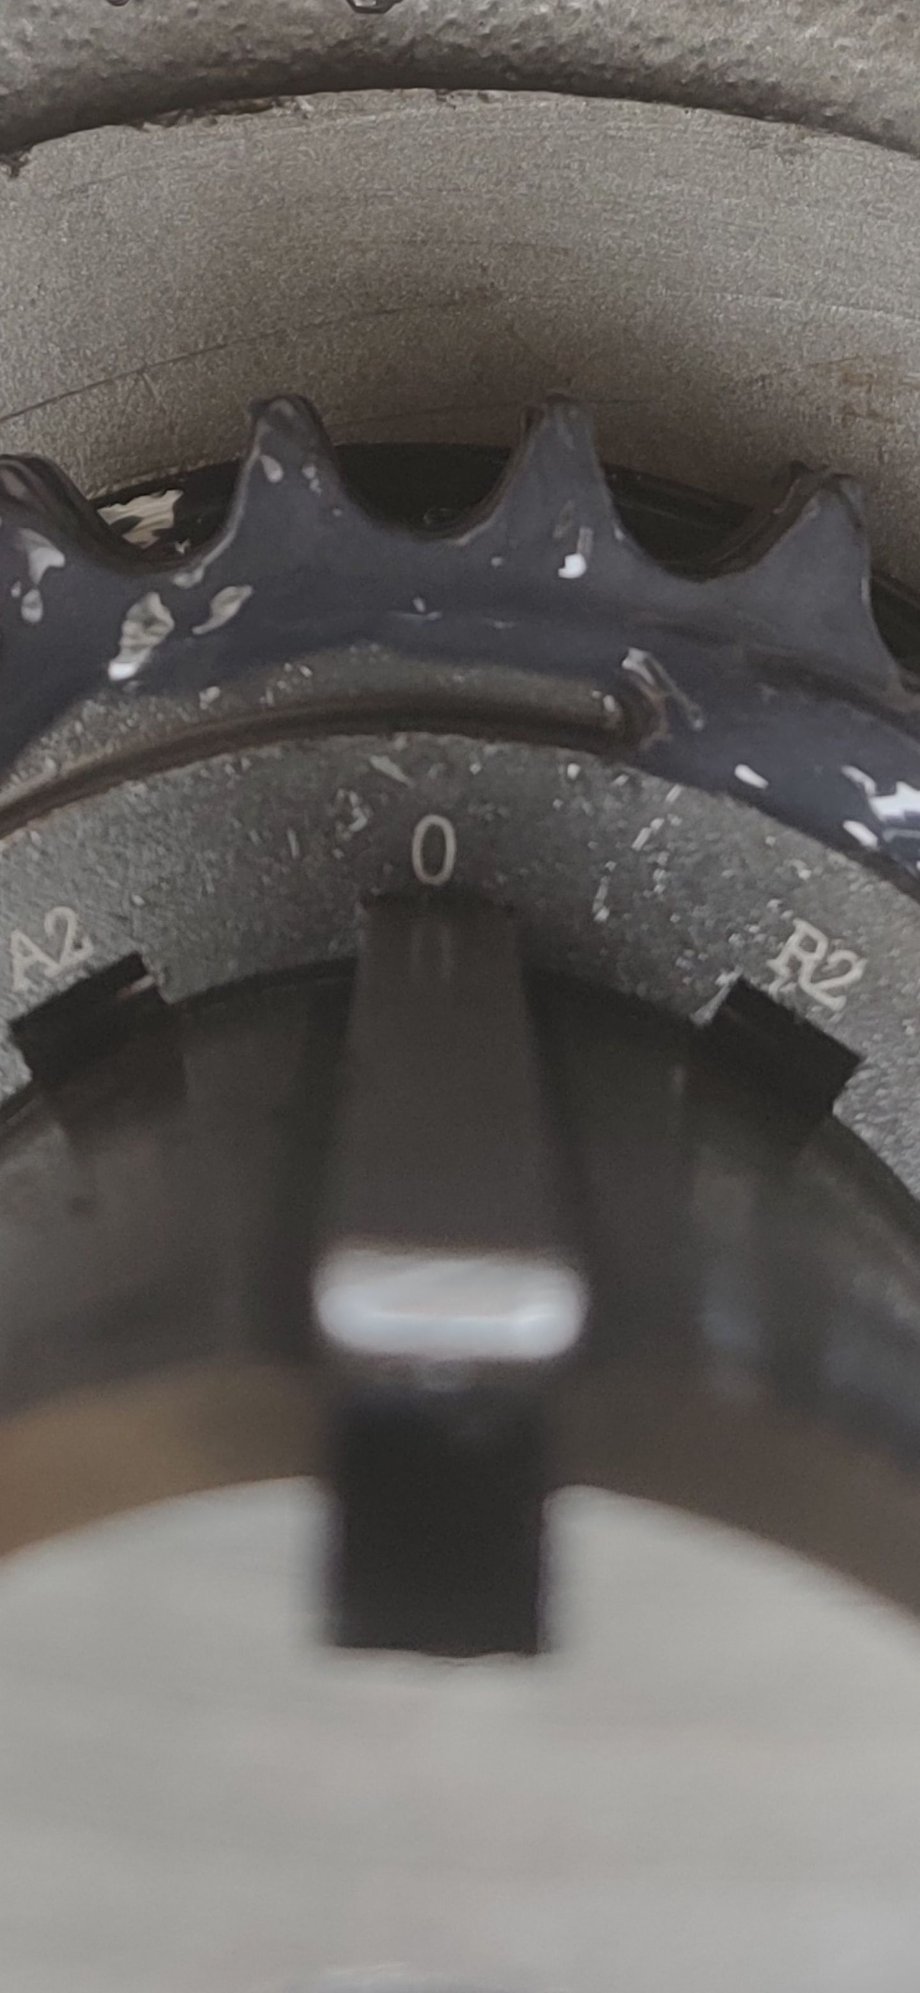
Is it one of the three keyway timing sets ? I have seen way too many of them installed incorrectly over the years. Almost always cause the intake valves to hit. Post a picture of the crank sprocket on the crank when you get it back.
Personally I have never used anything but the single roller "motorcycle" chain and simply have not had a problem even with cams up in the .625 lift range.
08-04-2021 | 08:32 AM
#47
Thread Starter
Registered
Joined: Jan 2017
Posts: 315
Likes: 88
From: SE Virginia/NH
Welp... That answers that. Thanks for all the suggestions. In the end it was just a bonehead that installed the bottom sprocket wrong. I just got back to it last night and figured it out. Too many cervezas while installing it I guess.
08-04-2021 | 08:37 AM
#48
Registered
Joined: Oct 2005
Posts: 1,077
Likes: 254
From: Waldorf, Md
Glad you figured it out At least you know what happened. Right keyway but wrong dot. Personally I wish they would stop making those things. Yours is probably at least the tenth time I have seen it happen over the years.
At least you know what happened. Right keyway but wrong dot. Personally I wish they would stop making those things. Yours is probably at least the tenth time I have seen it happen over the years.
08-04-2021 | 08:59 AM
#49
Platinum Member
Joined: Feb 2001
Posts: 4,303
Likes: 1,459
From: Virginia Beach
Hang on. Are you saying you lined up 0/keyway with the dot on the cam sprocket? The keyway should always point to approximately the 1 o’clock position.
Don’t assemble engines while drinking.
**edit: keyway at 1 o’clock if installing straight up.
Don’t assemble engines while drinking.
**edit: keyway at 1 o’clock if installing straight up.
Last edited by TomZ; 08-04-2021 at 10:27 AM.
 08-04-2021 | 10:12 AM
#50
Thread Starter
Registered
Joined: Jan 2017
Posts: 315
Likes: 88
From: SE Virginia/NH

