

Scarab Panther always a work in progress
 04-28-2025 | 04:27 AM
#221
Registered

Joined: Jun 2020
Posts: 523
Likes: 188
From: Holland MI
I kind of thought it gave some structure to to hull sides. Bummer to hear it rattles in big waves, I have it in my old wellcraft nova and like the look of it.

 04-29-2025 | 09:10 PM
#222
Platinum Member

Joined: Oct 2006
Posts: 1,573
Likes: 1,678
I liked all the teak in my 30� scarab but I can understand you wanting to get rid of those pieces in your boat because it doesn�t have much teak and is more sporty looking. I had to remove mine while I was working on my boat. Mine were held in with stainless #2 Phillips screws. Seems like they were really flexible and came out pretty easy. It�s good to see you working on that boat. Like I said before when I bought my 30� scarab I spent a lot of time looking at pictures of yours. Great looking boat!
 04-29-2025 | 09:28 PM
#223
Thread Starter
Registered

Joined: Jan 2003
Posts: 6,023
Likes: 1,522
From: Grand Rapids, MI
I liked all the teak in my 30� scarab but I can understand you wanting to get rid of those pieces in your boat because it doesn�t have much teak and is more sporty looking. I had to remove mine while I was working on my boat. Mine were held in with stainless #2 Phillips screws. Seems like they were really flexible and came out pretty easy. It�s good to see you working on that boat. Like I said before when I bought my 30� scarab I spent a lot of time looking at pictures of yours. Great looking boat!
Yeah, I looked today and saw all the screws holding them in. Should be easy enough to remove.
04-29-2025 | 09:33 PM
#224
Thread Starter
Registered
Joined: Jan 2003
Posts: 6,023
Likes: 1,522
From: Grand Rapids, MI
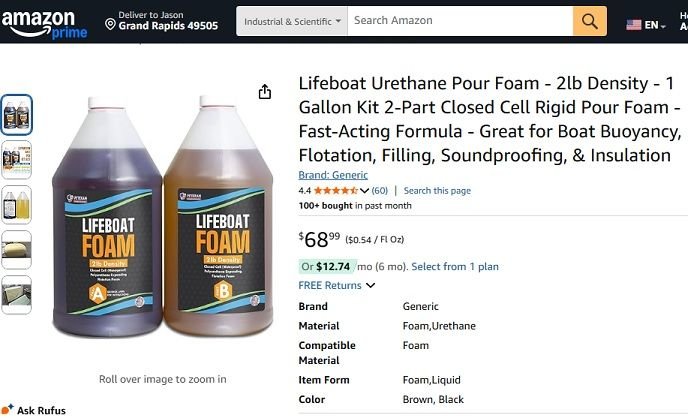
If anyone is curious to what foam I am using, it's from ebay or amazon. Works great, about 20 seconds of mixing time and rigid.
I have a chunk sitting in gasoline and going to see how it reacts.
I have a chunk sitting in gasoline and going to see how it reacts.
04-30-2025 | 06:52 PM
#225
Platinum Member
Joined: Dec 2001
Posts: 2,127
Likes: 171
From: St. Clair Shores, MI
Rookie Thats the same foam I used when I did the 70 gallon tank in my Sea Ray. I ended up using twice as much as I thought. I used two of the 1 gallon 4lb density kits and one of the one gallon 2 lb density kits. I had about 1/2 gallon left over. I poured it into red solo cups, timed the mixture and poured it really fast. the mixing time is about 20 seconds. I also spaced the tank off the bottom of the hull about 3/4 of a inch and poured the foam around the sides so it would run down to the bottom and support the bottom of the tank.
05-03-2025 | 07:29 PM
#226
Thread Starter
Registered
Joined: Jan 2003
Posts: 6,023
Likes: 1,522
From: Grand Rapids, MI
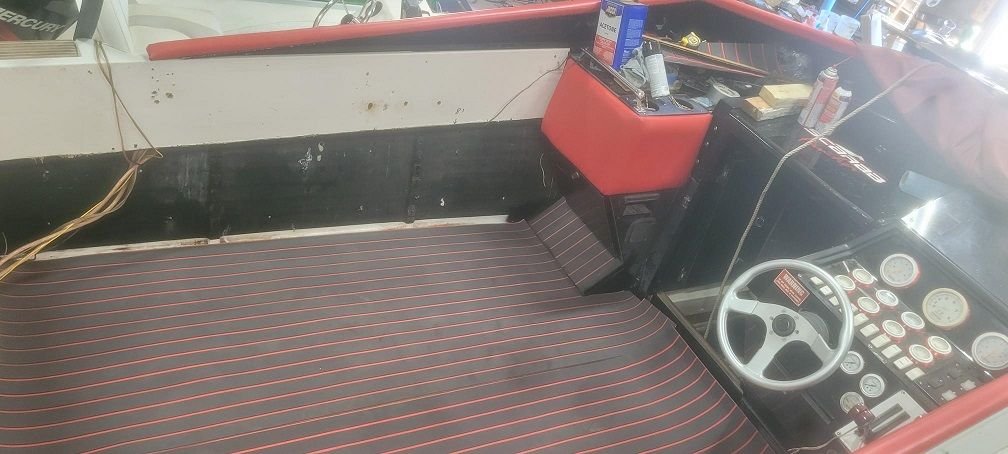
A little more progress today. Got the floor in and black painted the floor where it mates up to the interior walls. I am going to cover the whole floor with the red/dark gray EVA flooring now and if I have a little mismatch I don't want the white floor to magnify the mismatch.

I didn't realized that the interior sidewall that the lattice strips were attached to was an inner cockpit liner. That was also making a rattling noise. So I drilled some holes in it and got some expandable foam and filled it up, rattle fixed...

I didn't realized that the interior sidewall that the lattice strips were attached to was an inner cockpit liner. That was also making a rattling noise. So I drilled some holes in it and got some expandable foam and filled it up, rattle fixed...

 05-06-2025 | 12:03 AM
#229
Thread Starter
Registered
Joined: Jan 2003
Posts: 6,023
Likes: 1,522
From: Grand Rapids, MI
I spray down 3M Super 77 or Loctite spray adhesive around perimeter, seams and corners. I have had no issues on my Active Thunder doing this.


