

We hurt the 496....
 01-21-2025 | 09:51 AM
#431
Registered

Joined: Apr 2005
Posts: 965
Likes: 123
Why are you trying to re-invent the wheel on a 496? Just finish the thing and go boating. I can't imagine driving my self crazy like you seem to be on a simple engine build that isn't exotic or high power.
With all due respect.
With all due respect.
 01-21-2025 | 01:39 PM
#432
Thread Starter
VIP Member

Joined: Jun 2021
Posts: 3,476
Likes: 2,100
From: SW Ohio
The simple answer….? We’re not.
Very early on in this thread, Ryan asked if I was going to address the potential causes for the piston failure. With damned few exceptions, everything I’ve done has been to do just that.
The thing that most people who have not gone down this road don’t realize is that there’s a lot to be desired about both the Merc 496 and the ProCharger kit that came on the engine when I bought it.
The engine itself is fine, but was initially designed as a truck engine that would spend 90% of its life at 1700RPM, would rarely see 3500, and almost never see 5K. A boat engine spends 90% of its life at 3500, is ran extensively at 5K and literally NEVER sees 1700 other than sweeping past it getting on or falling off plane. Pretty much NOTHING that is going to take issue with these differences in design directive was addressed when Merc marinized the long block for marine use. Those differences have now been addressed.
The ProCharger, while the unit itself is fine and does its job perfectly well enough, the kit they sell with it leaves a LOT to be desired. These issues have all been addressed.
Damned little else has been done. Yes, we swapped to roller rockers. Who is going to argue this decision? The decision for 1.8 ratio was superficial, admittedly. So was the decision to drop 1/4” on the blower pulley diameter. Otherwise, I suppose we could have just ordered all OEM parts, slapped it all back together and started counting backwards from a number, waiting for a piston to let go again. Would that have been a better route to have gone?

Additionally, this is a ProCharger, NOT a “supercharger” like most of us refer to. While a Whipple or a Roots pulls air through the throttle body, the ProCharger pushes it through. There are pros and cons to both, but these differences make approaching the various issues different. Changes had to be made for proper setup.
We aren’t reinventing the wheel. We’re making a square wheel round.
Thanks. Brad.
Last edited by Brad Christy; 01-21-2025 at 05:02 PM.
01-27-2025 | 09:11 AM
#433
Thread Starter
VIP Member
Joined: Jun 2021
Posts: 3,476
Likes: 2,100
From: SW Ohio
Guys,
So, looking toward the finalization of the exhaust from elbows to tips while recalling some specifics discovered on "demo day"....
For context, and believe it or not, this is all connected in my train of thought....
When I pulled the remnants of the exhaust, I found that the exhaust had gotten hot enough to actually melt and extrude some of the nylon (I'm assuming) reinforcement from its encasement in the rubber exhaust tubing on both ends of sections between the SilentChoice diverters and the exhaust tips. I also discovered a 1/4" ID check valve at the top of the pickup on the fuel tank that seemed VERY restrictive by the old hillbilly flow-thru test. Additionally, the builder found the oil to be black as black gets, and suggested it was from fuel contamination from running too rich. With the nature of the failure in mind, it's hard to reconcile all these details. Short of any conclusive evidence of some culpable failure that led to the perforated piston, the only realistic conclusion I can come up with is that we were, indeed, running fairly rich at idle and cruise (as is typical for the Merc 496 tune), but lean at WOT, caused by the restrictive check valve and a fuel pump that fell short of the prescribed 65-75lbs of pressure the ProCharger kit (I don't believe I ever saw anything over ~53lbs). This doesn't really explain why just ONE cylinder went lean enough to cause what we found, but I guess one of them had to go first. We have since rebuilt the entire fuel delivery system from tank to intake manifold, including 80lb/hr injectors. Assuming we've eliminated any and all potential systemic fuel delivery shortcomings...
Is it normal for the exhaust hose to get that hot; enough to, at least over time, melt the nylon reinforcement in the exhaust hose? Or will ensuring we are always delivering sufficient fuel as to not run lean correct this?
As I work out the details of the exhaust routing from the elbows to the tips, I'm inclined to use as little exhaust hose as possible, based on what I found, but this complicates the fabrication of what will replace the SilentChoice diverters after the choice was made to not reinstall them upon reassembly. If we remember, we've made elbow risers that elevate the elbows ~2-1/2" and tilt them 8�, and I intend to extend the elbows an appropriate length to bring the terminus back to original height and fill in the gap left by the removal of the diverters. As I see it, I have three choices:
1) Just use exhaust hose to fill the entire gap between the elbow extensions and the tips, allowing them to account for the difference in height and angle. A smooth sweep would obviously be the goal.
2) Fully fab the extension, including an 8� incorporated elbow at the appropriate point to precisely line up with the exhaust tip, using a short section of exhaust hose to couple them together.
3) Terminate the elbow extension wherever works out the best, fab up a separate elbow to recover the 8� tilt of the elbows, using two short sections of exhaust hose on either side to couple it all together.
#1 is the simplest, but will result in what I see as excessive exhaust hose in the final install.
#2 is the most complicated, but is the least amount of exhaust hose.
#3 is a middle ground between the two.
I won't really know if any of these are viable or not until we get the engine back in the boat, but I would like to have my options fleshed out before we get there.
Thoughts?
Thanks. Brad.
Last edited by Brad Christy; 01-27-2025 at 09:17 AM.
01-27-2025 | 12:09 PM
#434
Registered

Joined: Aug 2010
Posts: 2,227
Likes: 547
From: Cape Coral FL
Draw us a picture of the side view and you will probably get more response. I can tell you this for sure, if you are putting rubber hose where the exhaust exits the elbow or riser or whatever you are using, it must be in a straight line for several inches. If you try to tilt the hose up or down very much at all the hot exhaust will burn a hole right through it. I have typically extended my tails to within an inch of the thru-hull tips and used a 4" rubber or silicone coupler to join them together.
Last edited by snapmorgan; 01-27-2025 at 12:12 PM.
01-27-2025 | 12:28 PM
#435
Registered
Joined: Jun 2007
Posts: 7,309
Likes: 1,815
From: Merritt Island, FL
I know you don't want to do this, but it's what we did when I redid the exhaust. Fit it up, put screws through and marked them. Then sent to CMI and had them make up some dry to tip tails. Fit perfect.

Result:

Result:
01-27-2025 | 02:37 PM
#436
Thread Starter
VIP Member
Joined: Jun 2021
Posts: 3,476
Likes: 2,100
From: SW Ohio
Draw us a picture of the side view and you will probably get more response. I can tell you this for sure, if you are putting rubber hose where the exhaust exits the elbow or riser or whatever you are using, it must be in a straight line for several inches. If you try to tilt the hose up or down very much at all the hot exhaust will burn a hole right through it. I have typically extended my tails to within an inch of the thru-hull tips and used a 4" rubber or silicone coupler to join them together.
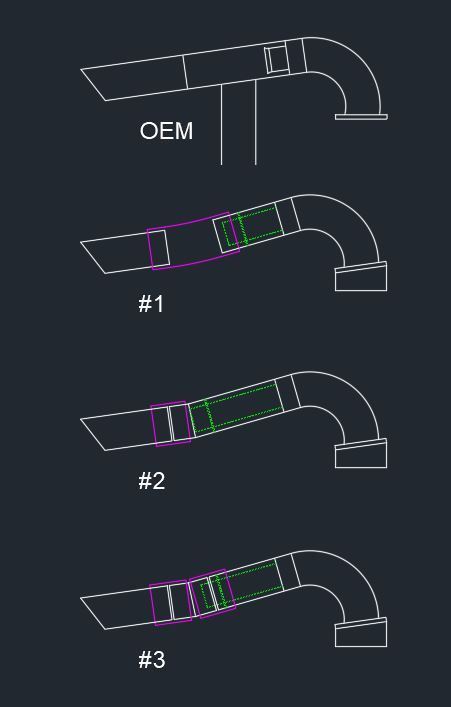
These are obviously for reference only. Reality will dictate final dimensions. The plan is to cut the trumpet off the OEM inner tube of the elbow and weld the inner tube extension to it. It will be telescope fit over the OEM tube, full seam welded at the base of the dam plate and tack welded through holes in the extension tube to the OEM inner tube. Then the new dam plate and outer tube will be welded to the outer body of the OEM elbow and the new dam plate, extending the water jacket and exhaust passage. A, 8� elbow with then be welded to the end.
Looking at it, I'm not at all a fan of option #1, for a couple reasons, including what you mentioned. It was a concern when I asked, for the reason you mentioned, and based on what I saw with the melting nylon reinforcement oozing out of the original exhaust tubing. I suppose I could use a straight filler tube and two sections of exhaust hose per side.
#2 is, in my opinion, the best option for functionality, but obviously the most complicated to get right. It would most likely require tack welding in the boat to ensure alignment of the 8� elbow at the downstream end of the extension and the exhaust tips.
#3 will be much more forgiving, as it will allow for adjustment at assembly.
FIW... I also just realized I hadn't represented the exhaust hose for the OEM configuration that included the SilentChoice diverters like I did the others. There obviously was, though....
Thanks. Brad.
Last edited by Brad Christy; 01-27-2025 at 02:45 PM.
01-27-2025 | 02:43 PM
#437
Thread Starter
VIP Member
Joined: Jun 2021
Posts: 3,476
Likes: 2,100
From: SW Ohio
I don't hate the idea, but I certainly don't want to go to the expense. I could be talked into incorporating the flex coupler at the joint between the elbow and the extension, however, If I could find either a weld-on flange or work out the dimensions and make them, but how is the inner tube connected? I will admit I am a little bit concerned about the welded-on extension.
I'm also never going to get dry exhaust past the CFO. She's already kinda peeved we ditched the SilentChoice. She's not as keen on the cackle and rumble like we refined folk are.

That looks sweet, BTW...
Thanks. Brad.
Last edited by Brad Christy; 01-27-2025 at 02:47 PM.
01-27-2025 | 03:22 PM
#438
Registered
Joined: Jun 2007
Posts: 7,309
Likes: 1,815
From: Merritt Island, FL
Wildman,
I don't hate the idea, but I certainly don't want to go to the expense. I could be talked into incorporating the flex coupler at the joint between the elbow and the extension, however, If I could find either a weld-on flange or work out the dimensions and make them, but how is the inner tube connected? I will admit I am a little bit concerned about the welded-on extension.
I'm also never going to get dry exhaust past the CFO. She's already kinda peeved we ditched the SilentChoice. She's not as keen on the cackle and rumble like we refined folk are.
That looks sweet, BTW...
Thanks. Brad.
I like 2, only one rubber coupling.
Last edited by Wildman_grafix; 01-27-2025 at 03:28 PM.
01-27-2025 | 03:43 PM
#439
Thread Starter
VIP Member
Joined: Jun 2021
Posts: 3,476
Likes: 2,100
From: SW Ohio
The OEM SilentChoice setup had two coupling joints per side. That doesn’t worry me so much as the exposed length of the exhaust hose at the joints. I’ve been thinking I’d be trying to keep any gaps to 1/4” or so, but Snap mentioned he’s had 1”, so it’s good to know I’ve got some leeway there.
#2 was the initial concept from the start, but the complications of it has led me to ponder and consider other options. I’m still leaning that direction, but haven’t ruled anything out.
The whole idea behind the 8� tilt of the riser was to bring the C/Ls back together somewhere near the inside end of the tips without an S-bend. Given I’m having the welding done on-site, I really think I would have as much time in a PVC mock up as I would just welding it as I fab it. I’m very sure if I were going the S-bend route, my tune would be much different.
Back to the discovery that led me to this particular line of questions…. Is it normal for the exhaust to get hot enough to melt the nylon reinforcement inside the exhaust hose? Even with fully wetted exhaust?
Thanks. Brad.


