

We hurt the 496....
 12-30-2024 | 07:24 PM
#381
Registered
Joined: May 2023
Posts: 18
Likes: 7
From: Dousman Wi
Looks great, I did similar to mine but kept factory location of oil filter just converted all oil cooler lines to AN. Do you know the size of the oil cooler or where you will be mounting it yet? I will
Be adding an oil temp gauge this winter when I update the radio to see if my upgrade helped or not
Be adding an oil temp gauge this winter when I update the radio to see if my upgrade helped or not
 12-30-2024 | 07:58 PM
#382
Thread Starter
VIP Member

Joined: Jun 2021
Posts: 3,533
Likes: 2,142
From: SW Ohio
Looks great, I did similar to mine but kept factory location of oil filter just converted all oil cooler lines to AN. Do you know the size of the oil cooler or where you will be mounting it yet? I will
Be adding an oil temp gauge this winter when I update the radio to see if my upgrade helped or not
Be adding an oil temp gauge this winter when I update the radio to see if my upgrade helped or not
I have an aftermarket 600SCI oil cooler from MrCool. It should mount where the power steering cooler was, and we are repurposing the OEM oil cooler, which will stay where it is, for power steering.
Don't know if you have it planned out yet, but you can drill and tap your remote filter head for the temp sender. Works great.
Thanks. Brad.

 12-31-2024 | 06:27 AM
#385
Thread Starter
VIP Member
Joined: Jun 2021
Posts: 3,533
Likes: 2,142
From: SW Ohio
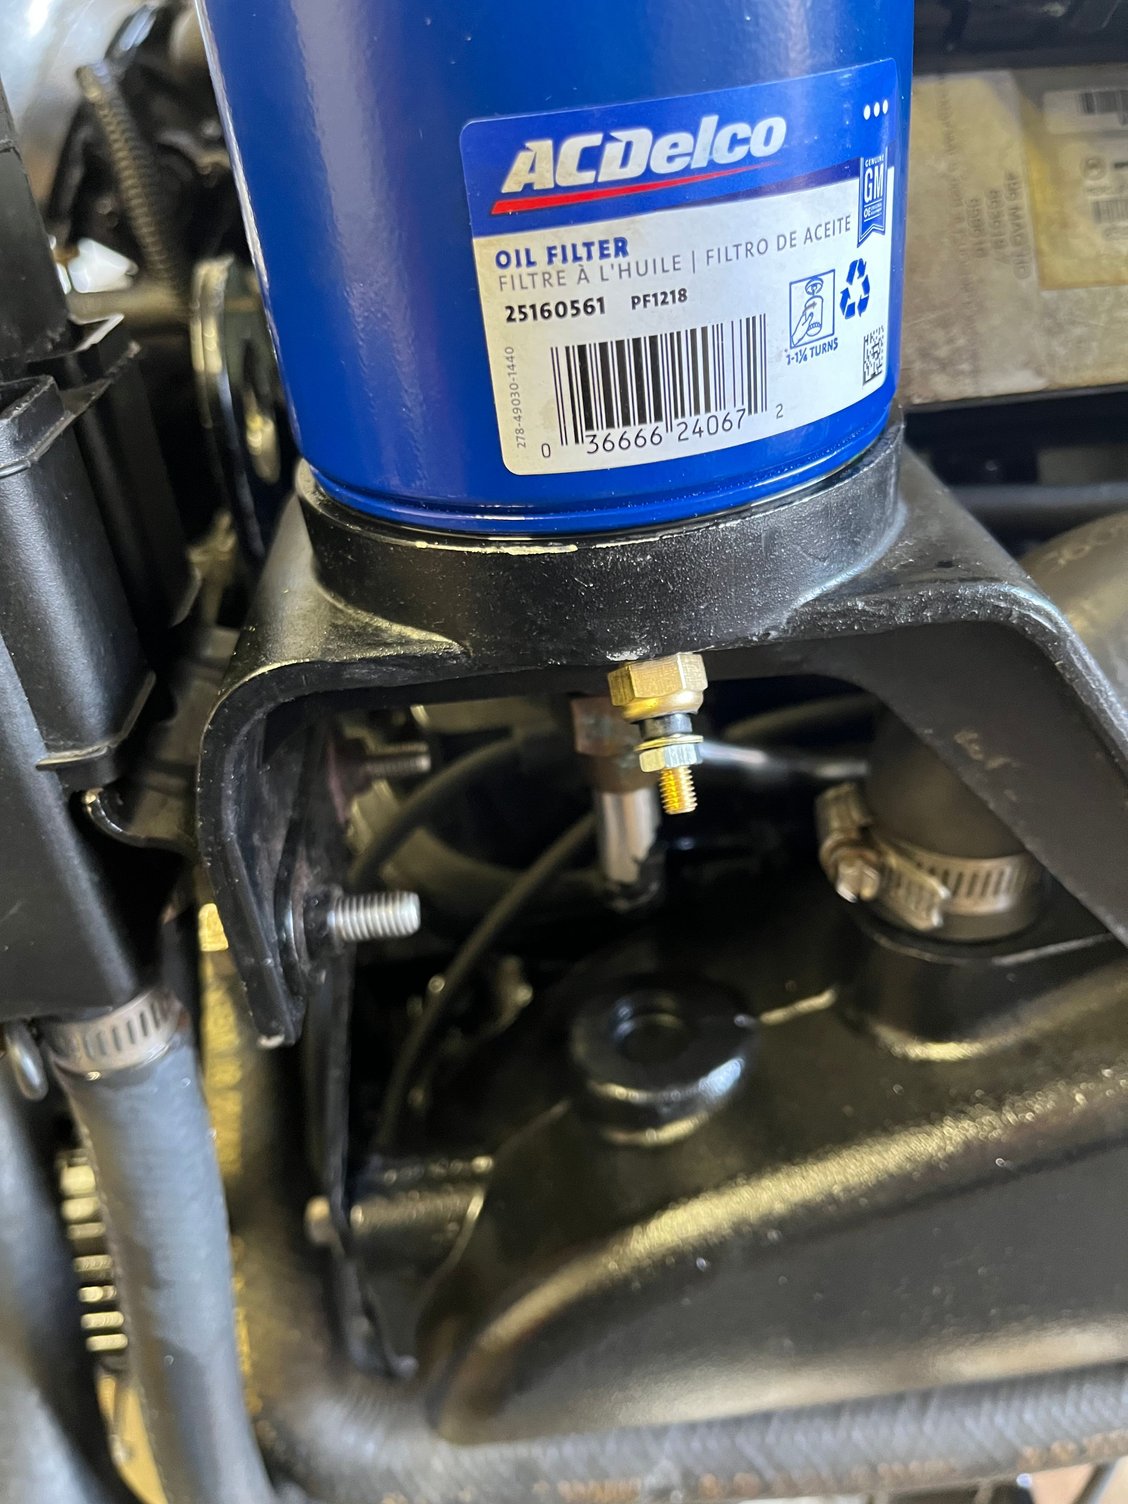
Cheech,
The remote filter head is a one-off, billet machined unit I designed and made here in my shop. The OEM filter socket cap had a brass fitting that served the purpose of securing the cap and plugging the inlet. Obviously, the block has another inlet somewhere for oil to return to the tract. We decided to make a new fitting to bring the oil back through the socket and plug that external inlet. The builder is also eliminating the pressure bypass, so ALL the oil gets filtered all the time, not just what happens to not go through the bypass.
I also remade the center fitting that came with the fuel filter head. It was such a nice filter head, but it came with a really poorly machined center fitting. So, I measured it up, reverse engineered it and made a new one. This sort of thing comes easy to me, being that it's what I do for a living. I've been doing this exact thing, just not for boat parts, for thirty years.
Thanks. Brad.
12-31-2024 | 11:00 AM
#386
Thread Starter
VIP Member
Joined: Jun 2021
Posts: 3,533
Likes: 2,142
From: SW Ohio
Looks great, I did similar to mine but kept factory location of oil filter just converted all oil cooler lines to AN. Do you know the size of the oil cooler or where you will be mounting it yet? I will
Be adding an oil temp gauge this winter when I update the radio to see if my upgrade helped or not
Be adding an oil temp gauge this winter when I update the radio to see if my upgrade helped or not

This is a 1/8”NPT. The sender you use will dictate the thread you put in.
It’s not hard to do, especially if you have the right machinery. But, just to be clear, the tap had to be run from the bottom into the cavity below the filter. And don’t use teflon tape or thread sealant. It needs to conduct.
Thanks. Brad.
Last edited by Brad Christy; 12-31-2024 at 11:55 AM.
 01-01-2025 | 12:38 PM
#388
Registered
Joined: May 2023
Posts: 18
Likes: 7
From: Dousman Wi
Copy that, I did the same to oem remote housing as you did when I had the motor out. Just need to run the wire and mount the gauge. I ran out of time as It was July and I wanted to get on the water as boating season in Wisconsin is short. Planning out where to place a gauge and cut a hole in the dash isn�t always fun. Do you know what your oil temp was running before the upgraded cooler? I have one of the 2� by 16� coolers in place of the p/s cooler as well, home made brackets out of aluminum mounted to bell housing
01-01-2025 | 01:49 PM
#389
Thread Starter
VIP Member
Joined: Jun 2021
Posts: 3,533
Likes: 2,142
From: SW Ohio
Copy that, I did the same to oem remote housing as you did when I had the motor out. Just need to run the wire and mount the gauge. I ran out of time as It was July and I wanted to get on the water as boating season in Wisconsin is short. Planning out where to place a gauge and cut a hole in the dash isn�t always fun. Do you know what your oil temp was running before the upgraded cooler? I have one of the 2� by 16� coolers in place of the p/s cooler as well, home made brackets out of aluminum mounted to bell housing
I made a new dash panel to shoehorn my oil temp gauge in. After getting the old dash panel out, I took it to a local vinyl shop and had them scan it and send me a DXF. Once I had that, I could manipulate the openings in AutoCad until it all fit the way I wanted. I had to lower all the switches and breakers to make room. Then I had an aluminum panel laser cut to the new DXF. When it was all said and done, I had the vinyl shop print the entire face white with a PQ logo to take up the open are in the center.

The old dash layout

The old dash panel
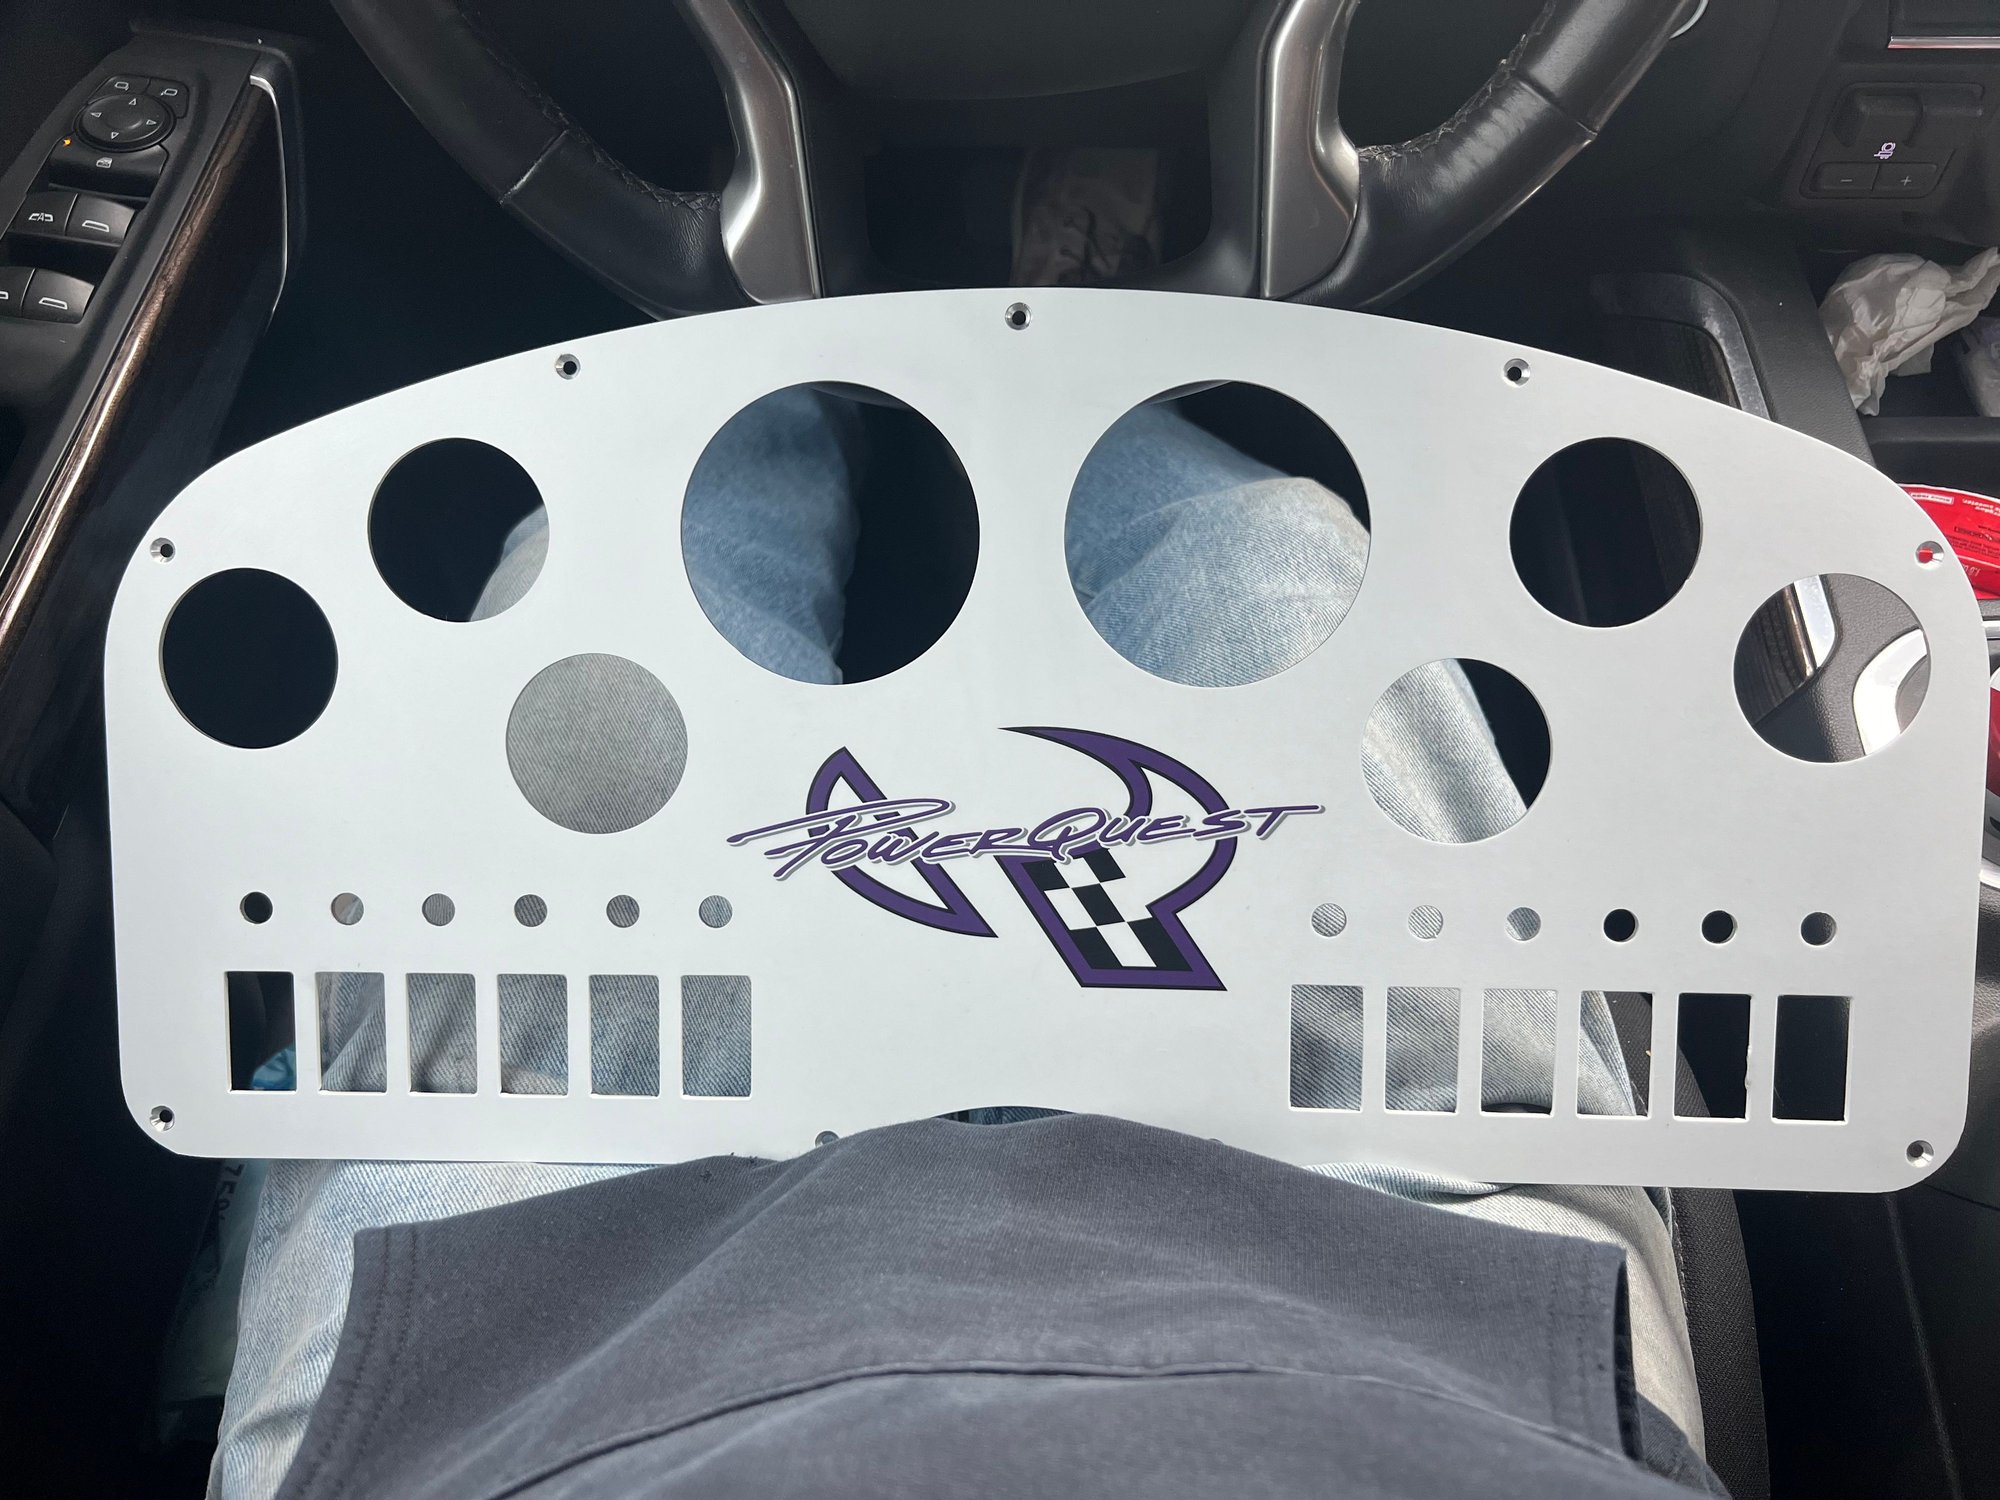
The new dash panel

The new dash layout
There�s a whole thread about it.
Thanks. Brad.
01-02-2025 | 05:13 PM
#390
Thread Starter
VIP Member
Joined: Jun 2021
Posts: 3,533
Likes: 2,142
From: SW Ohio
Guys,
I hate electrical.....
For context.....
A lot of this is covered above in this thread, but.... I reworked some of the engine well wiring so that literally everything feeds from the center post (output) of the battery selector switch (except the ECM, which will be connected directly to the port battery when we get to that point, which we're obviously not). In addition to the starter wire, I have a #4 12v wire feeding from the battery switch to a fuse block that, in turn, feeds the fuel pump, drive trim pump and a breaker panel that, in turn, feeds the main helm, float switch bilge pump feed and stereo amp (breaker panel is PQ OEM, and is pictured above somewhere, I think), all with appropriate fuses or breakers for each. Yes, the bilge pump still has dual power, one from the switch at the helm for manual function and one through a float switch for auto function. All good. This really isn't as complicated as it might sound.
So....
I dug into running the wire from the blower switch at the dash to where the second bilge blower will go when it arrives tomorrow. Since I don't have any batteries in the boat at the moment, I was using continuity to confirm which pin on the switch was the output feed to the blower and I started finding continuity where I didn't think I should be finding it. Like between the main body (ground) and center post (12v) for the 12v outlet (cigarette lighter) that is in the same panel as the ignition and blower switches. I'll skip a whole bunch of steps we went through that I don't think yields any discovery (long story short), but I've since discovered I am also finding continuity between the main starter wire from the battery selector switch and what appears to be a helm main ground, that would have been bolted to the engine block, but only when the fuse feeding the main helm power is in place. When that fuse is pulled, the unexpected continuity is only found in the helm wiring. I get continuity from literally any 12v terminal to any ground terminal, on any gauge (or otherwise), but there is resistance. I get ~180-400 (It varies, depending on factors I haven't divined yet) on the display with the multimeter set to 2000K (whatever that means; this is all Egyptian to me). The resistance also shows up in the engine well wiring involving the battery selector switch output wire and the main helm ground when the main helm fuse in the fuse block is in place.
As far as I know, I have changed NOTHING, ground-wise, except to disconnect a bunch of them from the block when we pulled the engine in October, most of which are still not connected to anything (plan is to connect them all, whatever they may be, to the ground strap I installed, but I haven't gotten to this yet). Additionally, prior to this, aside from chasing continuity from a wire suspected to be from the fuel pressure sender to the gauge at the helm (confirmed), I have not even been under the dash at all since finishing up the oil temp gauge project involving the new dash panel earlier this spring. Everything was working perfectly the last time I shut the engine off, catastrophic piston failure aside.
At this point, I'm scared to connect the batteries. Other than to connect a battery to verify the bilge pump was working, I wasn't even going to install the batteries until the engine was back in, but I'd certainly like to have this resolved before we do that.
What I am hoping for is that it is one or more of the gauges that are showing basic continuity, but that I don't have a dead short somewhere (hence, the resistance). How far underwater am I in these hopes?
Thanks. Brad.
Last edited by Brad Christy; 01-02-2025 at 05:16 PM.

